Conker: Live & Reloaded – ‘Conquering Conker’ Live Walkthrough
Navigation:
Conquering Conker: Live & Reloaded
Conquering Conker Part 1: Beach Dead
Conquering Conker Part 2: Fortress Deux
Conquering Conker Part 3: Castle Tedistein
Conquering Conker Part 4: A Bridge Too Narrow
Conquering Conker Part 5: Three Towers
Conquering Conker Part 6: Doon
Conquering Conker Part 7: T.M.S Spamono
Conquering Conker Part 8: The Ditch
A BRIDGE TOO NARROW
A Bridge Too Narrow is another capture the flag variant. You’ll need to cross a long bridge to an enemy room where a “code” symbol is located. Steal the code, and run back to a transmitter at your own base to upload the code. You must equip the transmitter in order to deploy it: press and hold the Y button, select the transmitter with the left thumbstick, and then pull the right trigger to deploy it.
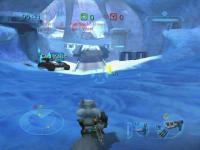
![]() A lone bridge connects your bases.
A lone bridge connects your bases.
The bridge is easier to cross on a vehicle than on foot, so you may want to mount up in the Mobile Unit spawn point inside your base. In fact, vehicles play a major role in controlling and winning this scenario.
Vehicles will likely take a lot of punishment from enemy Demolishers and turrets trying to cross the battlefield. Use the Demolisher’s Arc Welders to repair damage to your turrets and vehicles, if time allows, but be careful: because fixing damage isn’t easy in the middle of a firefight. Sky Jockeys are also equipped with Arc Welders, but they should concentrate on gaining air superiority with Steeds and transporting soldiers with Mules.
Always take optimal advantage of your weapon’s range. Soldiers (Grunts especially) with grenades and good short-range attacks should either defend their base or cross the bridge quickly in a vehicle. Don’t get caught out in the open with a short-range weapon.
The Long Ranger’s Widowmaker and the Thermophile’s Fauster (which becomes available after obtaining an upgrade sphere) work great in the wide open spaces between the two bases. The Fauster is brutally effective at long range because it’s difficult for soldiers to outrun it.
Sky Jockeys and Demolishers should have plenty of opportunities to destroy enemy vehicles. Because every vehicle needs to come out of one Mobile Unit base or the other, the doorways nearby make excellent camping for Long Rangers and Demolishers. If your enemies are relying on airborne Steeds (and they probably will), place Skyguards to bolster your anti-aircraft defenses.
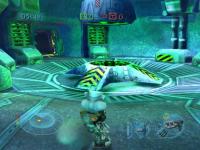

![]() Grab the enemy code…
Grab the enemy code…![]() …and take it to the transmitter!
…and take it to the transmitter!
Demolishers, Grunts and Long Rangers are all effective fighters against vehicles. Grunts and Long Rangers need to change their ammunition first. Grunts can switch to Dum Dum bullets; Long Rangers can use Depleted Uranium. To select Dum Dum bullets (for Grunts) or D.U. for Long Rangers, pull and hold the left trigger to open the ammunition menu, and then use the left thumbstick to select the appropriate ammo.
Sneekers can use their Hacking device to unlock shortcuts across the map (including a spawn point halfway between the two bases) and doors into the enemy base. Hack doors and shortcuts quickly so your team has more time to use them. Getting a Sneeker into the enemy base and hacking the enemy’s Mobile Unit station can be devestating, but it’s very difficult due to the large amount of enemy soldiers usually occupying or traversing the Mobile Unit area.