Perfect Dark GBC Walkthrough

Navigation:
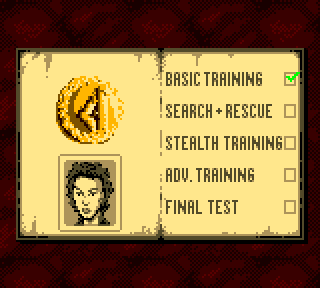
Chapter 1: Carrington Institute Training
-1-1: Basic Training
-1-2: Search & Rescue
-1-3: Stealth Training
-1-4: Advanced Training
-1-5: Final Test
Chapter 2: The Jungles of South America
Chapter 3: dataDyne Cybernetic Manufacturing
Chapter 4: dataDyne Operations Base/Crash Site
Chapter 5: Captive aboard the Pelagic I
Chapter 6: Carrington Institute HQ
Chapter 7: Perfect Dark GBC Secrets and Extras
CARRINGTON INSTITUTE: BASIC TRAINING
Recruited by Carrington Institute as an Agent-in-training, Joanna Dark is about to undergo a trial by fire in the Training Ground to prove herself as a full-fledged Agent. You’ll find yourself starting this mission in the waiting bay that leads into an urban simulation – before you carry on however, brief yourself on the HUD game screen and the inventory menu that can be accessed with the ‘start’ button – we’ve detailed the functions of both below:
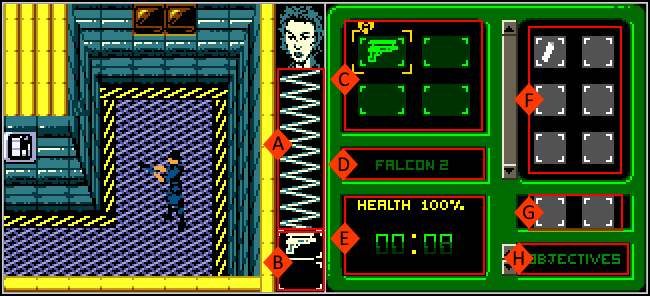
 This zig-zagging line represents your health, when Joanna takes damage it grows thinner until it flat-lines.
 Your current weapon and ammunition appear here – the second box will display held ammo to prompt reload.
 Displays all of Joanna’s available weapons. You can use this screen to swap held weapons during action.
 The inventory descriptor will detail any object that your cursor has selected in this menu.
 Displays Joanna’s current health and total time invested into Perfect Dark GBC.
 Any ammunition that Joanna has found during her assignments will appear here.
 Displays any mission-specific items found, such as Keycards, Explosives and Laptop Computers.
 Displays current Objectives, option to restart current mission, enable rumble feature or quit the game.
You can move around the waiting bay by pressing the directional buttons – if you tap the desired direction twice you’ll be able to sprint rather than walk. Sprinting will allow you to move more swiftly, but it does remove your ability to be stealthy; if you encounter a guard that’s turned away from you, actions like sprinting or reloading your weapon will make too much noise and alert them of your presence. On the subject of reloading, you’ll notice that Joanna is carrying a Falcon 2 pistol – you’ll be able to fire off 9 rounds successively before you’ll be forced to reload with A. Since you’ve come into the training with a Falcon 2 clip (seen in your inventory) you’ll be able to fire 18 rounds before you’ve run out of ammo entirely. Unlike your other weapons however, if you run out of Falcon 2 ammunition you’ll still be able to fire a single bullet every few seconds – so it’s best to keep well stocked.
BASIC TRAINING: MAP OVERVIEW
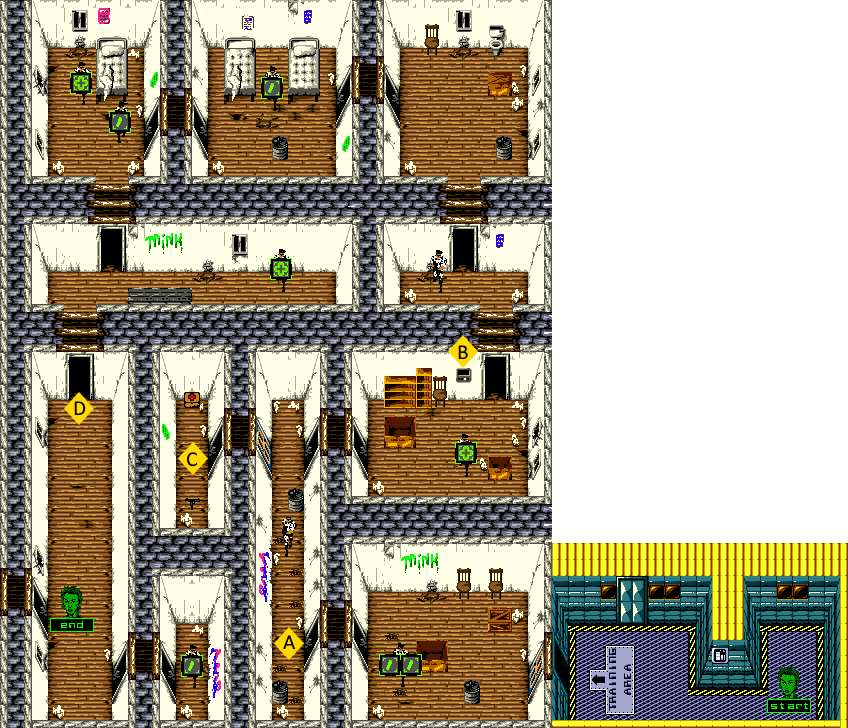
MISSION OBJECTIVES:
• COMPLETE TARGET RANGES
• REACH EXIT
When you’re ready to begin, leave the waiting bay area through the exit and you’ll find yourself inside the first room. There is a single guard pacing the area; hiding behind the box in the middle of the room will provide a bit of cover and time to plan your strategy. You can either subdue the guard by following very closely behind him when his back is turned and assassinating him with your Falcon 2, or you can cast aside any subtlety and engage in a firefight. The former option is preferred, but takes a bit of timing and patience – the second option may be quicker but you also stand to take more damage and use it forces you to use three rounds of ammunition rather than one.
When you’ve managed to down the guard, Carrington will interject and tell you to examine the body by walking over it and pressing the ‘select’ button – if you do so, your efforts will be rewarded with a pair of ammunition clips for your Falcon 2. Collect them both with A and you’ll return to the room proper. You can now venture into the hallway by heading west, and doing so will begin the first target shooting test.
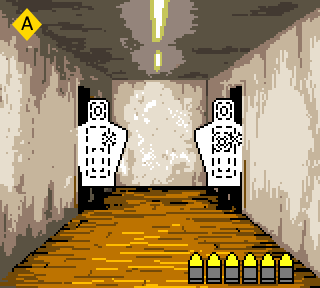
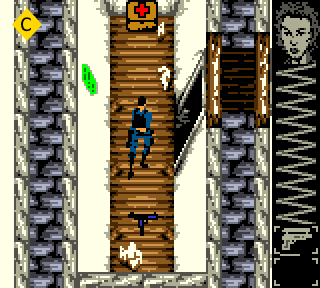
![]() Rather than an overhead view, your perspective will switch to first-person as you peer down an empty hallway with two open doors on either side. Controlling the crosshair that appears in the middle of the screen with your directional buttons, you’ll need to aim your weapon and fire at the target figures that appear in the doorways. While you have an infinite amount of ammo during these sections, you will still need to reload after you’ve spent all 6 shots with B; you might even prefer to reload between every shot so you avoid an empty barrel. Once you’ve hit at least 10 of the 15 targets you’ll be permitted to continue.
Rather than an overhead view, your perspective will switch to first-person as you peer down an empty hallway with two open doors on either side. Controlling the crosshair that appears in the middle of the screen with your directional buttons, you’ll need to aim your weapon and fire at the target figures that appear in the doorways. While you have an infinite amount of ammo during these sections, you will still need to reload after you’ve spent all 6 shots with B; you might even prefer to reload between every shot so you avoid an empty barrel. Once you’ve hit at least 10 of the 15 targets you’ll be permitted to continue.
The second guard patrols this hallway, and there’s very little warning when you’ll run into him. When you do however, rush back to the south and stand in the doorway between the first room and the hall; once you do you’ll see that the guard will give chase until you’ve passed the threshold, and will return to his patrol shortly thereafter. This is a strategy that you can use in any room that features a doorway, and will prove indispensable in the later missions.
After you’ve managed to get the jump on the guard, take him out and then carry on – if you press ‘select’ he has nothing to offer. When you reach the end of the hallway, you’ll spot two doorways adjacent to each other; the one on the right will allow passage, but the one on the left is currently locked. Remember where this locked door is, because we’ll be returning to it very shortly. Enter through the door on the right and you’ll encounter the third guard – remember to take cover in the doorway if needed, and then take him out.
Pressing ‘select’ over this guard will offer a Med Kit which heals 25% of your current health instantly. Once you’ve returned to the room you’ll notice another locked door ahead, with an odd looking panel beside it.
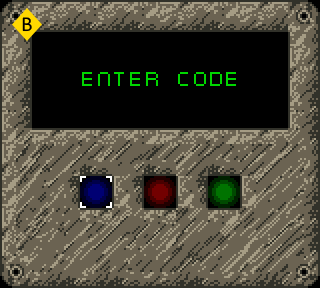
![]() When you approach the panel you’ll switch perspective and see it up close – in the center of the console are three colored buttons that light up in a sequence. You will need to repeat the pattern back once its been shown using the directional buttons to choose the right button, and then A to confirm. This first ‘Door Control’ puzzle only features a three button combination, so it shouldn’t pose you much trouble, but things will get much more difficult later on. If you enter the incorrect sequence twice, you’ll be provided with a new code to try and repeat. Once you manage to enter the correct sequence, you’ll unlock the door to the next area.
When you approach the panel you’ll switch perspective and see it up close – in the center of the console are three colored buttons that light up in a sequence. You will need to repeat the pattern back once its been shown using the directional buttons to choose the right button, and then A to confirm. This first ‘Door Control’ puzzle only features a three button combination, so it shouldn’t pose you much trouble, but things will get much more difficult later on. If you enter the incorrect sequence twice, you’ll be provided with a new code to try and repeat. Once you manage to enter the correct sequence, you’ll unlock the door to the next area.
![]() Before you continue off to the north however, we’ll want to return to the hallway where we saw the first locked door. Now that you’ve mastered the Door Control puzzle, you’ll find that the door is unlocked. Venturing inside will reward you with your second Med-Kit (25% Health Restore) and the 6-YYY submachine gun. The 6-YYY is just as effective as your Falcon 2, but fires its shots more quickly. You can switch over to it using the ‘start’ button if you prefer to use it against the guards ahead, but be wary that you won’t find any replacement ammo for it in basic training; the 32 rounds that it comes with is all you’ll get here.
Before you continue off to the north however, we’ll want to return to the hallway where we saw the first locked door. Now that you’ve mastered the Door Control puzzle, you’ll find that the door is unlocked. Venturing inside will reward you with your second Med-Kit (25% Health Restore) and the 6-YYY submachine gun. The 6-YYY is just as effective as your Falcon 2, but fires its shots more quickly. You can switch over to it using the ‘start’ button if you prefer to use it against the guards ahead, but be wary that you won’t find any replacement ammo for it in basic training; the 32 rounds that it comes with is all you’ll get here.
Once you’ve cleared out the locked room, return to the Door Control puzzle and walk through the doorway you unlocked to the north. You’ll find the forth guard patrolling this cramped area – use either the Falcon 2 or 6-YYY to take him out and then carry on through to the next doorway. The fifth guard can be found in the room ahead, but there’s a doorway to your left when you enter the room. If you time it correctly, you can sprint by double tapping a directional button and duck into the safety of the doorway to the left. The guard will give chase initially, but he’ll resume patrolling once you’re out of his line of sight. As he heads back, get the jump on him and take him out quickly; your efforts will be rewarded with a Med-Kit (25% Health Restore) when you inspect with ‘select’.
Carry on through to the next room and you’ll encounter the fifth guard; if you’re running low on ammunition for your Falcon 2, this guard will provide a new clip once he’s been downed. Once you’ve finished reloading, continue to the left and you’ll discover a new challenge; this room features two guards that pace the area. A stealthy approach is going to be too difficult to pull off effectively here, so it might be preferable to swap over to the 6-YYY and open fire when they’re both together. If you’d prefer to use the Falcon 2, supplement its low rate of fire by retreating into the shelter of the doorway so they don’t overwhelm you. Examine their bodies once you’ve put down some suppression fire and you’ll find a Med-Kit (25% Health Restore) and another Falcon 2 ammunition clip.
Head south through the next doorway and you’ll encounter the eighth guard pacing to the far right – dash any stealth and prepare to open fire; the guard is carrying another Med-Kit (25% Health Restore) which will make up for any lack of subterfuge.
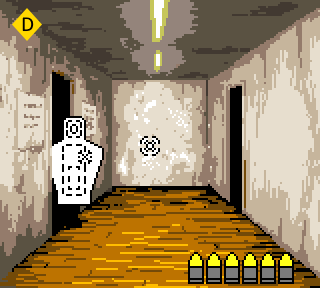
![]() Once you’re finished in this area, head into the next hallway and you’ll enter the next Target Range. Rather than having two doors adjacent to each other, the door on the right is further back, which means that it presents a smaller target in its frame. To compensate, you’ll need to find a vantage point that will hit the target on the left and the target on the right with as little room for vertical error as possible. Despite the grading of the target, you won’t be recognized for head shots; so just make sure to hit at least 10 of the 15 targets anywhere you can on their bodies. If you can manage to fulfill this condition you’ll be able to pass.
Once you’re finished in this area, head into the next hallway and you’ll enter the next Target Range. Rather than having two doors adjacent to each other, the door on the right is further back, which means that it presents a smaller target in its frame. To compensate, you’ll need to find a vantage point that will hit the target on the left and the target on the right with as little room for vertical error as possible. Despite the grading of the target, you won’t be recognized for head shots; so just make sure to hit at least 10 of the 15 targets anywhere you can on their bodies. If you can manage to fulfill this condition you’ll be able to pass.
![]() After you’ve finished with your latest target range, you’ll have completed your first objective and be permitted to carry on down further to the south. From here, you can either choose to head to the left to exit Basic Training to complete the second objective, or you can carry on down the hall and through the doorway to the right to find the final room with the ninth guard. Choosing the latter will reward your persistence with a Falcon 2 clip upon a selection inspection, though it’s entirely optional to grab. In either case, you’ll find that passing through the door found on the left will earn your Basic Training commendation.
After you’ve finished with your latest target range, you’ll have completed your first objective and be permitted to carry on down further to the south. From here, you can either choose to head to the left to exit Basic Training to complete the second objective, or you can carry on down the hall and through the doorway to the right to find the final room with the ninth guard. Choosing the latter will reward your persistence with a Falcon 2 clip upon a selection inspection, though it’s entirely optional to grab. In either case, you’ll find that passing through the door found on the left will earn your Basic Training commendation.