Chapter 5-4: Octopus Prime Showdown


Navigation:
Chapter 1: Carrington Institute Training
Chapter 2: The Jungles of South America
Chapter 3: dataDyne Cybernetic Manufacturing
Chapter 4: dataDyne Operations Base/Crash Site
Chapter 5: Captive aboard the Pelagic I
5-1: Pelagic I Lower Deck
5-2: Pelagic I Mid Deck
5-3: Pelagic I Upper Deck
5-4: Octopus Prime Showdown
5-5: Pelagic I Main Deck
5-6: Pelagic I Escape
Chapter 6: Carrington Institute HQ
Chapter 7: Perfect Dark GBC Secrets and Extras
OCTOPUS PRIME SHOWDOWN
![]()
![]()
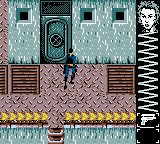
Breaching daylight as the wrought-iron door swings open, Joanna Dark clambers onto the Main Deck of the Pelagic I. Before she can formulate the next stage of her escape plan however, an imposing form lost in a sea of wires and conduits rises into the air in front of the agent – in its heart, a cybernetic hybrid meets her gaze…
Octopus Prime: Going somewhere?
Joanna Dark: Huh?!
Octopus Prime: You can’t escape that easily.
Joanna Dark: Get out of my way!
Octopus Prime: Octopus Prime does not follow orders, especially from one such as you.
Joanna Dark: Move!
Octopus Prime: Oh, no! No! I’m going to turn you into fish food.
MISSION OBJECTIVES:
• DESTROY PELAGIC I
• ESCAPE USING SHIPS HELICOPTER

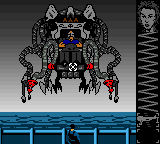
![]() The showdown with Octopus Prime functions identically to our previous showdown against the dataDyne Hind. You’ll use the Directional Pad to maneuver Joanna across the ships deck to avoid fire, holding B in combination to adjust the aiming reticle, and pressing A to fire the Machine Gun. At the start of the showdown, aim your Machine Gun at one of the ‘tentacles’ that Octopus Prime has extended and open fire. If left to charge up, they’ll release a powerful bolt of electricity that travels across the field. This attack is incredibly effective, so you’ll need to riddle one of the tentacles with bullets until they both drop from his frame.
The showdown with Octopus Prime functions identically to our previous showdown against the dataDyne Hind. You’ll use the Directional Pad to maneuver Joanna across the ships deck to avoid fire, holding B in combination to adjust the aiming reticle, and pressing A to fire the Machine Gun. At the start of the showdown, aim your Machine Gun at one of the ‘tentacles’ that Octopus Prime has extended and open fire. If left to charge up, they’ll release a powerful bolt of electricity that travels across the field. This attack is incredibly effective, so you’ll need to riddle one of the tentacles with bullets until they both drop from his frame.
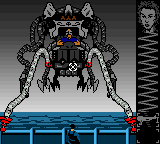
![]() Now that you’ve managed to avoid Octopus Prime’s electrical pulse, you’ll need to contend with the dual Machine Guns on either side. This phase of the battle is where you’ll likely accumulate the most damage, as there isn’t anywhere to hide and you’ll be vulnerable to injury as you attempt to escape his reach. Do what you can to weave in and out his line of fire while taking aim at one of his Machines Guns and returning the favor. You’ll need to keep hitting the same Machine Gun while preserving as much of your own health as you can, so it demands a fair bit of multi-tasking as you continue to move and adjust your reticle.
Now that you’ve managed to avoid Octopus Prime’s electrical pulse, you’ll need to contend with the dual Machine Guns on either side. This phase of the battle is where you’ll likely accumulate the most damage, as there isn’t anywhere to hide and you’ll be vulnerable to injury as you attempt to escape his reach. Do what you can to weave in and out his line of fire while taking aim at one of his Machines Guns and returning the favor. You’ll need to keep hitting the same Machine Gun while preserving as much of your own health as you can, so it demands a fair bit of multi-tasking as you continue to move and adjust your reticle.

![]() Once you’ve managed to take out one of the Machine Guns you’ll be provided with a bit of a reprieve, as you’ll be able to avoid fire from the remaining Machine Gun. If you’ve taken out the left Machine Gun, you can avoid taking fire by staying on the far-left side of the battlefield; if you’ve taken out the right Machine Gun, stay on the far-right side of the battlefield instead. Aim your reticle at the remaining Machine Gun and then open fire from your respective corner; you should be able to do so without needing to multi-task, as you’ll be impervious to any damage as long as you remain as far away as possible.
Once you’ve managed to take out one of the Machine Guns you’ll be provided with a bit of a reprieve, as you’ll be able to avoid fire from the remaining Machine Gun. If you’ve taken out the left Machine Gun, you can avoid taking fire by staying on the far-left side of the battlefield; if you’ve taken out the right Machine Gun, stay on the far-right side of the battlefield instead. Aim your reticle at the remaining Machine Gun and then open fire from your respective corner; you should be able to do so without needing to multi-task, as you’ll be impervious to any damage as long as you remain as far away as possible.
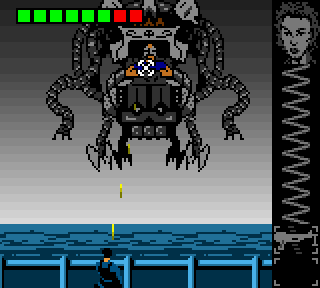
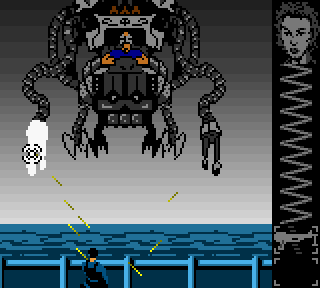
![]() After you’ve managed to destroy the remaining Machine Gun, Octopus Prime will be vulnerable to your attacks – move from your corner and then fire at the ‘pilot’. You may need to adjust your reticle during this phase, as Octopus Prime will drift about as he attempts to avoid your bullets. Any damage inflicted on Octopus Prime will be made visible from the green bar that descends from above. In a similar method to the Attack Cyborg before it, we’ll need to convert all of Prime’s green squares to red in order to survive the showdown. After a short period, Prime will regrow his limbs and the first phase will start again.
After you’ve managed to destroy the remaining Machine Gun, Octopus Prime will be vulnerable to your attacks – move from your corner and then fire at the ‘pilot’. You may need to adjust your reticle during this phase, as Octopus Prime will drift about as he attempts to avoid your bullets. Any damage inflicted on Octopus Prime will be made visible from the green bar that descends from above. In a similar method to the Attack Cyborg before it, we’ll need to convert all of Prime’s green squares to red in order to survive the showdown. After a short period, Prime will regrow his limbs and the first phase will start again.
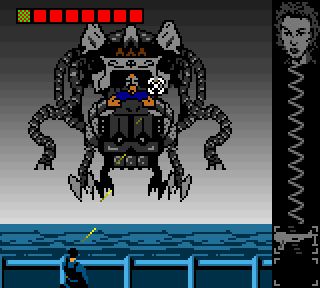
![]() If you haven’t moved from the corner before Octopus Prime has regrown his limbs, he’ll begin lashing at you with his charged tentacle directly, which removes a tenth of your health with each successive strike. Keep to the center during the charging phase, and only return to the corner when you’ve been able to remove one of his Machine Guns. Open fire at Octopus Prime directly when both guns have been decommissioned and try to remove at least two squares of health with each pass. Once you’re able to remove all of Prime’s health during this difficult showdown, he’ll take flight from the Pelagic I in defeat.
If you haven’t moved from the corner before Octopus Prime has regrown his limbs, he’ll begin lashing at you with his charged tentacle directly, which removes a tenth of your health with each successive strike. Keep to the center during the charging phase, and only return to the corner when you’ve been able to remove one of his Machine Guns. Open fire at Octopus Prime directly when both guns have been decommissioned and try to remove at least two squares of health with each pass. Once you’re able to remove all of Prime’s health during this difficult showdown, he’ll take flight from the Pelagic I in defeat.