Perfect Dark GBC – Multiplayer Map Overview

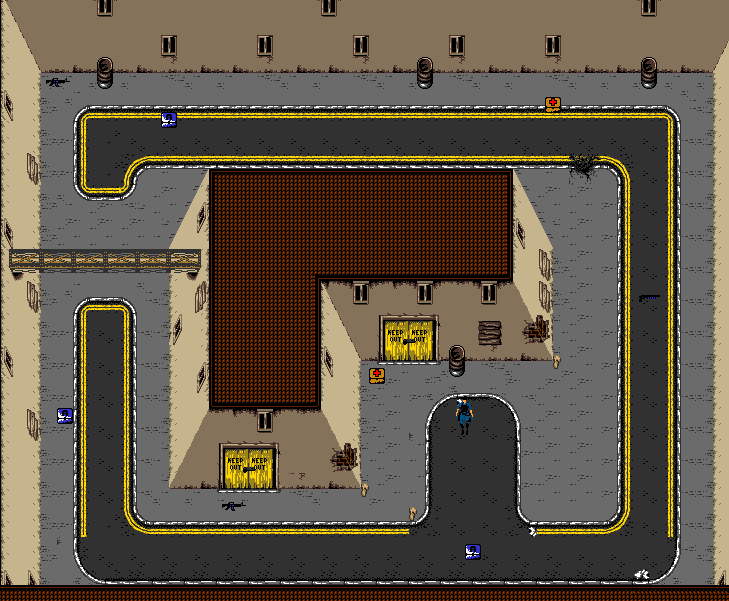
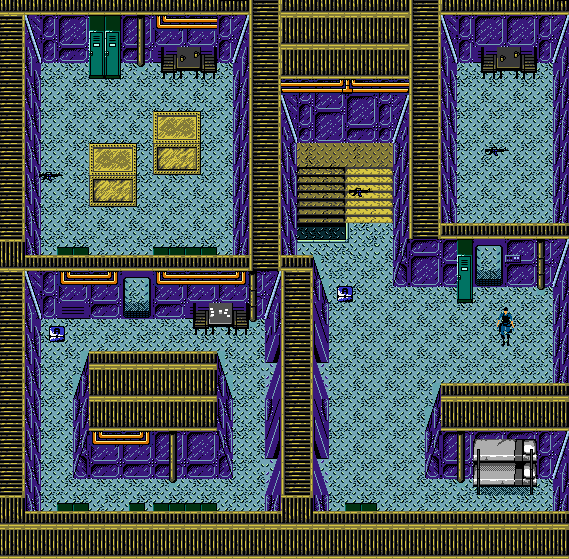
Available once you’ve completed Basic Training during the Perfect Dark GBC Campaign, “House Interior 1” features three distinct areas that can be utilized in shootouts. Use the surrounding perimeter to wrap around the base, nesting four rooms with an entrance and exit to an interior junction.
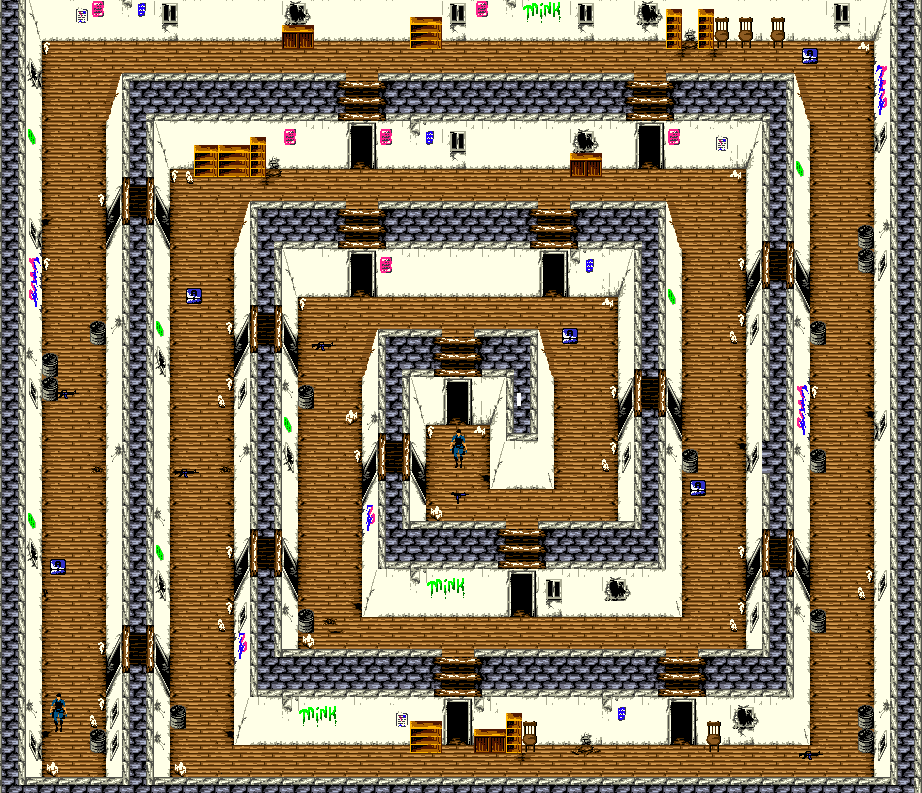
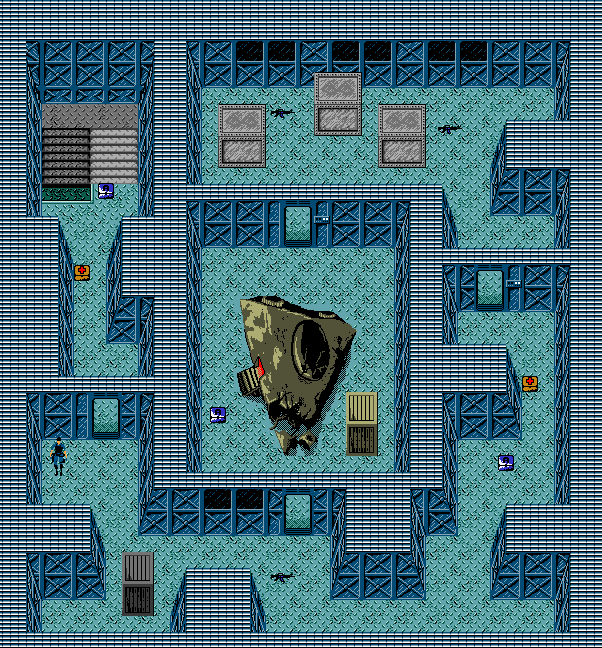
Available once you’ve completed Basic Training during the Perfect Dark GBC Campaign, “House Interior 2” features a spiral design that leads into twisted confrontations. Use the hallways to take shortcuts in and out of the spiral as you work your way into the base, or flee from its center.
Available once you’ve rescued the first Hostage during the Perfect Dark GBC Campaign, “House Interior 3” features a trio of cramped quarters that lead into inevitable confrontations in the shared center. Stay out of sight from the main area unless you’re armed and ready for a firefight.
Available once you’ve rescued the second Hostage during the Perfect Dark GBC Campaign, “Streets 1” features a closed variation of the Carrinton Institute exterior. Do what you can to avoid taking too many blind corners; if your opponent sits in wait, they might be able to spring a surprise on you.
Available once you’ve cleared Jungle Base III during the Perfect Dark GBC Campaign, “Streets 2” features a second closed variation of the Carrinton Institute exterior. If you’re in pursuit of an opponent, avoid following the roads; you’ll be quicker if you trace the walls of the central building.
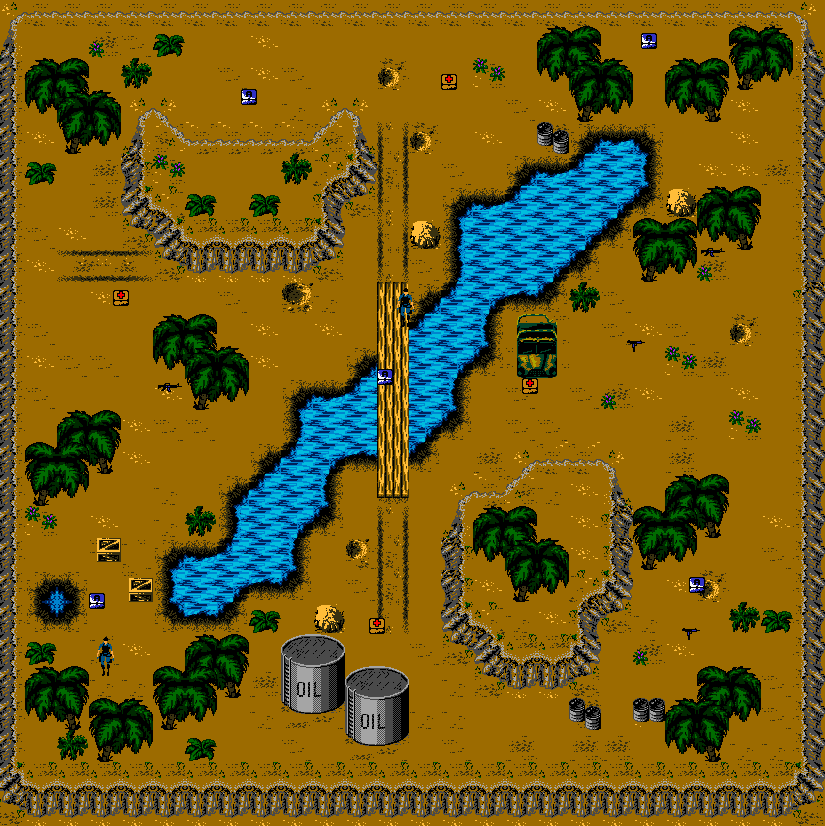
Available once you’ve rescued the third Hostage during the Perfect Dark GBC Campaign, “Jungle 1” features an expanse of rainforest separated by a river through its center. The only connection between both areas is a single wooden bridge over the water; prepare for a confrontation every time you attempt to cross.
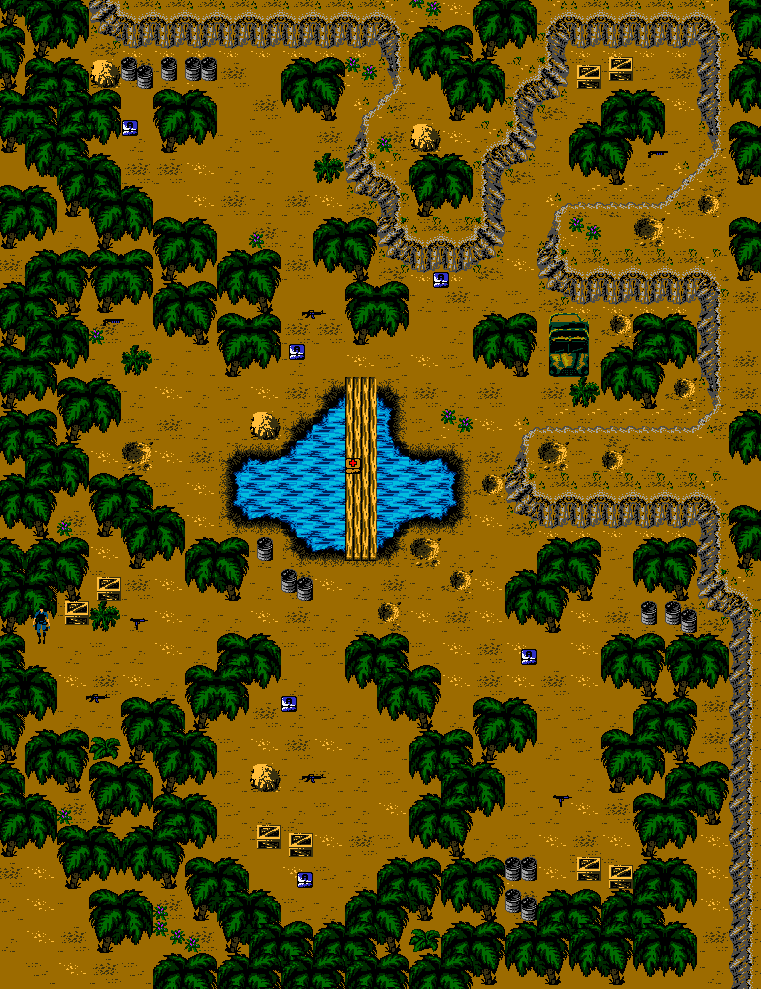
Available once you’ve rescued the fourth Hostage during the Perfect Dark GBC Campaign, “Jungle 2” features a plot of rainforest more overgrown than its counterpart, though both areas feature a pool of water in the center which must be traversed via the wooden bridge. Once again, you’ll should prepare for confrontations if you venture towards the water at any point.
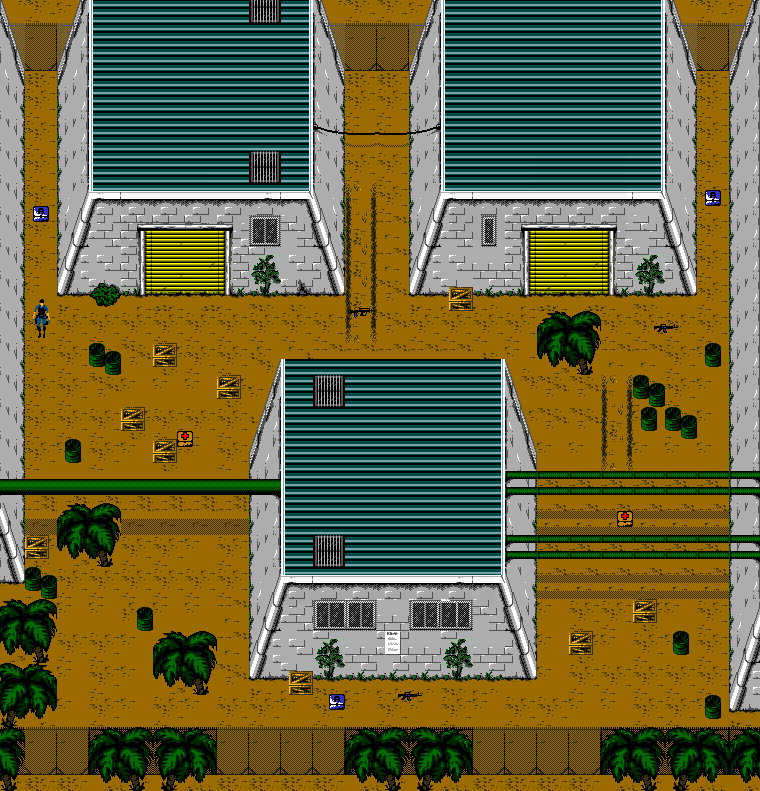
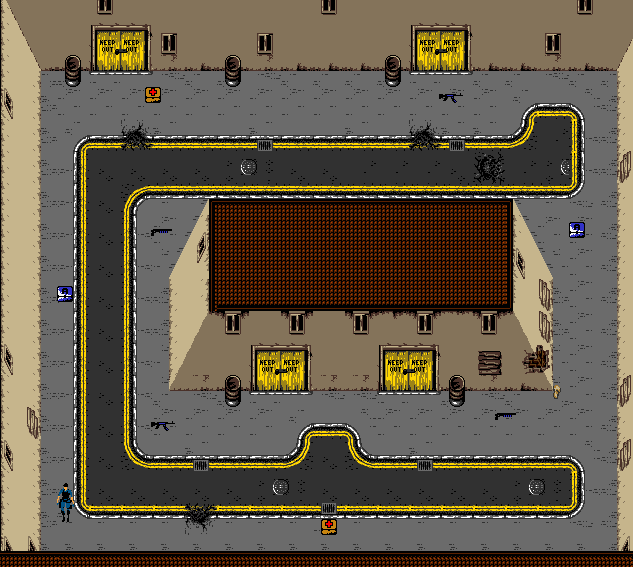
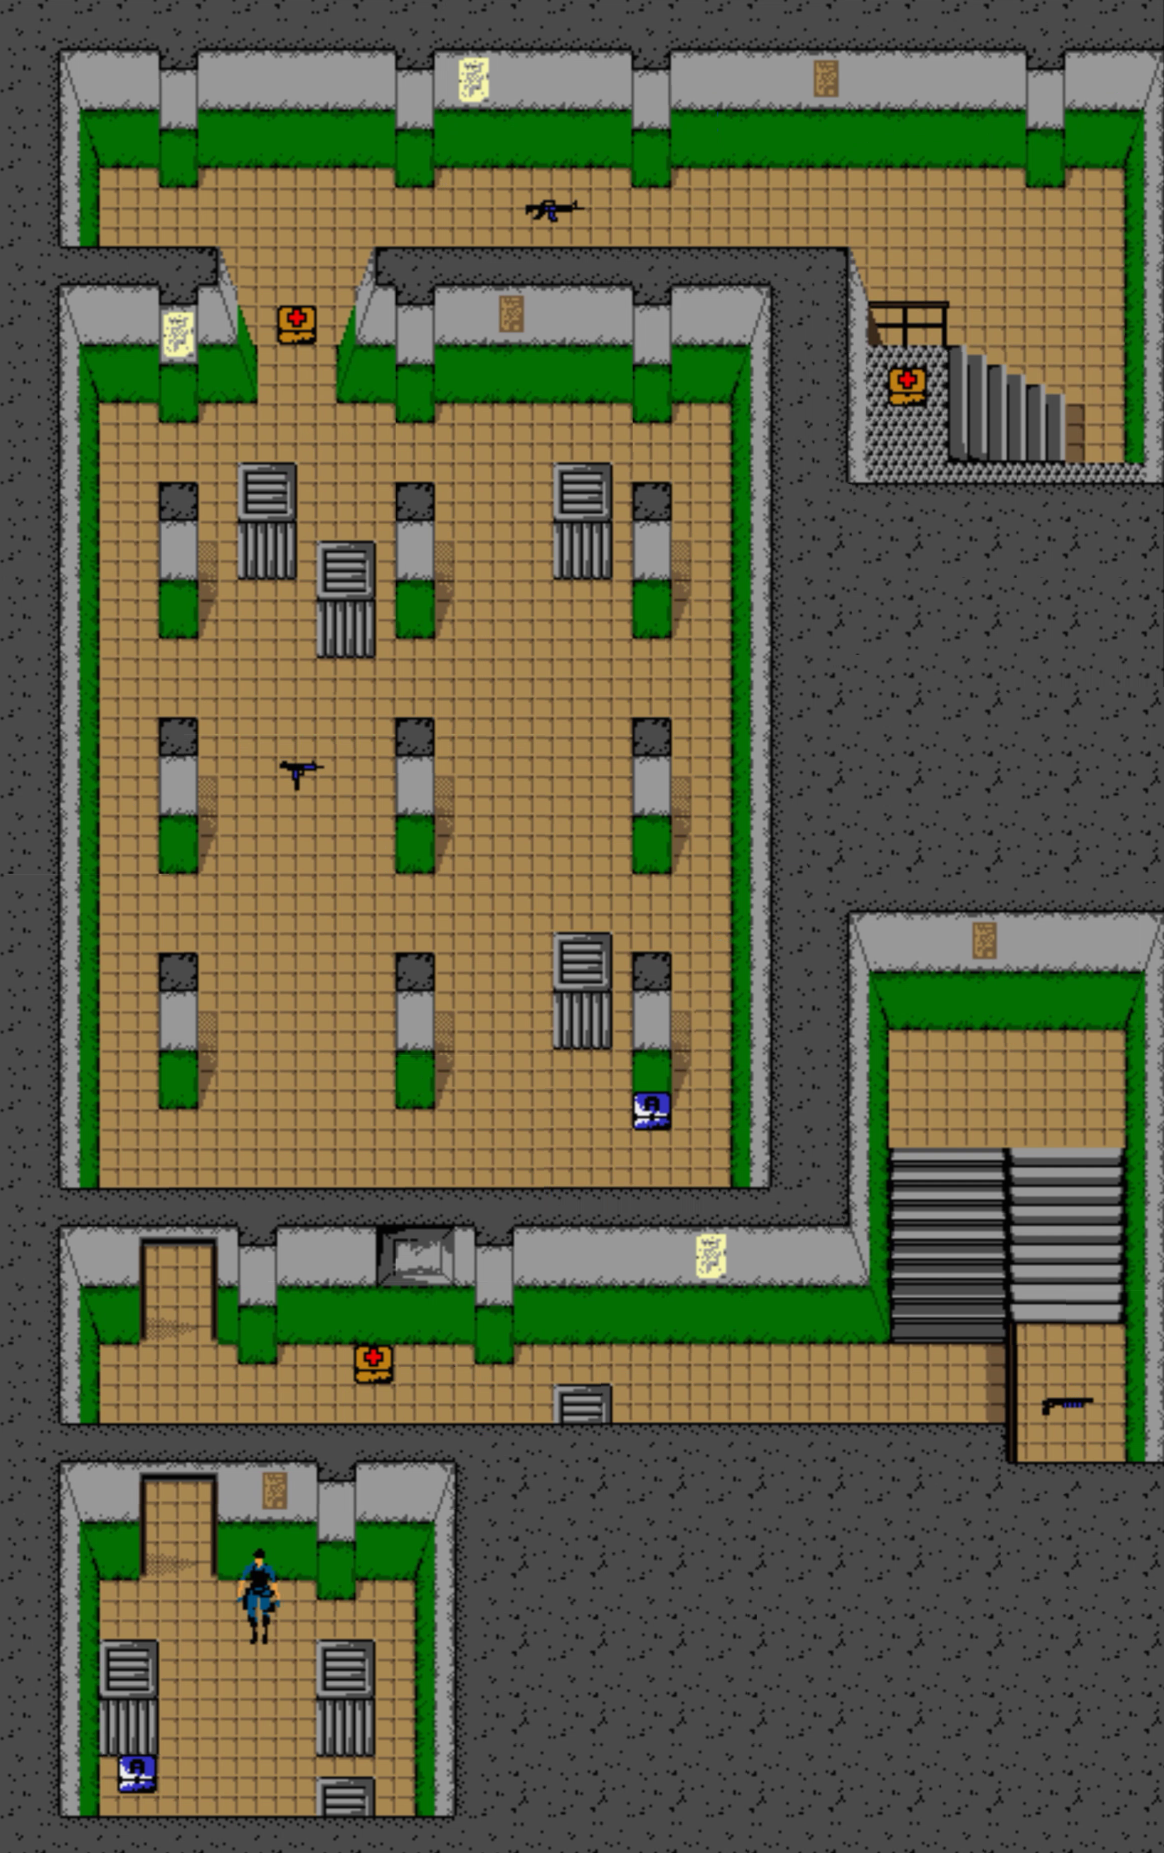
Available once you’ve rescued the fifth Hostage during the Perfect Dark GBC Campaign, “Factory Units” features an enclosed plot of land occupied by three large warehouse buildings. The perimeter of the southern building may be explored freely, but the alleyways of the northern buildings will lead to dead ends, forcing confrontations if you should become cornered.
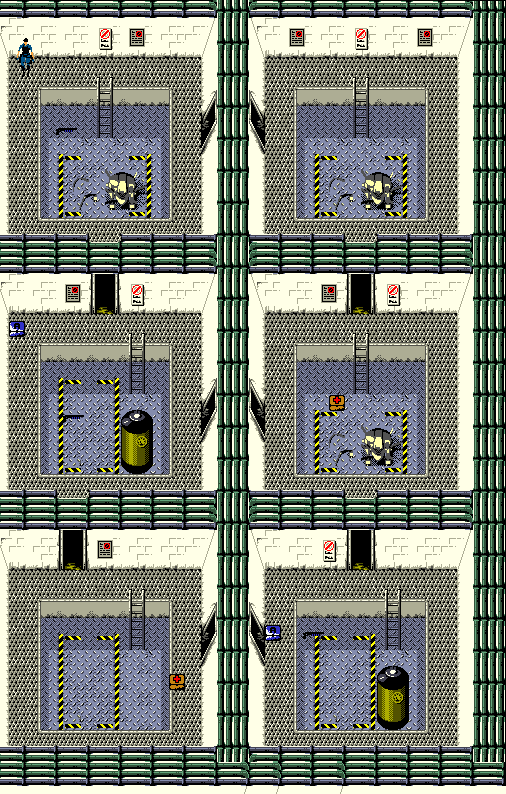
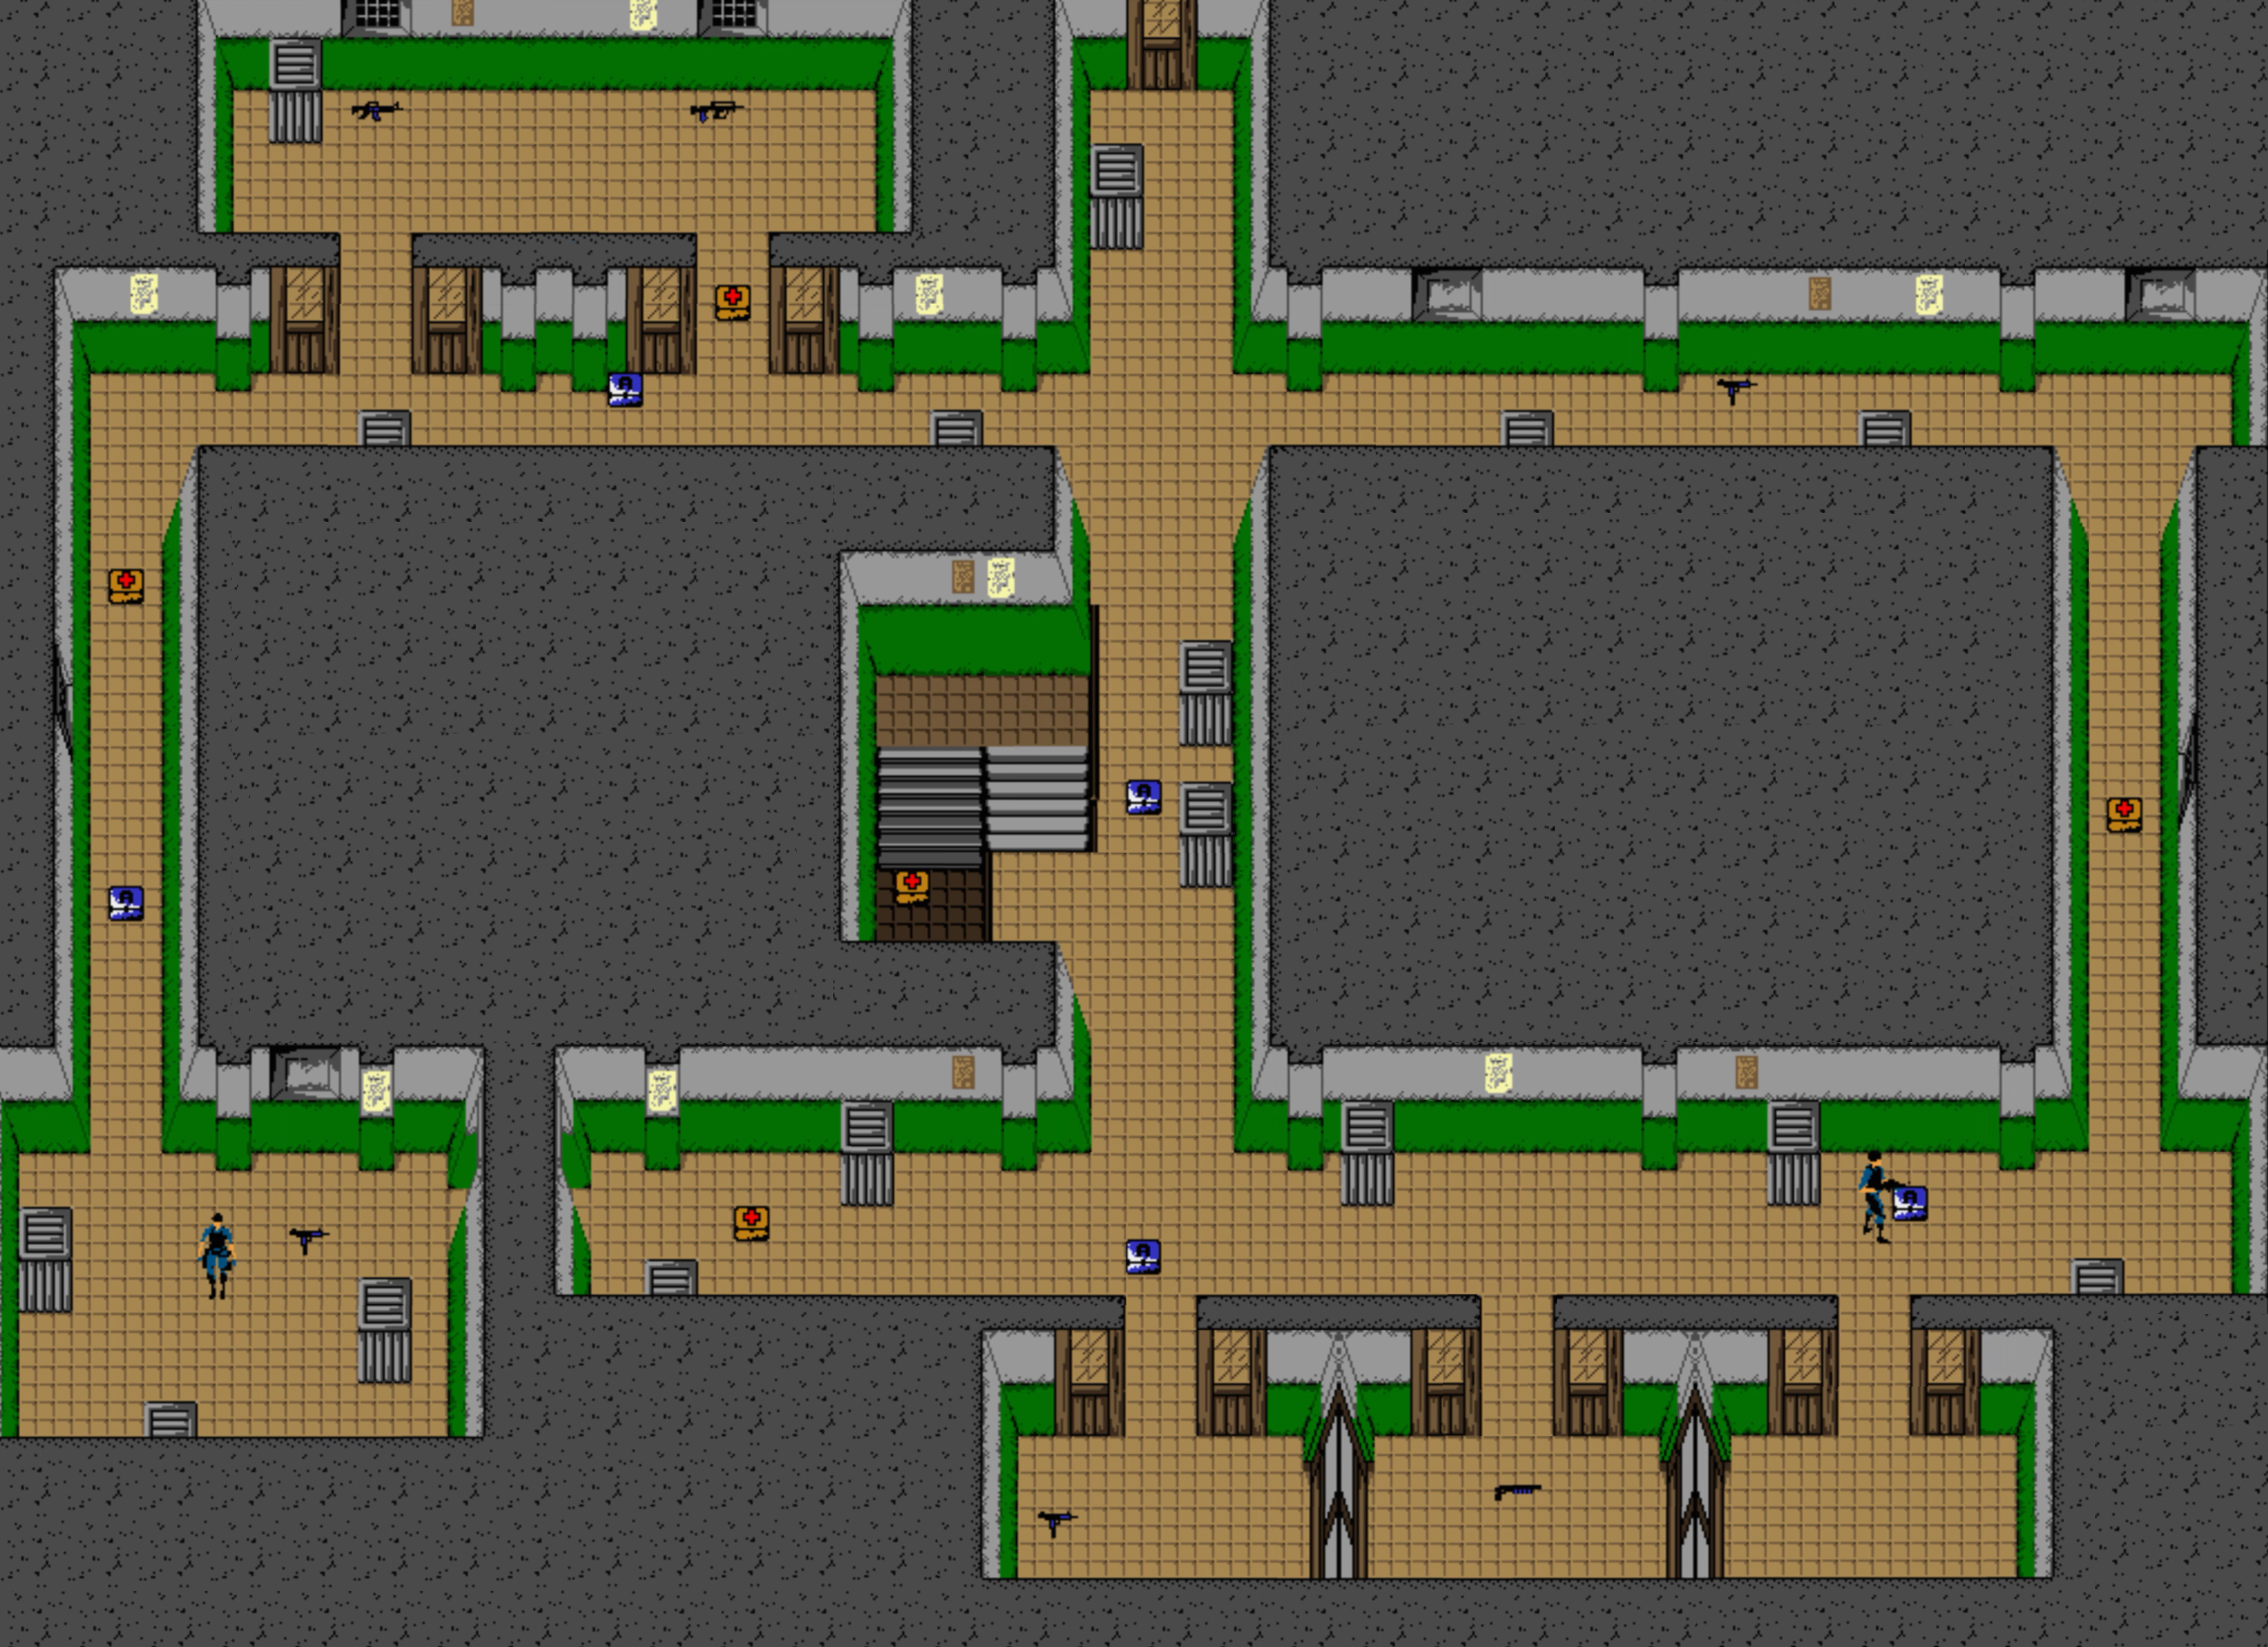
Available once you’ve defeated Mink Hunter during the Perfect Dark GBC Campaign, “Factory Interior 1” features six interconnected rooms inside the Cybernetic Factory. As each room presents two exits, you’ll never have an instance where you become trapped, as you’ll always be able to make an escape. This applies to your assailants as well, however, and can result in long, drawn out matches of attrition.
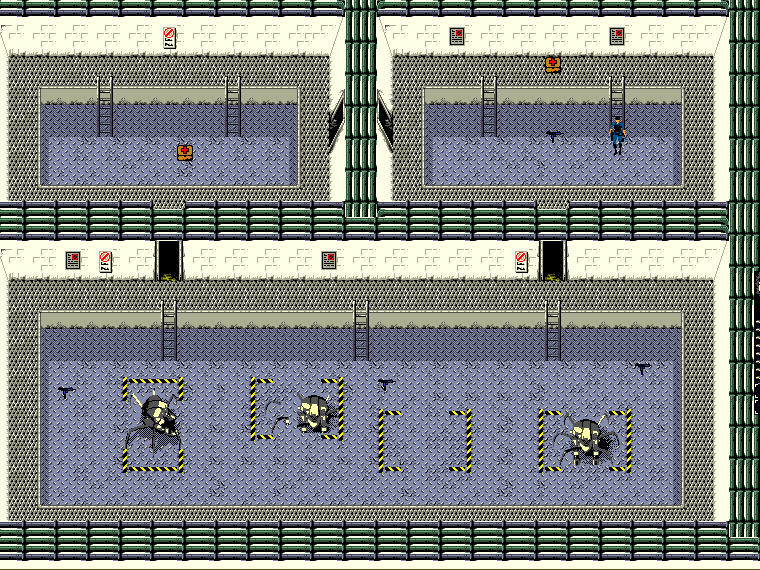
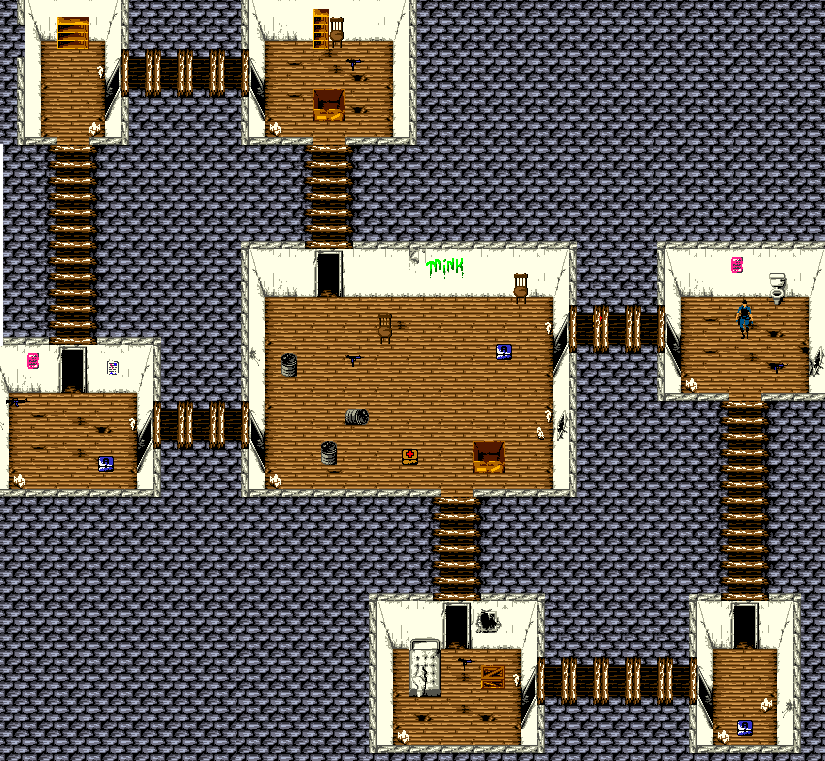
Available once you’ve defeated Mink Hunter during the Perfect Dark GBC Campaign, “Factory Interior 2” features three interconnected rooms inside the Cybernetic Factory. The largest southern chamber will provide ample escape routes, so it’s recommended that you confront your assailants in the smaller twin chambers to the north, where there’s less room for negotiation.
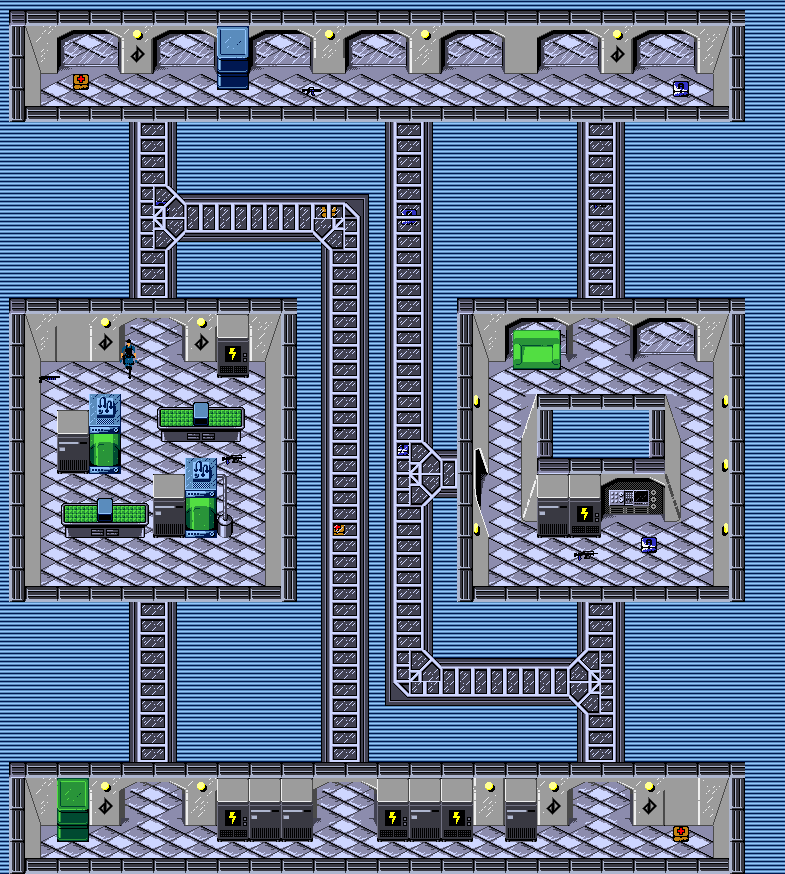
Available once you’ve rescued the sixth Hostage during the Perfect Dark GBC Campaign, “DataDyne Base 1” features two long chambers serving as access stations to a pair of offices, connected by snaking tunnels. In order to travel to either office, you’ll need to work your way through the tunnels and towards the long chambers to the north and south. Make sure you have plenty of ammunition when you decide to move office…
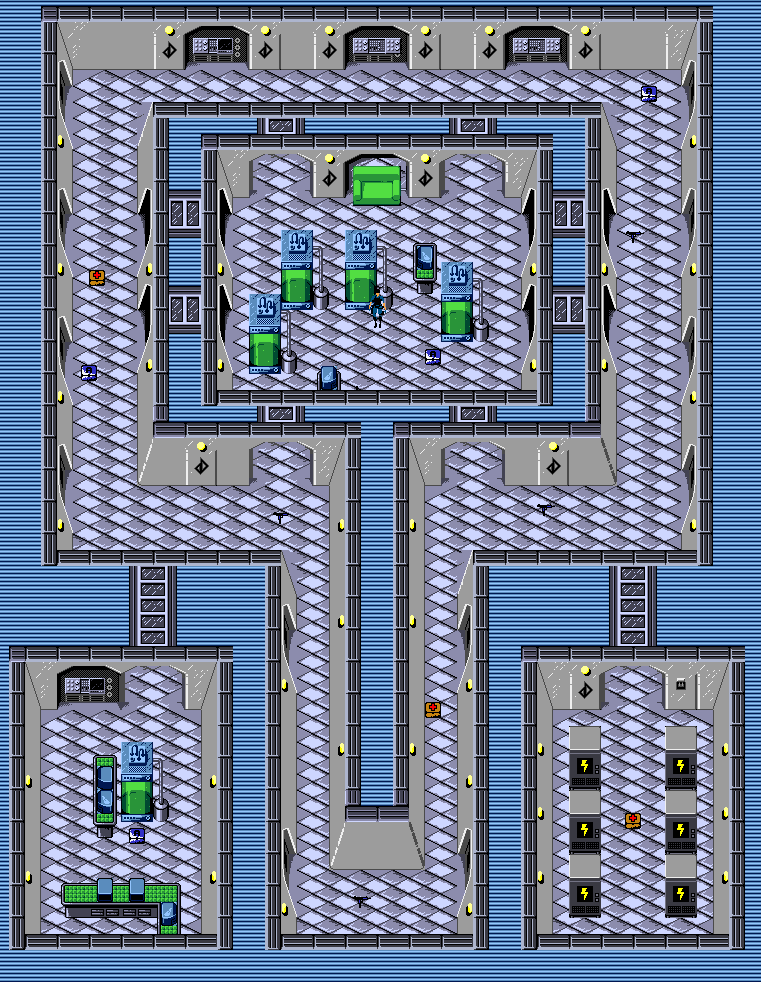
Available once you’ve cleared dataDyne Base IV during the Perfect Dark GBC Campaign, “DataDyne Base 2” features a variation on the final base you’ve encountered previously. Familiarly will breed contempt here, however, as the Key Card wing and the Power Matrix wing only feature one entrance each, which can lead to becoming trapped. You can also use this knowledge to corner your assailants in each room, however.
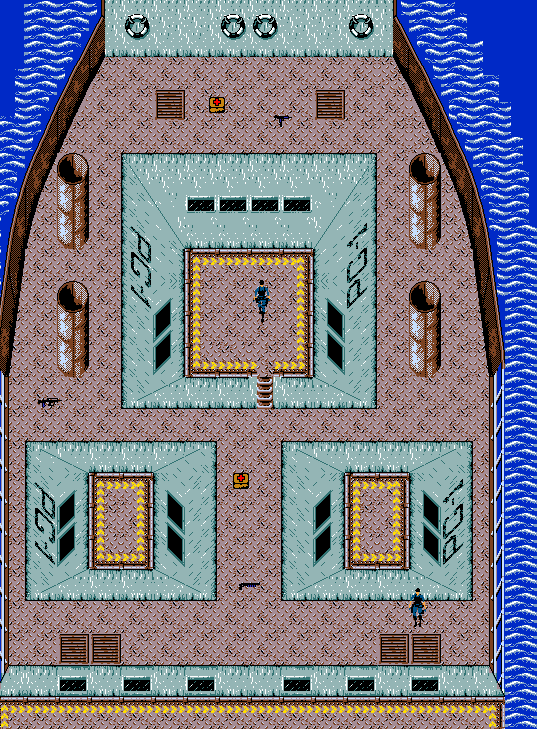
Available once you’ve rescued the seventh Hostage during the Perfect Dark GBC Campaign, “Pelagic 1” features a modified bridge on the deck of dataDyne’s flagship. Aside from the central platform, this map doesn’t feature any dead ends where you’ll be cornered unexpectedly, you can gain an advantage by taking cover behind the smokestacks on either side of the ship when your assailants are exploring, however.
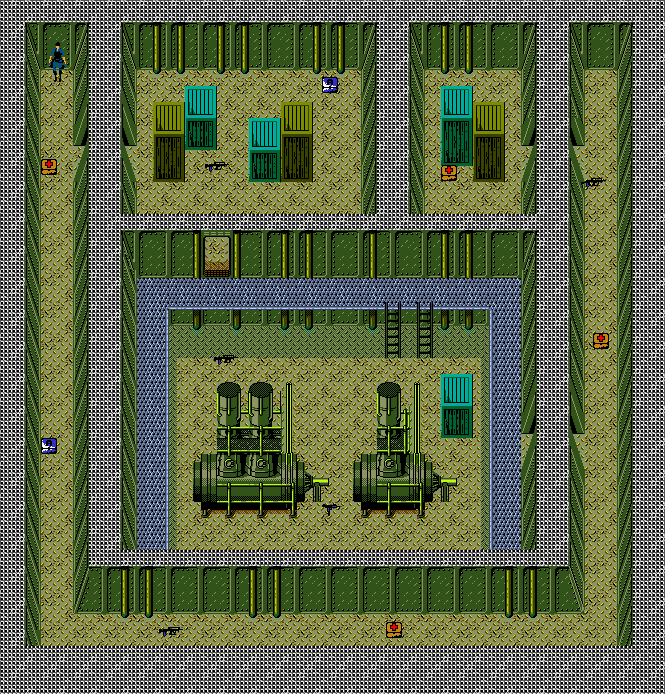
Available once you’ve rescued the eighth Hostage during the Perfect Dark GBC Campaign, “Lower Deck 1” features three interconnected rooms that are framed with a long perimeter tunnel that travels from the East, South and West. The North Eastern interior only contains one possible exit, making it ideal to trap assailants, or safeguard to ensure confrontation from only one direction.
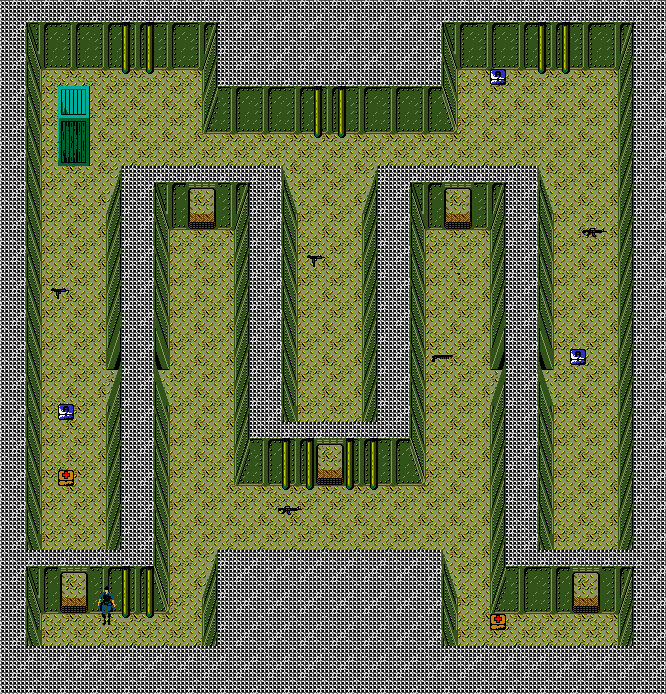
Available once you’ve cleared Pelagic 1 Escape during the Perfect Dark GBC Campaign, “Lower Deck 2” features a large open arena that has been divided by a hallway in the design of a sine wave. As this arena features many exits, it is quite difficult to effectively trap your assailants, leading to many wars of attrition. To counter, take shelter in doorways and you’ll have a chance to surprise your assailants when they come running past.
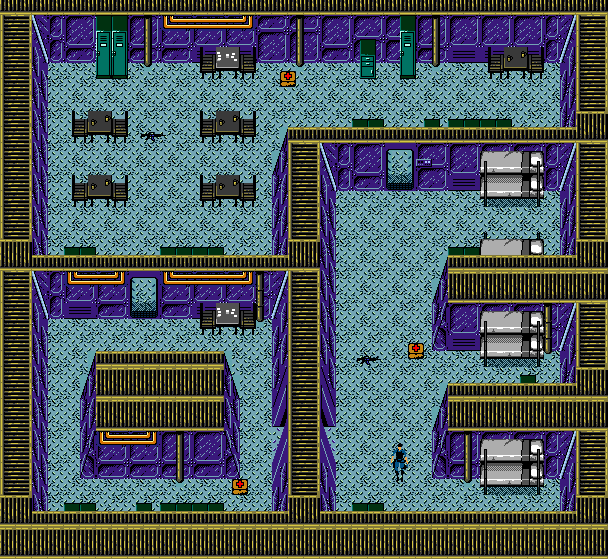
Available once you’ve cleared Pelagic 1 Escape during the Perfect Dark GBC Campaign, “Mid Deck 1” features a large communal space on the ship divided into three chambers. The lack of choke points and single direction routing affects the maps strategy, though the corners of each chamber can be utilized for an effective ambush, should your assailant rush through the area unaware.
Available once you’ve cleared Pelagic 1 Escape during the Perfect Dark GBC Campaign, “Mid Deck 2” features four interconnected rooms arranged in the shape of a ‘U’. As this map does not loop back onto itself, driving assailants to the North Eastern and North Western rooms will allow you to sufficiently corner them. Conversely, you can occupy these rooms to safeguard your position from behind.
Available once you’ve cleared Pelagic 1 Escape during the Perfect Dark GBC Campaign, “Upper Deck” features a modified storage base in the hull of dataDyne’s flagship. As the spiral routing of the Upper Deck creates a path in the shape of a ‘6’, you can either drive your assailants to the North Western staircase to corner them, or safeguard the position yourself to ensure that you aren’t caught from behind.
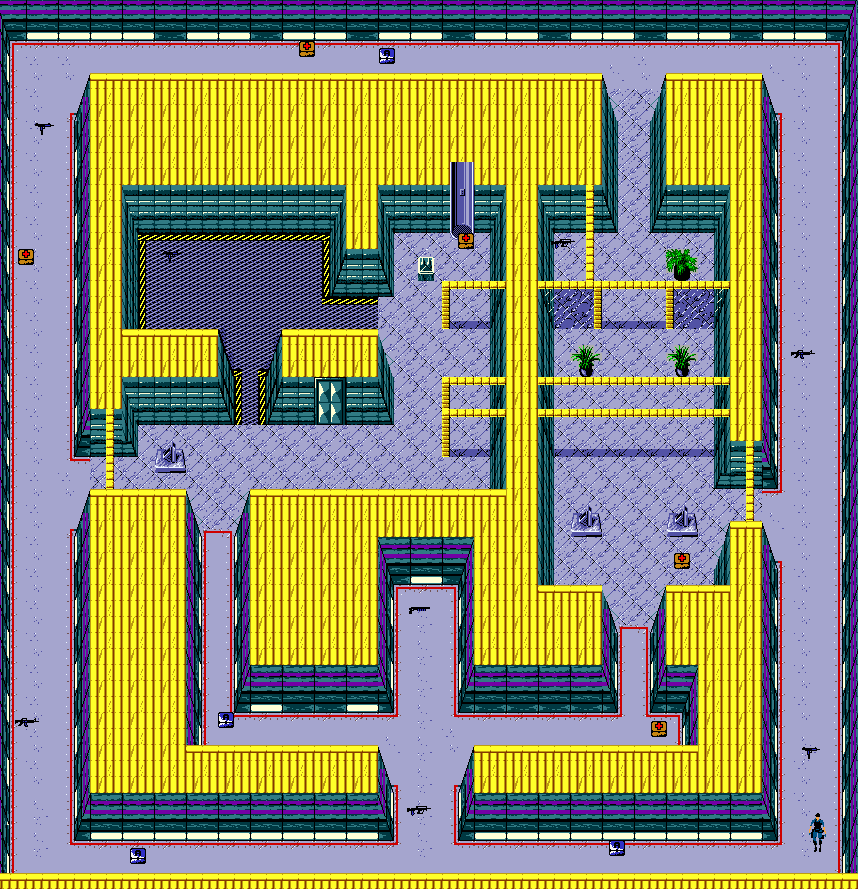
Available once you’ve rescued the ninth and final Hostage during the Perfect Dark GBC Campaign, “CI HQ 1” features the internal offices of Carrington Institute surrounded by a perimeter pathway. When pursuing an assailant on the perimeter pathway, the most direct path can be found by cutting through the central offices. The North Western path is the only exception, which does not feature a direct route into the offices.
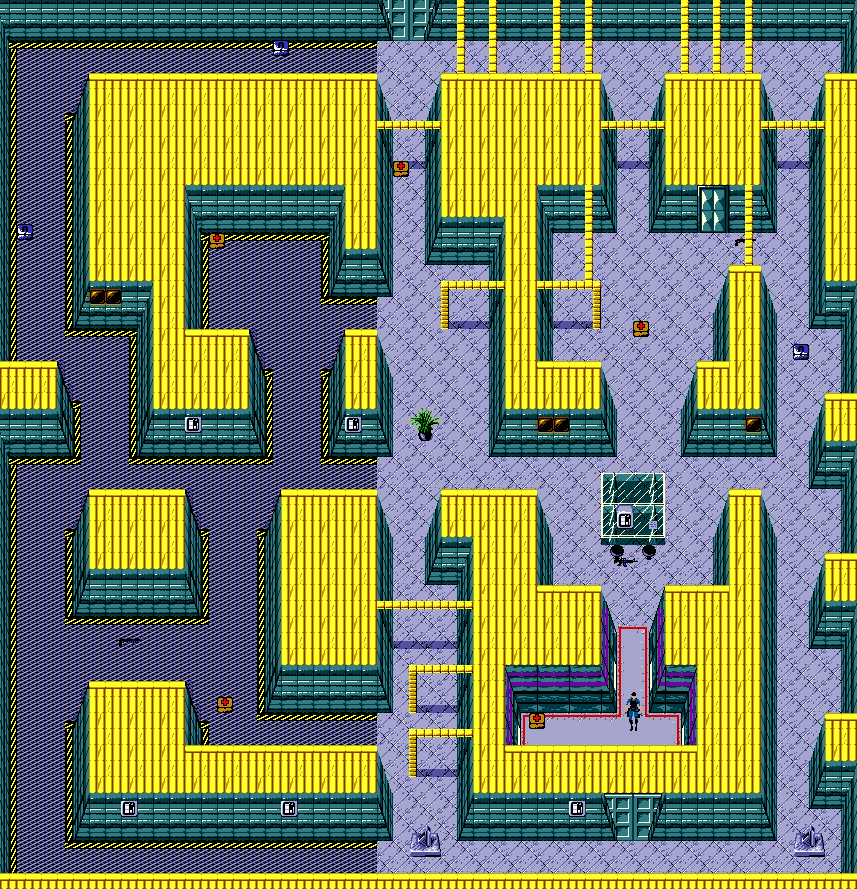
Available once you’ve cleared dataDyne Attack during the Perfect Dark GBC Campaign, “CI HQ 2” features the offices of Carrington Institute arranged as a labyrinth. The floor has been split, with the Eastern half comprised of an industrial grid, and West given a layer of tile. Given the routing and complex nature of this map, locating your assailants will prove quite difficult, though escape when being pursued is also afforded to you.

Available once you’ve cleared dataDyne Attack during the Perfect Dark GBC Campaign, “CI HQ 3” features 12 large cubes arranged in a grid in the Carrington Institute. As this map does not harbor any advantageous routing, it lacks an optimal strategy for cornering assailants. Instead, you’ll need to take cover behind the cubes when appropriate and avoid lingering in one location for long.
Available once you’ve cleared dataDyne Attack during the Perfect Dark GBC Campaign, “Miliary Archives 1” features the lower floor of the Military Archives map see in Rare’s Nintendo 64 release, GoldenEye 007. As the staircases to the north and south do not allow passage to the upper floor, pursing assailants through these routes can be advantageous.
Available once you’ve cleared dataDyne Attack during the Perfect Dark GBC Campaign, “Miliary Archives 1” features the upper floor of the Military Archives map seen in Rare’s Nintendo 64 release, GoldenEye 007.
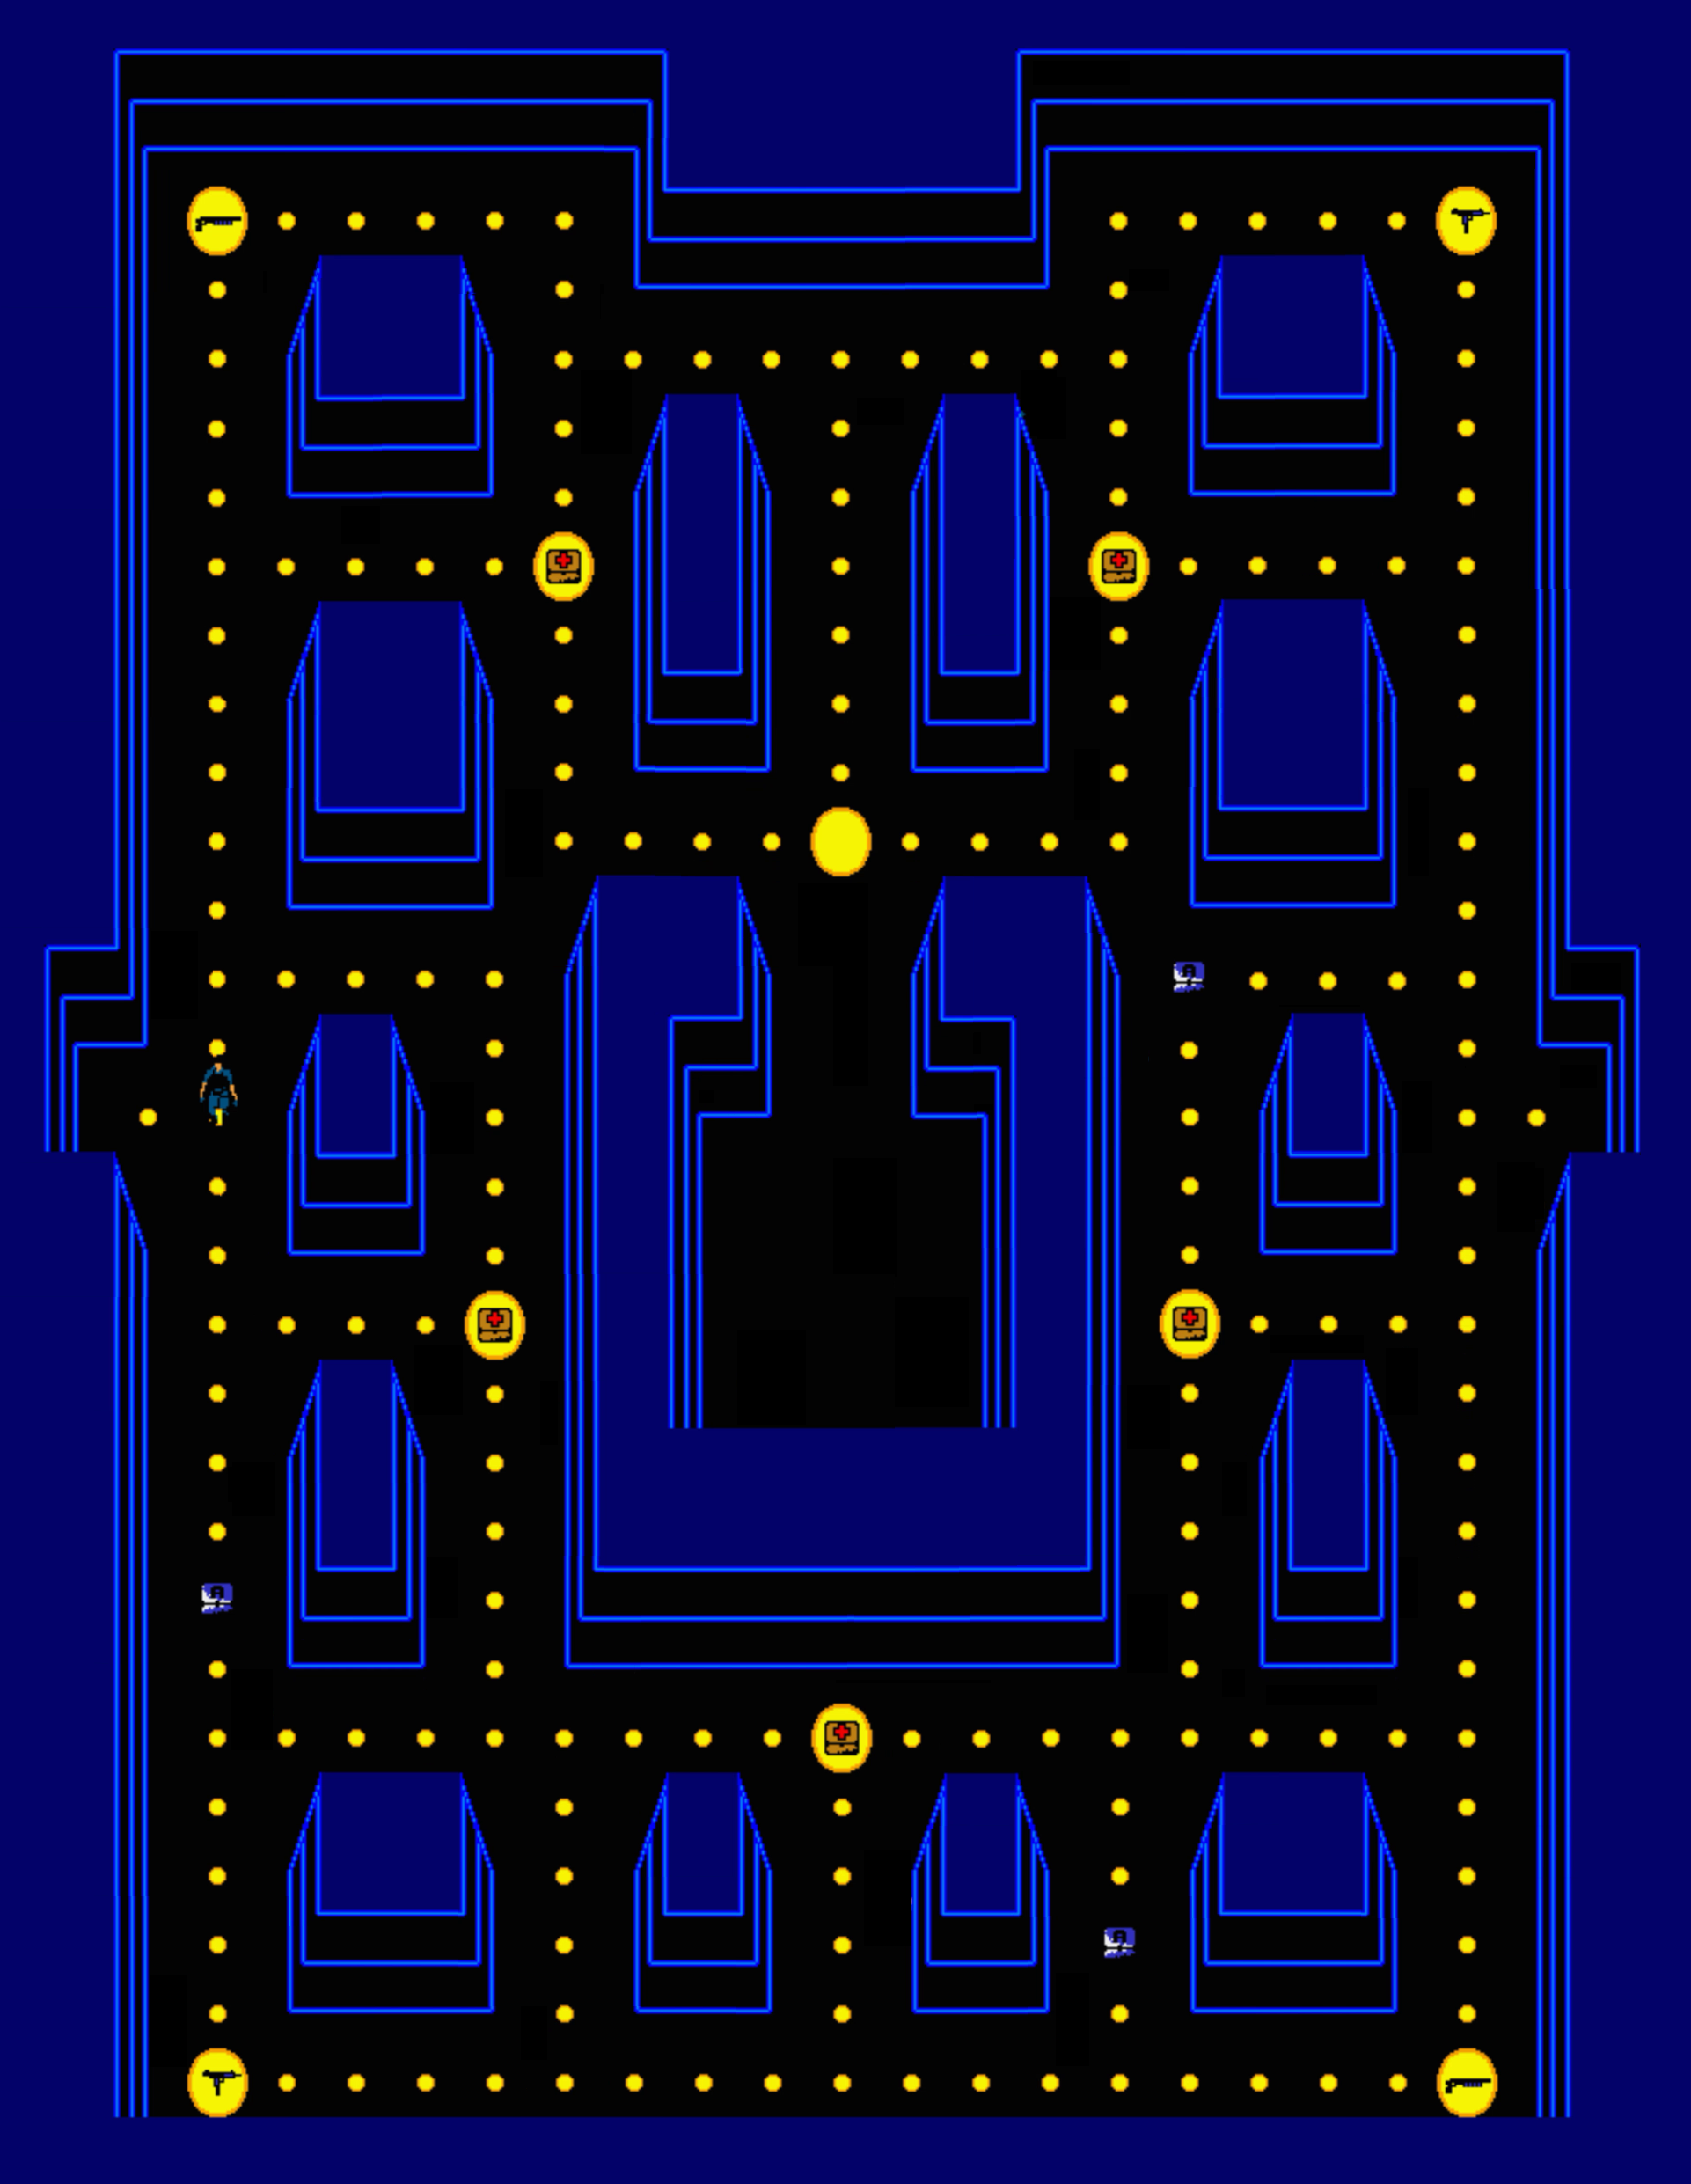
24 – Classic Arcade 1
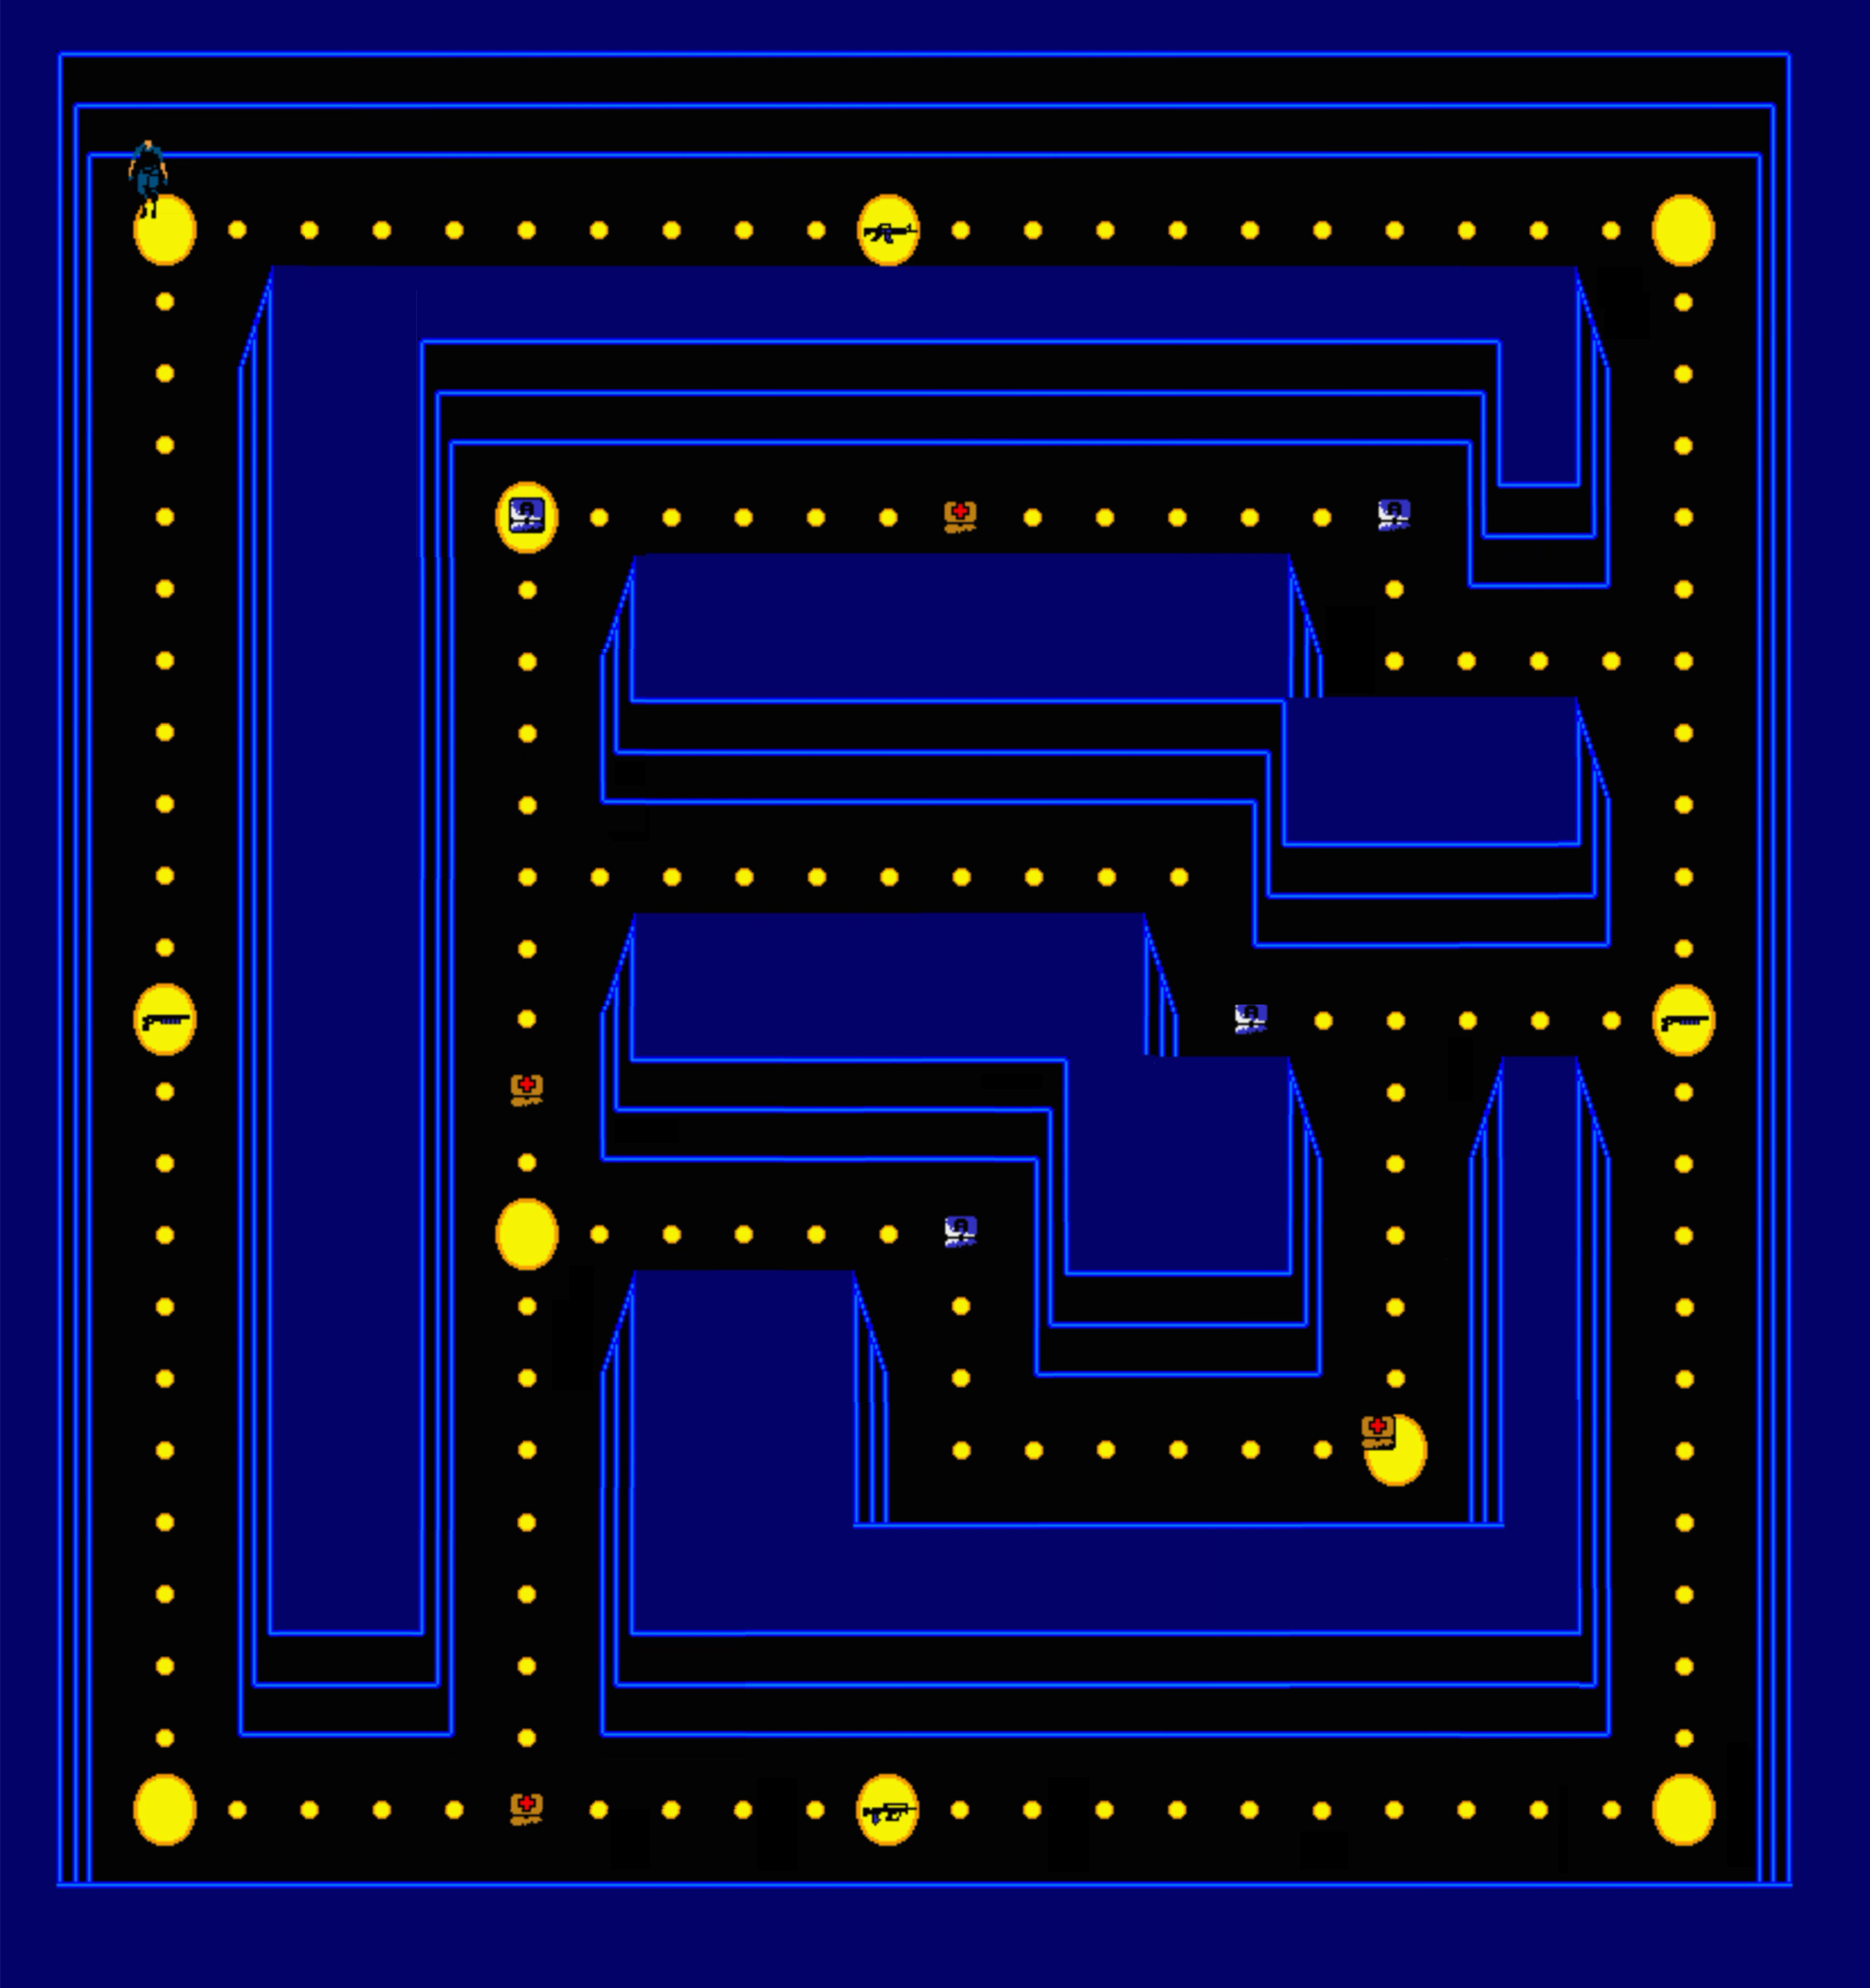
25 – Classic Arcade 2
Deathball
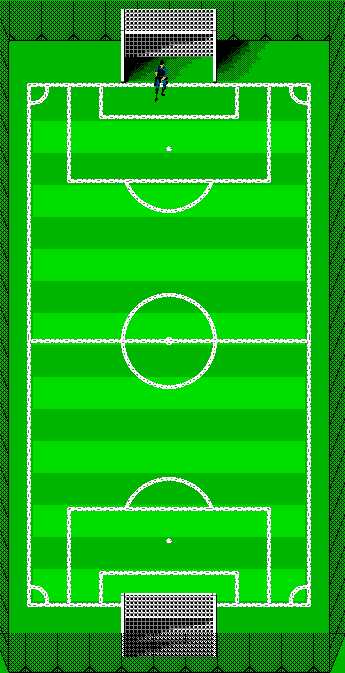
Soccer Stadium
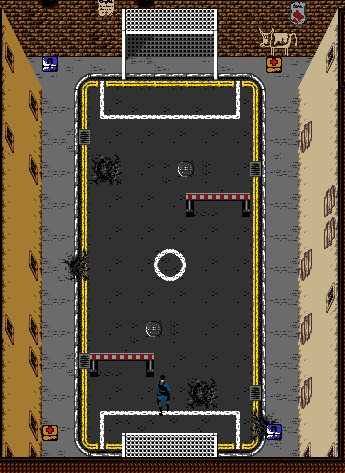
Street Stadium
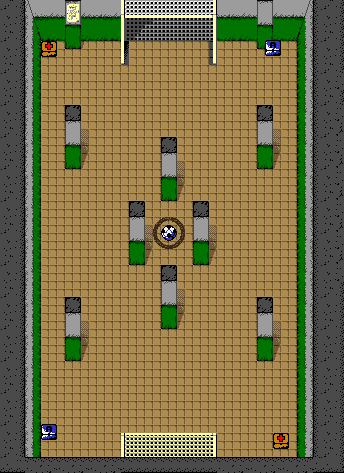
Office Stadium
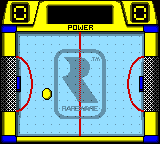
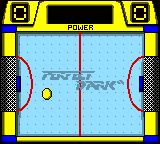
Air Hockey
Perfect Dark Table:
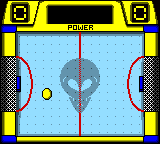
Alien Table:
Rare Table