Chapter 1-4: Advanced Training


Navigation:
Chapter 1: Carrington Institute Training
-1-1: Basic Training
-1-2: Search & Rescue
-1-3: Stealth Training
-1-4: Advanced Training
-1-5: Final Test
Chapter 2: The Jungles of South America
Chapter 3: dataDyne Cybernetic Manufacturing
Chapter 4: dataDyne Operations Base/Crash Site
Chapter 5: Captive aboard the Pelagic I
Chapter 6: Carrington Institute HQ
Chapter 7: Perfect Dark GBC Secrets and Extras
CARRINGTON INSTITUTE: ADVANCED TRAINING
The second you’ve returned to the streets, you’ll see a guard heading to the left as he paces the area – you’ll need to follow him without sprinting and bridge the gap between. Once you’ve gotten onto the sidewalk, you should have the perfect opportunity for an assassination. Even if the guard is in the process of turning around if he’s been alerted, a single hit will prove fatal. If you haven’t been quick enough, return fire at the guard and he’ll go down with the third hit. Inspecting the body will reveal a Med-Kit (25% Health Restore). From here, head to the left until you see a pair of yellow double doors marked “Keep Out” – when you do, approach the doors and then follow the wall to the left. You should come up to a barrel along with the wall with a guard standing on the other side – line yourself up with the guard across the barrel and then fire a single shot from your Falcon 2 to assassinate him. Inspect the body to find a Falcon 2 clip, and then enter the door he was guarding marked “4”.
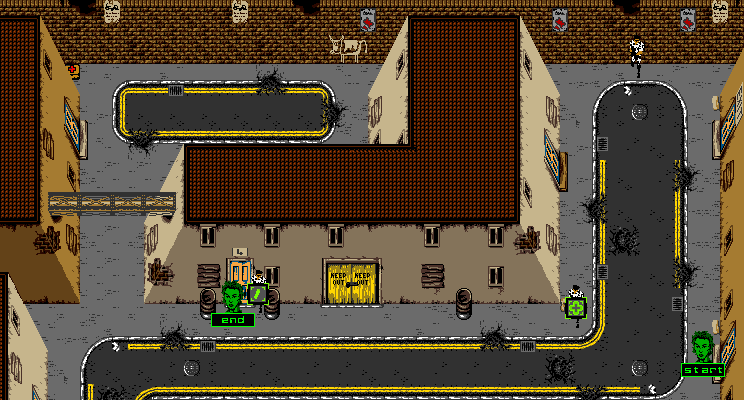
ADVANCED TRAINING: MAP OVERVIEW

MISSION OBJECTIVES:
• COMPLETE TARGET RANGES
• FIND LAPTOP AND DISARM BOMB
• RESCUE HOSTAGES
• REACH EXIT
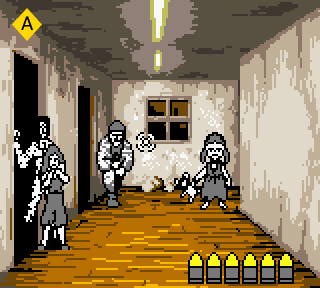
![]() As you enter the Advanced Training scenario, you’ll be thrust into the next Target Range. In this instance, you’ll be presented with 20 legitimate targets, with 15 needed to pass this section. The ‘Little Girl’ decoy target will make a reappearance here on the right side of the hallway, and as usual, if any shots hit her target, you’ll be forced to restart the mission. A new target has also been introduced to further complicate things, with a woman who shields herself behind a hostage she has her arm around. When she appears from the doorway on the left, you’ll need to avoid shooting her hostage, and instead aim for any vulnerable areas that the woman has left exposed.
As you enter the Advanced Training scenario, you’ll be thrust into the next Target Range. In this instance, you’ll be presented with 20 legitimate targets, with 15 needed to pass this section. The ‘Little Girl’ decoy target will make a reappearance here on the right side of the hallway, and as usual, if any shots hit her target, you’ll be forced to restart the mission. A new target has also been introduced to further complicate things, with a woman who shields herself behind a hostage she has her arm around. When she appears from the doorway on the left, you’ll need to avoid shooting her hostage, and instead aim for any vulnerable areas that the woman has left exposed.
Her right elbow, and her head serve as the least difficult shots to manage; anything closer and you risk shooting the hostage when the target retreats. The distance between the targets shouldn’t give you much trouble, as you can pan across the room and hit all of the targets on the same alignment – just make sure to avoid hitting any of the decoys and hostages and you’ll get through this range without much resistance.
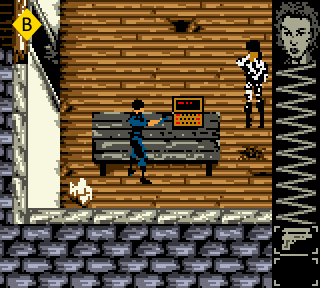
![]() From here, we’ll walk through to the door on our right and head south towards a table after crossing the threshold. You’ll be able to see a Laptop on the table, along with a guard that paces vertically, stopping at the table to turn north. Luckily this guard won’t be able to see us behind the table, so we’ll take advantage of our position by approaching the guard as he turns to the north and assassinating him before he turns around. The guard does have a Med-Kit (25% Health Restore) on his person, though you should only collect it if you need it; you can always return to a guard to inspect them, but only if you haven’t done so before.
From here, we’ll walk through to the door on our right and head south towards a table after crossing the threshold. You’ll be able to see a Laptop on the table, along with a guard that paces vertically, stopping at the table to turn north. Luckily this guard won’t be able to see us behind the table, so we’ll take advantage of our position by approaching the guard as he turns to the north and assassinating him before he turns around. The guard does have a Med-Kit (25% Health Restore) on his person, though you should only collect it if you need it; you can always return to a guard to inspect them, but only if you haven’t done so before.
Should you run into any danger of dying in the later rooms, or in fact the later stages, it gives you a bit of insurance to have a Med-Kit that you can return to with a bit of backtracking.
Now that the room is empty, we can return to the table and pick up the Laptop by interacting with it – Carrington will then appear and tell you that the device can be used to defuse a bomb in this building. Luckily there isn’t an imposed time limit on the bomb, so we can take as long as we’d like to achieve that objective.
Right, now that we’ve got the secured the Laptop we’re going to head up north to the next door, and then carefully edge ourselves towards the threshold until we can see a guard standing in front of the door to our north-east. Given his position, there’s no way that we can employ stealth to sneak by undetected – however, if we line ourselves up so that we face him diagonally (pressing right and up on the directional pad) we can fire off a shot that will hit him as we stay inside the safety of the door. In response, the guard will immediately abandon his post and rush down the hall to the west; now we’ve managed to weaken the guard for a later confrontation and given ourselves a clear path to the door.
Head into the open door the guard previously stood in front of and immediately head to left, hugging the wall. If you’ve done this correctly, you should manage to bypass the guard pacing horizontally in this room. When you see a cardboard box in the middle of the room, head around it to the north in order to follow the guard to the right, and you should achieve a perfect opportunity for an assassination. You can inspect the guard for another Med-Kit (25% Health Restore) if you need it, otherwise it would be wise to ignore checking him so we can come back to it, should things start looking grim. From here, we’ll explore the rest of the room by heading to the left, locating and freeing our first hostage in the corner. Now that we’re finished with this room, we’ll prepare for the confrontation with the wounded guard that we left in the hallway. If you still have any ammunition for the MG1-16G Machine Gun, this would be a good time to use it – otherwise we’ll stick with the Falcon 2.
Once you’re back in the hallway, head to the west and be prepared to encounter the guard – take him out quickly and then head around the corner and to the north to find the final guard in this hallway. You can sneak up on him, though it is difficult given the cramped quarters, so it’s entirely within reason to take him out with a few burst rounds of the MG1-16G or sheltered fire in the doorway with the Falcon 2.
This guard holds the third, and final Med-Kit (25% Health Restore) in this building, so you can inspect him if you need some recovery after the hallway shootout, leaving the other two Med-Kits behind for later use.
Once you’re ready, we’ll continue on through the doorway to the left. When you enter the room, you should be able to spot a hostage tied up to a long table to the south, and a guard that paces in front of him horizontally. When the guard turns around and begins to head to the left, leave the table and follow him for a undetected assassination. Free the hostage if you haven’t done so by following the guards path, and then inspect the body for a Falcon 2 clip.
Once you’re finished, head immediately south from the center of the table and you should be able to spot the next guard heading the same same direction on the left side of the room. Head towards the table that harbors the hostage but DO NOT free him yet, as doing so would alert the guard of your presence. Instead, wait on the right side of the table and the guard should return to pace north once he’s reached the end of his path. The instant that he passes the table heading north, follow him cautiously and then go in for the assassination when you’ve bridged the gap. Inspect the guard for another Falcon 2 clip and then head back down towards the table to free the third hostage.
With this room clear, we’ll head head to the north past the oil barrels to find the next doorway. There are two strategies to utilize here, depending on your current ammunition. If you still have the ability to fire the MG1-16G, you can head off the assault by entering the room and opening fire on the first guard as he approaches, and then taking down the second guard to the north while avoiding the hostage on the left side of the room. If you’d prefer to use the Falcon 2, you can take a more frantic approach by dashing into the room and heading towards the doorway on its right side. Both guards will give chase, but you should be able to negate their pursuit once you make it across the threshold. From here, it’s a simple manner of using the doorway as a barrack as you pop out and fire shots from your Falcon 2 and retreat if they start to give chase. Once both guards have been dealt with, return to the left side of the room and free the hostage. The second guard will provide another Falcon 2 clip, and if your health is starting to cause you worry, you can use this time to return to the the earlier rooms and inspect the other guards for at least one Med-Kit.
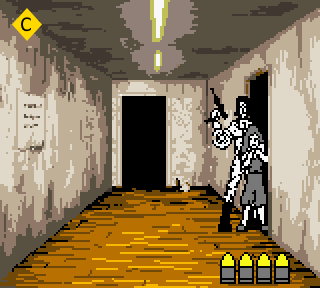
![]() When you’re ready to progress, we’ll head out the doorway to the right and enter the final Target Range of your training. Once again you’ll be expected to shoot at least 15 of the 20 intended targets, with decoys and hostages appearing throughout. In this instance, the hostage-taking-target appears routinely in the right doorway, which exposes her elbow first, making for an easy hit. If you keep your shots aimed in the middle of the range, you’ll avoid accidentally hitting the decoy target as it passes in the far door, while still hitting the taller guards and the crook of the hostage-takers elbow without needing to adjust vertically.
When you’re ready to progress, we’ll head out the doorway to the right and enter the final Target Range of your training. Once again you’ll be expected to shoot at least 15 of the 20 intended targets, with decoys and hostages appearing throughout. In this instance, the hostage-taking-target appears routinely in the right doorway, which exposes her elbow first, making for an easy hit. If you keep your shots aimed in the middle of the range, you’ll avoid accidentally hitting the decoy target as it passes in the far door, while still hitting the taller guards and the crook of the hostage-takers elbow without needing to adjust vertically.
Once you’ve returned to the hallway after passing the final Target Range, you’ll need to head right to find the next guard pacing the length of the hall horizontally. It’s difficult to guarantee an assassination with the limited visibility; you’ll either catch up to the guard facing away from you heading right, which is ideal; or you’ll end up catching the guard head-on as he walks to the left. In either case, the guard offers nothing on his person when he’s taken down, so ignore the inspection and head for the doorway to the south.
Cautiously approach the threshold and you should spot a guard making his way down to the south – as he leaves your field of view, rush over to the doorway on the right in this room and you should be able to enter the doorway as he finishes his vertical pacing. If you’ve done this correctly, you’ll remain undetected as he begins to pace back up to the north – take advantage of your position and go in for an assassination as he passes the doorway.
When you’ve finished, return to the doorway and then prepare to glimpse into the next room as you approach the threshold – you should see a guard pacing diagonally from the north-west corner to the south-east corner. There is no way to avoid detection in this room, so if you feel that your health isn’t well enough to warrant a confrontation, return to one of the guards in the first area to recover at least 25%.
When you’re ready to continue, we’ll wait until the guard is heading towards the north-west corner and then we’ll sprint across the threshold and run to the south doorway. If you can manage this quickly enough, you should be able to outrun the guards fire and watch as he returns to his pacing when you’ve entered the doorway.
When you’re ready, get behind the guard and open fire with your Falcon 2; as assassination is difficult here, but you should be able to land three shots before things get too dire, which will do the job.
Ignore inspecting the guards body, and instead head to the south through the doorway we sought shelter in. As you make your way through the doorway and get a glimpse into the next room, you’ll spot another guard pacing horizontally in front of the entrance.
Compared to the previous guards we’ve faced, this one is very easy to take out – in fact, you won’t even need to leave the doorway to do it – just line up your shot as you face south and eventually he’ll pace out directly underneath your Falcon 2. Take a single shot and you’ll take him out, then inspect the body to find a Falcon 2 clip.

![]() There aren’t any guards in the next room, so you can let your defenses down and continue through the doorway to the left. Once you’re inside, you should be able to spot a curious wall-mounted device to the north – this is the bomb you’ll need to defuse. Since we have the Laptop in our inventory, all we need to do is approach the bomb and we’ll begin the automatic process of defusing it. If you don’t see the Laptop in the pause menu and nothing happens when you approach the bomb, it means you’ve forgotten the Laptop in the first room and you’ll need to retrieve it to progress. Once the device is safe, we’ll have completed all of our objectives.
There aren’t any guards in the next room, so you can let your defenses down and continue through the doorway to the left. Once you’re inside, you should be able to spot a curious wall-mounted device to the north – this is the bomb you’ll need to defuse. Since we have the Laptop in our inventory, all we need to do is approach the bomb and we’ll begin the automatic process of defusing it. If you don’t see the Laptop in the pause menu and nothing happens when you approach the bomb, it means you’ve forgotten the Laptop in the first room and you’ll need to retrieve it to progress. Once the device is safe, we’ll have completed all of our objectives.
All we have left to do now is reach the exit in order to complete our Advanced Training scenario.
From the bomb, head to the right room where we encountered the horizontal pacing guard, north through the late diagonal-pacing guard’s room, and then left through the vertical pacing guard’s room. Heading north here will bring us back in the main hallway. Head to the right and prepare for a confrontation with one final guard that waits for us at our exit. If you can follow along the north-most wall, you should be able to spot his legs – if you’ve still got ammunition for the MG1-16G you can take him out easily enough as you round the corner, otherwise you can use your Falcon 2 for the stand-off. If you’re worried about your health and would rather save the ammunition, you can always sprint towards the exit – you’ll still be fired upon but you’ll potentially outrun the shots. The guard has nothing on him that he can offer, so regardless of strategy, just head for the exit on the right to complete your Advanced Training.