Chapter 5-1: Pelagic I Lower Deck


Navigation:
Chapter 1: Carrington Institute Training
Chapter 2: The Jungles of South America
Chapter 3: dataDyne Cybernetic Manufacturing
Chapter 4: dataDyne Operations Base/Crash Site
Chapter 5: Captive aboard the Pelagic I
5-1: Pelagic I Lower Deck
5-2: Pelagic I Mid Deck
5-3: Pelagic I Upper Deck
5-4: Octopus Prime Showdown
5-5: Pelagic I Main Deck
5-6: Pelagic I Escape
Chapter 6: Carrington Institute HQ
Chapter 7: Perfect Dark GBC Secrets and Extras
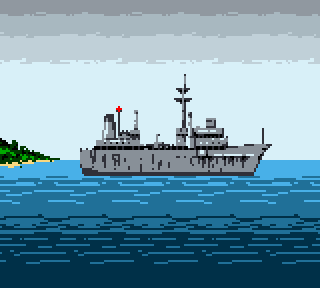
CAPTIVE ABOARD THE PELAGIC I – FEBRUARY 4TH 2022
![]()
![]()

On the coastline of South America, dataDyne’s flagship, the Pelagic I readies the transport of the alien craft to dataDyne’s Headquarters – deep in the bowels of the ship, Joanna Dark sits in the cramped quarters of her make-shift holding cell like a prisoner. She suspects that dataDyne will keep her alive for the the time being, and use her for bargaining power against the Carrington Institute; information on Max Danger and Daniel Carrington would be of great interest to dataDyne as well, but Joanna has stayed resiliently tight-lipped since her arrival – she knows that the second dataDyne had what they needed, her usefulness will reach its end.
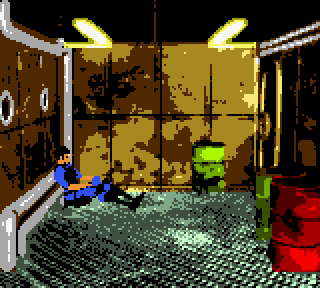
Dwelling on grim thoughts, the agent is momentarily distracted as she hears footsteps approach the hatch from the outside. Looking up, she hears the heavy door unbolt and then swing open, revealing a diminutive creature with a bulbous head. The alien Grey crosses the threshold and begins to speak…
Elvis: Joanna, you must gather as much information on the alien ship as possible and get it back to the Carrington Institute.
Joanna Dark: Who… Who are you?
Elvis: A friend. Listen, you must stop dataDyne getting away with the alien wreckage.
Joanna Dark: What do you mean?
Elvis: You must sink this ship and escape.
Joanna Dark: How?
Elvis: I’m sorry I can’t help you any further.
PELAGIC I LOWER DECK: MAP OVERVIEW

MISSION OBJECTIVES:
• DESTROY PELAGIC I
• ESCAPE USING SHIPS HELICOPTER
As dataDyne has confiscated all of our weapons upon boarding the Pelagic I, you’ll find that we’re left initially defenseless against the guards in the Lower Decks. Worse still, Joanna’s encounter with the dataDyne soldiers at the Crash Site has left her straggling, with only 15% health at the start of the mission – you’ll need to use all of your Institute training and stealth to survive this escape.
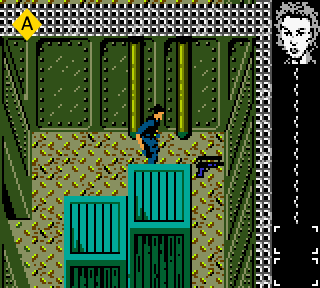
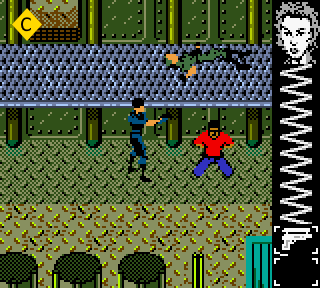
![]() From your current position, you’ll need to leave your cell by walking through the door to the right; when you exit the room you’ll notice two guards in the hallway that have been stationed to the north and south. Luckily, the guards are facing away from us, so we’ll continue walking to the east into the next cell. In the northeast corner of this room, you’ll discover the confiscated Falcon 2 pistol – walk over to it and you’ll reclaim the weapon. Now that we’re armed, we’ll head back to the east to return to the hallway and then prepare to assassinate the guards. Approach the back of the north guard first, and then neutralize him with a single shot.
From your current position, you’ll need to leave your cell by walking through the door to the right; when you exit the room you’ll notice two guards in the hallway that have been stationed to the north and south. Luckily, the guards are facing away from us, so we’ll continue walking to the east into the next cell. In the northeast corner of this room, you’ll discover the confiscated Falcon 2 pistol – walk over to it and you’ll reclaim the weapon. Now that we’re armed, we’ll head back to the east to return to the hallway and then prepare to assassinate the guards. Approach the back of the north guard first, and then neutralize him with a single shot.
When this is accomplished, turn on your heel and approach the guard to the south, lining up your shot and firing when you’re close enough for an assassination. Inspecting the guard to the north will provide us with a much-needed Med-Kit (25% Health Restore) that will bring our current standing to 40%. Inspecting the guard to the south afterwards will provide us with a Falcon 2 clip, which we’ll take with us as well.
When you’re ready to continue, begin heading to the south and you’ll encounter the third dataDyne guard pacing in the corridor horizontally. Approach the guard from behind as he walks the width of the corridor and assassinate him before he’s gotten the chance to turn around. Inspecting this guard will provide us with another Falcon 2 clip, and a Med-Kit (25% Health Restore), bringing our current standing to 65%.
There are two more guards in the adjacent cells to the east and west, but only the guard to the east will provide us with further ammunition. Walk through the doorway to the east and you’ll find the guard has been stationed in front of a pair of crates, looking to the right. There isn’t a chance of being detected unless you walk into his field of vision, so stay close to the crates as you wrap around the south to the back of the guard and then assassinate him with the Falcon 2. Inspecting the fallen guard will provide us with another Falcon 2 clip, which we’ll take with us as we return to the hallway.
From here, approach the doorway that leads to the catwalk to the south, but don’t step through it at this time. If you wait at the foot of the door, you’ll witness a guard on the right approach the door and then turn on his heel as he continues his patrol to the east. Once the guard has turned, you can cross the threshold and approach the right guard from behind for an assassination with the Falcon 2.
![]() Inspecting the fallen guard will provide us with another Falcon 2 ammunition clip, which we’ll take with us as we retrace our steps back through the door into the hallway. After you’ve crossed the threshold, you’ll need to walk to the left and position yourself in the leftmost corner of the hallway; once you’ve done so, you’ll witness a second guard making his horizontal patrol to the south. As soon as the guard comes into view, you’ll need to abandon the corner and make your way to the doorway to the south once more. Follow the guard covertly as he continues his patrol to the left, and then assassinate him with the Falcon 2.
Inspecting the fallen guard will provide us with another Falcon 2 ammunition clip, which we’ll take with us as we retrace our steps back through the door into the hallway. After you’ve crossed the threshold, you’ll need to walk to the left and position yourself in the leftmost corner of the hallway; once you’ve done so, you’ll witness a second guard making his horizontal patrol to the south. As soon as the guard comes into view, you’ll need to abandon the corner and make your way to the doorway to the south once more. Follow the guard covertly as he continues his patrol to the left, and then assassinate him with the Falcon 2.
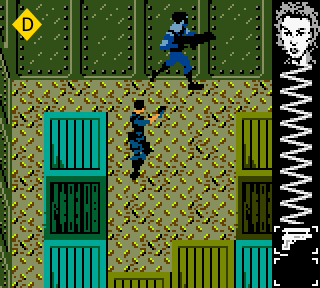
![]() Inspect the guard once you’ve taken him out, and you’ll acquire another Med-Kit (25% Health Restore), bringing our current standing to 90%. Descend from the catwalk towards the lower floor using the pair of ladders provided, and then head to the east to discover a Hostage. After you’ve rescued the Hostage, we’ll return to the hallway and arrive at the northernmost point where we encountered the first two guards in front of our holding cell. Head north through the doorway and you’ll arrive in a horizontal corridor – make your way towards the second doorway that can be found just ahead to enter the storage hold.
Inspect the guard once you’ve taken him out, and you’ll acquire another Med-Kit (25% Health Restore), bringing our current standing to 90%. Descend from the catwalk towards the lower floor using the pair of ladders provided, and then head to the east to discover a Hostage. After you’ve rescued the Hostage, we’ll return to the hallway and arrive at the northernmost point where we encountered the first two guards in front of our holding cell. Head north through the doorway and you’ll arrive in a horizontal corridor – make your way towards the second doorway that can be found just ahead to enter the storage hold.
Make your way to the north from this point and you’ll come across a collection of tall storage crates; keep to the right side of the room and you’ll be able to continue through a narrow opening between the wall and the crates.
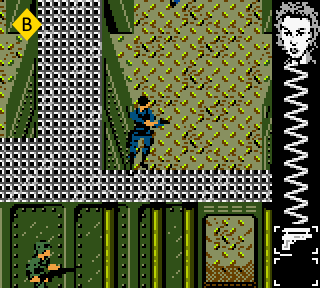
![]() After you pass the first row of crates, but before passing the second row, you should be able make your way to the left and squeeze through the gap between them to remain hidden in the center. You’ll need to remain covert as you make your way to the west, as there’s a guard to the north that patrols horizontally. If you’re careful to avoid his line of sight by walking slowly to the west, you’ll be able to track his movement by looking out for his legs; once the guard passes your current position and carries on oblivious, you’ll need to approach him from behind with the Falcon 2 and then take him out with an assassination.
After you pass the first row of crates, but before passing the second row, you should be able make your way to the left and squeeze through the gap between them to remain hidden in the center. You’ll need to remain covert as you make your way to the west, as there’s a guard to the north that patrols horizontally. If you’re careful to avoid his line of sight by walking slowly to the west, you’ll be able to track his movement by looking out for his legs; once the guard passes your current position and carries on oblivious, you’ll need to approach him from behind with the Falcon 2 and then take him out with an assassination.
Inspect the fallen guard and you’ll recover another Med-Kit (25% Health Restore) to bring our current standing to 100% – a sight better than the 15% we started with. Head to the west until you’ve arrived at the northwestern corner of the storage hold, and then begin to make your way to the south to discover a second guard positioned in front of a teal crate. You’ll need to approach the guard using the narrow passage between the crates, and when you’re practically standing shoulder to shoulder, spin to the right and pull the trigger on the Falcon 2 for a quick assassination.
Inspecting the guard will provide us with another Falcon 2 ammunition clip – not a moment too soon either, as we’ll have spent our first from the eight guards we’ve encountered previously. Once you’ve reloaded, we’ll continue to the south where another guard waits for us on the opposite side of the doorway. In similar fashion to the previous guard, it’s a simple case of covertly approaching the guard from the north, and then going in for an assassination as you arrive at the threshold of the doorway.
There’s one final guard to encounter in this corridor, and they’re positioned in front of the final doorway to the east. You’ll need to remain aligned with the position of the guard we’ve just assassinated and then head to the right, passing the doorway that lead us into the storage room. If you’ve done this correctly, you’ll find yourself aligned with the final oblivious guard in front of the third doorway. Approach the guard from the left and then go in for an assassination with the Falcon 2.
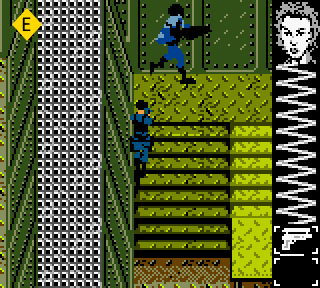
![]() When you’re ready to continue, we’ll head to the north through the doorway as we approach the stairs leading to the Mid Deck. You’ll find one final guard patrolling horizontally on the landing here, and given his limited patrol it can be quite tricky to approach him covertly. There are two strategies you can employ to progress to the next floor. First, you can approach the stairway in the center to get an idea of the guards current position – when he starts making his way to the left, leave the stairs and approach the left wall, waiting a few seconds for the guard to reach the end of his patrol before you begin climbing the stairs again.
When you’re ready to continue, we’ll head to the north through the doorway as we approach the stairs leading to the Mid Deck. You’ll find one final guard patrolling horizontally on the landing here, and given his limited patrol it can be quite tricky to approach him covertly. There are two strategies you can employ to progress to the next floor. First, you can approach the stairway in the center to get an idea of the guards current position – when he starts making his way to the left, leave the stairs and approach the left wall, waiting a few seconds for the guard to reach the end of his patrol before you begin climbing the stairs again.
If you’ve timed this out well, you’ll begin ascending the stairs just as the guard turns to the right and continues his patrol, giving you enough time to approach him covertly from behind and assassinate him with the Falcon 2 before he’s reached the eastern wall. Once you’ve dealt with the guard, it’s just a case of climbing the remaining stairs and heading to the east when you’ve arrived at the final landing. If this stealthy setup proves to be too difficult however, you can choose to employ the second strategy, where you’ll approach the staircase to get an idea of the guards position and then sprint up the stairs as quickly as possible to progress to the Mid Deck.
If you’re fast enough, the guard won’t be able to hone in on your position before you have the chance to climb both set of stairs and exit to the east.