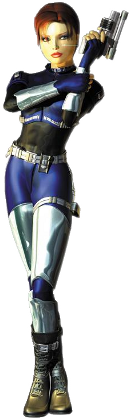
Chapter 1-2: Search & Rescue

Navigation:
Chapter 1: Carrington Institute Training
-1-1: Basic Training
-1-2: Search & Rescue
-1-3: Stealth Training
-1-4: Advanced Training
-1-5: Final Test
Chapter 2: The Jungles of South America
Chapter 3: dataDyne Cybernetic Manufacturing
Chapter 4: dataDyne Operations Base/Crash Site
Chapter 5: Captive aboard the Pelagic I
Chapter 6: Carrington Institute HQ
Chapter 7: Perfect Dark GBC Secrets and Extras
CARRINGTON INSTITUTE: SEARCH & RESCUE
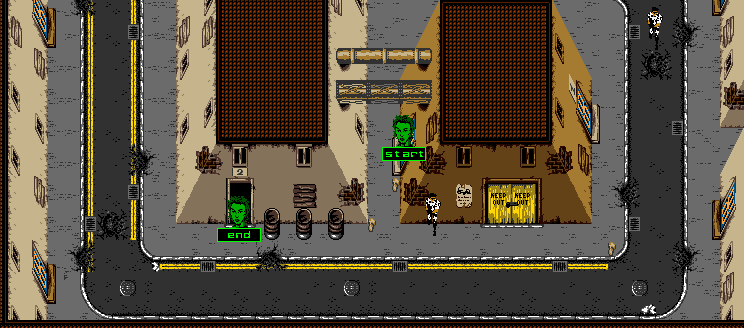
After you’ve left Basic Training, you’ll find yourself outside the building in the streets. You’ll be returning here after the end of every training assignment, so we’ve mapped out the entire area should you need it. For our purposes now however, we’re just going around the corner so the above map will suffice. From your current standing you should spot a single guard pacing back and forth; you can either choose to sneak up behind for a quick assassination or simply rush into the door to the left found after three barrels. The guard doesn’t provide any rations of health or ammunition, so once you’ve finished with this region, carry on into the door marked “2” to start the Search & Rescue assessment.
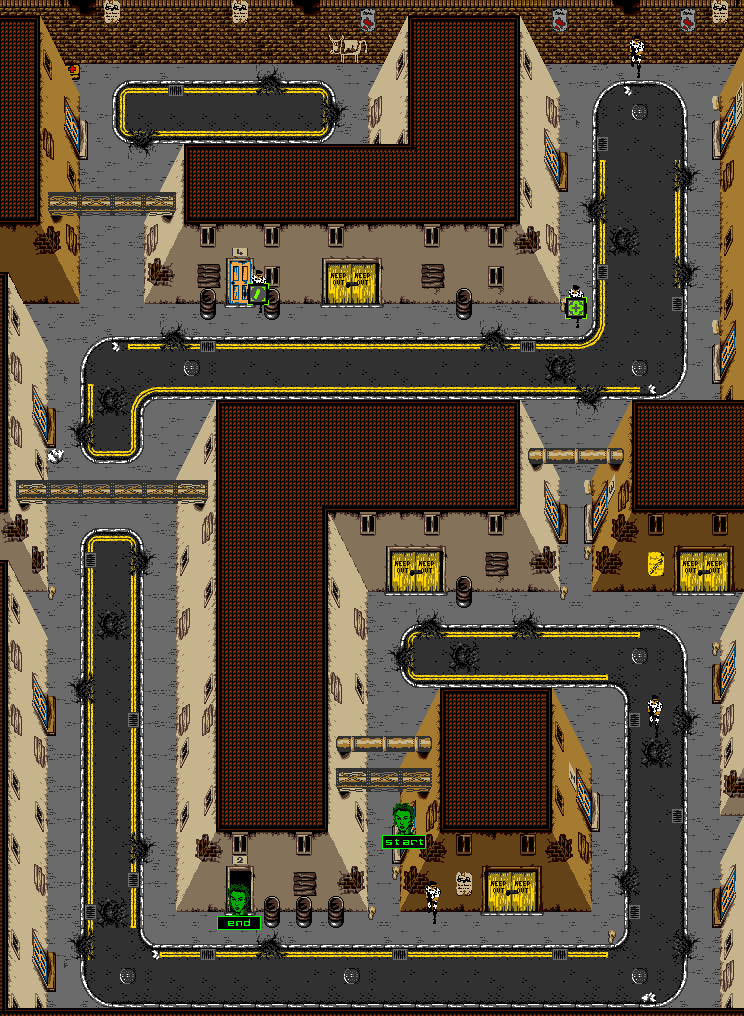
SEARCH & RESCUE: MAP OVERVIEW
MISSION OBJECTIVES:
• COMPLETE TARGET RANGES
• RESCUE HOSTAGES
• REACH EXIT
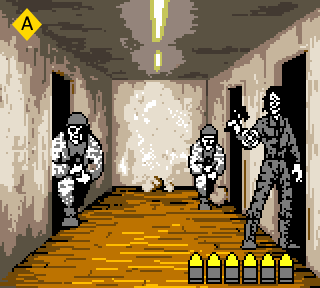
![]() Stepping through the door, you’ll be thrust into the next target range challenge. This one is set up a little bit different than the ones you’ve faced before however, as there are three doors at varying distances, and the non-descript targets have been replaced with armed soldiers. You’ll find that the crouching male soldiers present an easier mark with their wide frame, but the same isn’t true for the woman on the right; her slim frame provides a number of chances to miss your shot, especially around her waist. Try to aim for her upper body or her hips with the other soldiers in line, that way you won’t have to adjust your shot vertically.
Stepping through the door, you’ll be thrust into the next target range challenge. This one is set up a little bit different than the ones you’ve faced before however, as there are three doors at varying distances, and the non-descript targets have been replaced with armed soldiers. You’ll find that the crouching male soldiers present an easier mark with their wide frame, but the same isn’t true for the woman on the right; her slim frame provides a number of chances to miss your shot, especially around her waist. Try to aim for her upper body or her hips with the other soldiers in line, that way you won’t have to adjust your shot vertically.
You will need to make sure that you hit at least 10 of the 15 targets in order to pass this challenge – if you fail, you’ll be prompted to restart the mission from the streets, so it’s not too heady of a punishment.
Once you’ve managed to complete your target training, we’ll head north in the current room to find the first guard – take him out with a few shots of your Falcon 2 and then inspect his body to find two Falcon 2 clips.
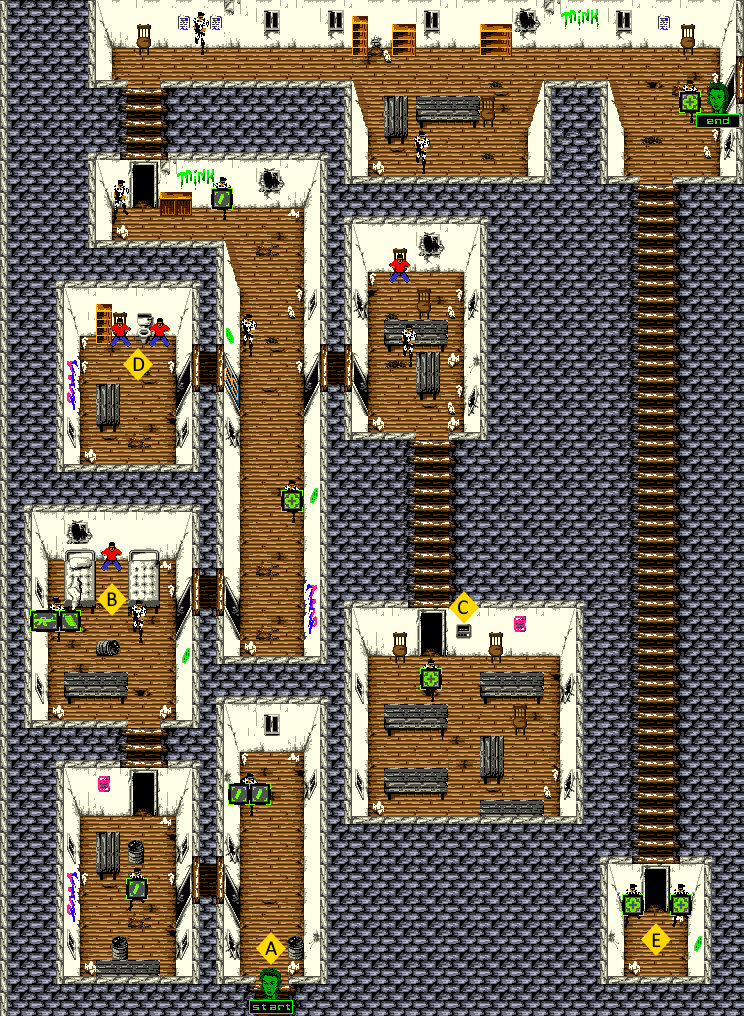
From here we’ll head south and prepare to enter the first door on the left. We’ll need to be careful not to edge in too enthusiastically, as there’s a guard standing in place that offers up an excellent vantage for a quick headshot. The guard won’t notice your approach unless you run, so be cautious as you enter the room, and line up the shot for an easy assassination. If you’ve done this correctly, the guard will drop and you’ll be able to find another Falcon 2 clip on his person. You’ll likely have Carrington interject about your mission objective in this area, which involves locating and untying captured hostages. When he’s finished speaking, head north.
The next room features two guards; one paces vertically on the left, and the other marches horizontally on the right. You should be able to use the table at the foot of the room to creep around to the left and get the jump on the vertically pacing guard – just wait until he turns around and follow him closely, taking the shot when the time is right. The second guard will likely take notice here, so finish the first guard and then get some distance before quickly dispatching him as well – if you find yourself getting low on health, we’ll be able to replenish soon. Inspecting the body of the first slain guard will reveal the MG1-16G Machine Gun and a Machine Gun clip – this weapon is good for crowd control, but it is rather noisy so we’ll pocket it for now when stealth isn’t a priority.
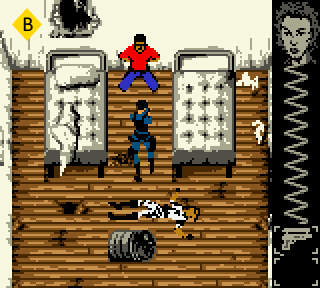
![]() After you’ve finished gathering supplies, you should notice a man in a red shirt with his hands behind his back wedged between the bed frames. This is our first hostage. Simply approach him and you’ll free him from his binds – he’ll even shout out a “Thank-you!” for your efforts. You’ll need to make sure that no danger comes to the hostages; if they’re accidentally shot and killed by guards, or from three errant Falcon 2 shots, you’ll be forced to restart the mission. Liberating all of the hostages during your campaign file will unlock secret features for the Multiplayer game, which we will take care to list in order to unlock everything that Perfect Dark GBC has to offer.
After you’ve finished gathering supplies, you should notice a man in a red shirt with his hands behind his back wedged between the bed frames. This is our first hostage. Simply approach him and you’ll free him from his binds – he’ll even shout out a “Thank-you!” for your efforts. You’ll need to make sure that no danger comes to the hostages; if they’re accidentally shot and killed by guards, or from three errant Falcon 2 shots, you’ll be forced to restart the mission. Liberating all of the hostages during your campaign file will unlock secret features for the Multiplayer game, which we will take care to list in order to unlock everything that Perfect Dark GBC has to offer.
Once you free the hostage, head out of this room to the right and you’ll find yourself in the main hall – a guard paces its length to the north on the right side – the easiest strategy to employ here is to alert him to your presence by running out behind him and then rush back to safety of the door you’ve just left. Once the guard has given chase and returned to his patrol shortly after, quickly assassinate him or fire three shots from the Falcon 2. Inspecting the guard will offer up a Med-Kit (25% Health Restore) that we’ll take immediately. You’ll need to follow the hall to the right where we’ll find the next open doorway – you may run into another guard pacing this section, if you do, simply run into the open doorway and deal with him in the same manner.
There’s nothing to find on his body, so once you’re ready to continue, we’ll approach the next room cautiously.
You should be able to spot the guard standing in place to the north-east; due to his position, there’s no way to sneak up on this guy – we’ll just need to bite the bullet and go out blazing – if you can, try to lure the guard back to the doorway and then neutralize him as soon as possible.
Having accomplished that, we’ll ignore inspecting his body and explore the north side of the room – doing so reveals the second hostage, which we’ll free and then carry on down to the south to the next doorway.
Coming through to the other side, you’ll spot a pacing guard that marches horizontally – it’s not too difficult to get behind him and follow things up with a quick assassination. Inspect his body and you’ll earn another Med-Kit (25% Health Restore). Your health should be looking a lot better than it was a few minutes ago.
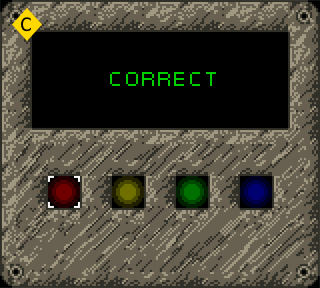
![]() The only thing left in this room is to interact with the Door Control panel to the right of the door you entered from. You’ll find that there are four buttons to press with a six key combination. The sequence will be random, so we can’t offer too much help here, just try to re-enter the combination as accurately as you can – you’ll be given two attempts before you’re presented with a new code to repeat. An easy strategy is to assign the number 1-4 for each button, and then call them aloud or write them down as you see them. After you’ve bypassed Door Control, we’ll leave the room heading north, and then get back to the hall on the left.
The only thing left in this room is to interact with the Door Control panel to the right of the door you entered from. You’ll find that there are four buttons to press with a six key combination. The sequence will be random, so we can’t offer too much help here, just try to re-enter the combination as accurately as you can – you’ll be given two attempts before you’re presented with a new code to repeat. An easy strategy is to assign the number 1-4 for each button, and then call them aloud or write them down as you see them. After you’ve bypassed Door Control, we’ll leave the room heading north, and then get back to the hall on the left.

![]() Directly across from the room that harbored the second hostage is an open doorway that had previously been locked. Since we’ve beaten Door Control, we’re free to rush inside and discover the final two hostages waiting to be rescued. The instant that you’ve manage to untie the fourth hostage, you’ll be shown the documentation proving that you’ve accomplished the Search & Rescue portion of your training objectives. There aren’t any more hostages to find in this building – the only thing left to do is to find the exit. Head back out into the hall and deal with the second guard if you haven’t done so already and then prepare for further opposition ahead.
Directly across from the room that harbored the second hostage is an open doorway that had previously been locked. Since we’ve beaten Door Control, we’re free to rush inside and discover the final two hostages waiting to be rescued. The instant that you’ve manage to untie the fourth hostage, you’ll be shown the documentation proving that you’ve accomplished the Search & Rescue portion of your training objectives. There aren’t any more hostages to find in this building – the only thing left to do is to find the exit. Head back out into the hall and deal with the second guard if you haven’t done so already and then prepare for further opposition ahead.
Heading north, you should be able to see the hallway turn to the left, with a guard that will routinely march horizontally into the corner and back again. Sneak up on the guard as he marches to the left and go in for the assassination, then inspect his body and you’ll come out with another Falcon 2 clip.
The next guard can be found guarding the door to the left of a large cabinet – as long as you don’t run or come into his line of sight, this guard will remain frozen in place. Carefully move your way around the cabinet and approach him from the side to line up your Falcon 2, and then go for the headshot when the time is right. After you’ve managed to neutralize the guard, ignore the inspection and head north through the doorway. If you’ve timed it right, you should manage to spot a guard just leaving your current position and heading east – if you’re quick (without sprinting) you can make your way behind the guard and assassinate him before he gets too far away. If you’ve missed your window, switch your Falcon 2 to the MG1-16G and sprint after him – the rate of fire on this machine gun is so fast that the guard won’t even have a chance to react before you’ve brought him down.
From here you can either choose to switch back to the Falcon 2 to dispatch the next two guards in this area slowly, or go with the MG1-16G to rampage through the room – you will get a chance to restore your health, so the only real disadvantage is the rounds of ammunition you’ll lose (2-6 minimum for the Falcon 2 and 6 minimum for the MG1-16G). The next guard is found pacing horizontally to the south where you’ll encounter two tables. Either employ a stealthy assassination with the Falcon 2 as he heads east, or take him out with three quick bursts from the MG1-16G.
You’ll find the final guard standing in front of the exit – there is no way to be covert with this guard as he’ll see you from any angle you approach here. The only option is to approach from the front with either the Falcon 2 or MG1-16G drawn and open fire! Whatever damage you incur here should be remedied after you inspect the body, as you’ll find a Med-Kit (25% Health Restore) on his person.
If your health isn’t completely restored to 100% at this point, avoid leaving the exit to the right and instead head down to the south where a slightly hidden doorway can be found. Inside the doorway is an incredibly long hallway, it’s encouraged that you walk its length, but if you want to sprint, just take care to slow yourself before bursting through to the adjoining room when it ends.
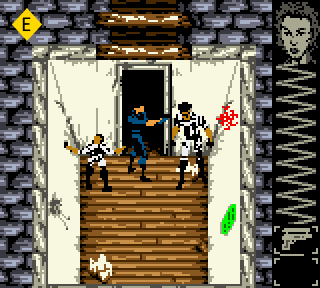
![]() Inside this secret room you’ll spot two guards standing in place on either side of the doorway. If you’re wielding the MG1-16G, go back to your inventory and switch it out for the Falcon 2. When you’re ready, enter the room so that you’re of equal height to the guards and then quickly face left, fire, and then face right and fire! If you’ve done this correctly, Joanna will assassinate both guards in quick succession with impressive flair. Inspecting the bodies will each offer a Med-Kit (25% Health Restore) that will get you back to 100%. Sprint back through the hallway and then head right through the exit to finish the objective.
Inside this secret room you’ll spot two guards standing in place on either side of the doorway. If you’re wielding the MG1-16G, go back to your inventory and switch it out for the Falcon 2. When you’re ready, enter the room so that you’re of equal height to the guards and then quickly face left, fire, and then face right and fire! If you’ve done this correctly, Joanna will assassinate both guards in quick succession with impressive flair. Inspecting the bodies will each offer a Med-Kit (25% Health Restore) that will get you back to 100%. Sprint back through the hallway and then head right through the exit to finish the objective.