GoldenEye 007 Walkthrough 4-1: Frigate


Navigation:
Mission 1: Arkangelsk
Mission 2: Severnaya
Mission 3: Kirghizstan
Mission 4: Monte Carlo
– 4-1: Frigate
Mission 5: Severnaya
Mission 6: St. Petersburg
Mission 7: Cuba
Mission 8: Teotihuaca’n
Mission 9: el-Saghira
MISSION 4: MONTE CARLO – STAGE 1: FRIGATE
Objectives:
1- Rescue the Hostages (Agent)
2- Disarm the Bridge Bomb (Secret Agent)
3- Disarm the Engine Room Bomb (Secret Agent)
4- Plant the Tracking Bug on the Helicopter (Agent)
M. Briefing: This is the best chance we’ve had in years to get a lead on Janus. The French are prepared to play along with an entrapment scenario. We need you to place a tracker on the Pirate so that we can trace its movements after Janus steals it. This must go smoothly, 007, if the press gets a sniff of this, we’ll all have egg on our faces.
Q Branch: The French have kindly given us technical details of the Pirate so I’ve managed to convert this tracker bug into quite a clever little chap. It’s undetectable and it locks out all weapon firing commands.
Janus is also threatening to blow up the ship. They are most likely to have placed explosives on the bridge and in the engine room. Take care, 007, and be certain to use the bomb defuser correctly.
Moneypenny: Xenia Onatopp, one of Janus’ main operatives may be on board the La Fayette.
They say she has thighs of steel, James. Just be sure to stay out of their grasp.
![]() MISSION 4: MONTE CARLO – STAGE 1: FRIGATE – MAPS
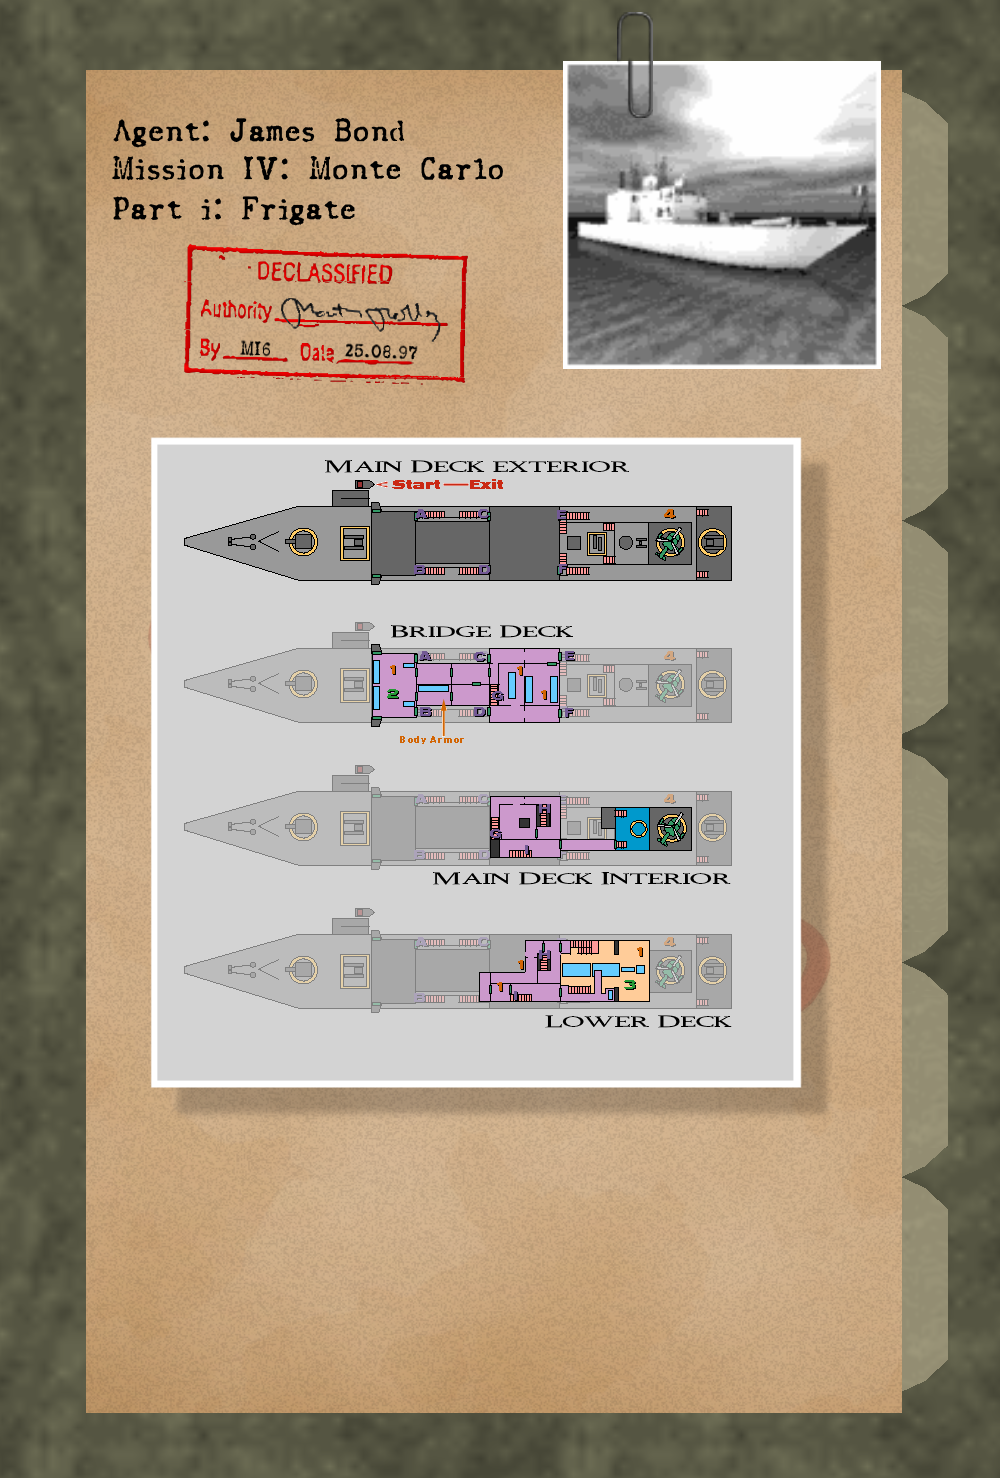
MISSION 4: MONTE CARLO – STAGE 1: FRIGATE – MAPS
These declassified maps from MI6 give a satellite view of the Frigate – our intelligence has also taken great care to provide internal blueprints for any area that our cameras haven’t been able to peer inside of, giving you complete visibility of every location in your mission. Crucial provisions like Body Armor and hidden Weapons have also been detailed inside the dossier, along with other points of interest during the assignment.
Click here to expand the dossier and take a closer look at the maps provided within.
You may use these maps before the mission starts to familiarize yourself with the region, and refer to them throughout as you need them.
Good luck, 007!
FRIGATE ‘LA FAYETTE’, MONTE CARLO
Climb out from your mini-boat and board the frigate. This place is a chaotic mess of hallways and stairs, so the following directions will be merely one way of accomplishing all these tasks. Find the two stairways to your left. Go up the left one and walk through the door. Eliminate any guards inside. Turn right from where you walked in and go through the door. You’ll walk into a hallway with more soldiers, so be ready. Pass through.
Next will be the bridge. In here is your first hostage to free. Open the door but do not walk in (they don’t react until you enter). Shoot only the soldier who is aiming a gun at the poor seaman. Everyone else will turn to shoot you, so step back and let each of them walk into the hallway individually to take you on. Shoot them one-by-one. Once they’re all cleared out, enter the bridge. Select the Bomb Defuser on your items menu; use it on the packaged explosive. Objective complete. It’s time to free some more hostages.
Head outside through the door on the far left of the bridge (facing forward). Walk down the stairs and ascend the other set in front of you. Walk in prepared to shoot up about three or four soldiers. Peek into the room on your left, where a hostage should be held captive. Remove his captor quickly. Go through that room and peek through the door on the right. Another hostage should be in there, so snipe him out real quick to free the third one.
Walk back two rooms to the staircase. Descend with guns a-blazing as there are bound to be enemies galore here. Go through the hallway until you see stairs on your right. Go down those. Once a few more enemies are taken out, head left and through the door. Follow this hallway, taking out soldiers and carefully liberating the hostages before you’re noticed. Once you’re through that, pass by the flight of stairs and shoot the guards nearby. Pass into the next room, which will be the Engine Room. Walk forward to the console.
Use the Bomb Defuser on it. Now that both bombs are defused, this frigate is safe! All that is left is to remove the remaining soldiers from this area. The final hostage can be found down below, so shoot the captor from a distance. Head up the stairs and leave through the door you entered from. Walk up the staircase to the left. Once upstairs, you should head backward to the door at the far end of the hall. Go through it to reach another hallway with two baddies. Kill them both and move on.
You will find yourself outside now. Find your way to the helicopter. Select the Tracker Bug from your items menu. Aim at the machine and press Z to throw it on. Once it attaches, MI6 will be able to follow the helicopter wherever it goes! Your job here is all done, so head back to the stairs on the right. Run through straight forward until you reach your boat. Walk onto it to end the mission.
Note about hostages: If you are inside the direct vicinity of a hostage, don’t stand there too long or he will be executed. Shoot the captor before doing anything to free him. Nobody else will harm the poor victim, so watch your fire. Sometimes you will notice that elsewhere on the ship a hostage has escaped. That means that the person holding the hostage down has left his post to go find you. This is a blessing and a curse. Also, there are a total of six hostages on La Fayette. Not every single one needs to be liberated. The number of hostages that must survive depends on the stage difficulty.