GoldenEye 007 Walkthrough – 3-1: Silo


Navigation:
Mission 1: Arkangelsk
Mission 2: Severnaya
Mission 3: Kirghizstan
– 3-1: Silo
Mission 4: Monte Carlo
Mission 5: Severnaya
Mission 6: St. Petersburg
Mission 7: Cuba
Mission 8: Teotihuaca’n
Mission 9: el-Saghira
MISSION 3: KIRGHIZSTAN – STAGE 1: SILO

Objectives:
1- Plant Bombs in the Fuel Rooms (00 Agent)
2- Photograph the Satellite (Agent)
3- Obtain Telemetric Data (Secret Agent)
4- Retrieve the Satellite Circuitry (Secret Agent)
5- Minimize Scientist Casualties (Agent)
M Briefing: Infiltrate the silo and ascertain what is being placed into orbit; if it is the satellites, recover their control circuitry and sabotage the launches. You are authorized to destroy the base if necessary. This is a matter of international security, 007. Consider the military personnel expendable.
Q Branch: The layout of the missile silo means that a few carefully placed explosive charges will destroy the entire complex – concentrate on the fuel rooms (H4, C3, K2 and A1). 007, remember to treat the timed explosives with respect – you know what happened to 004 in Beirut. Oh, and get me a picture of the satellite, there’s a good chap.
Moneypenny: You leave at 1800 hours for Bishkek. James, just imagine those romantic nights in the steppes. Lying beneath the stars, the campfires twinkling on the hills – sounds like heaven. When you’re in the arms of some dusky maiden, spare a thought for poor old me cooped up behind a desk in rainy London.
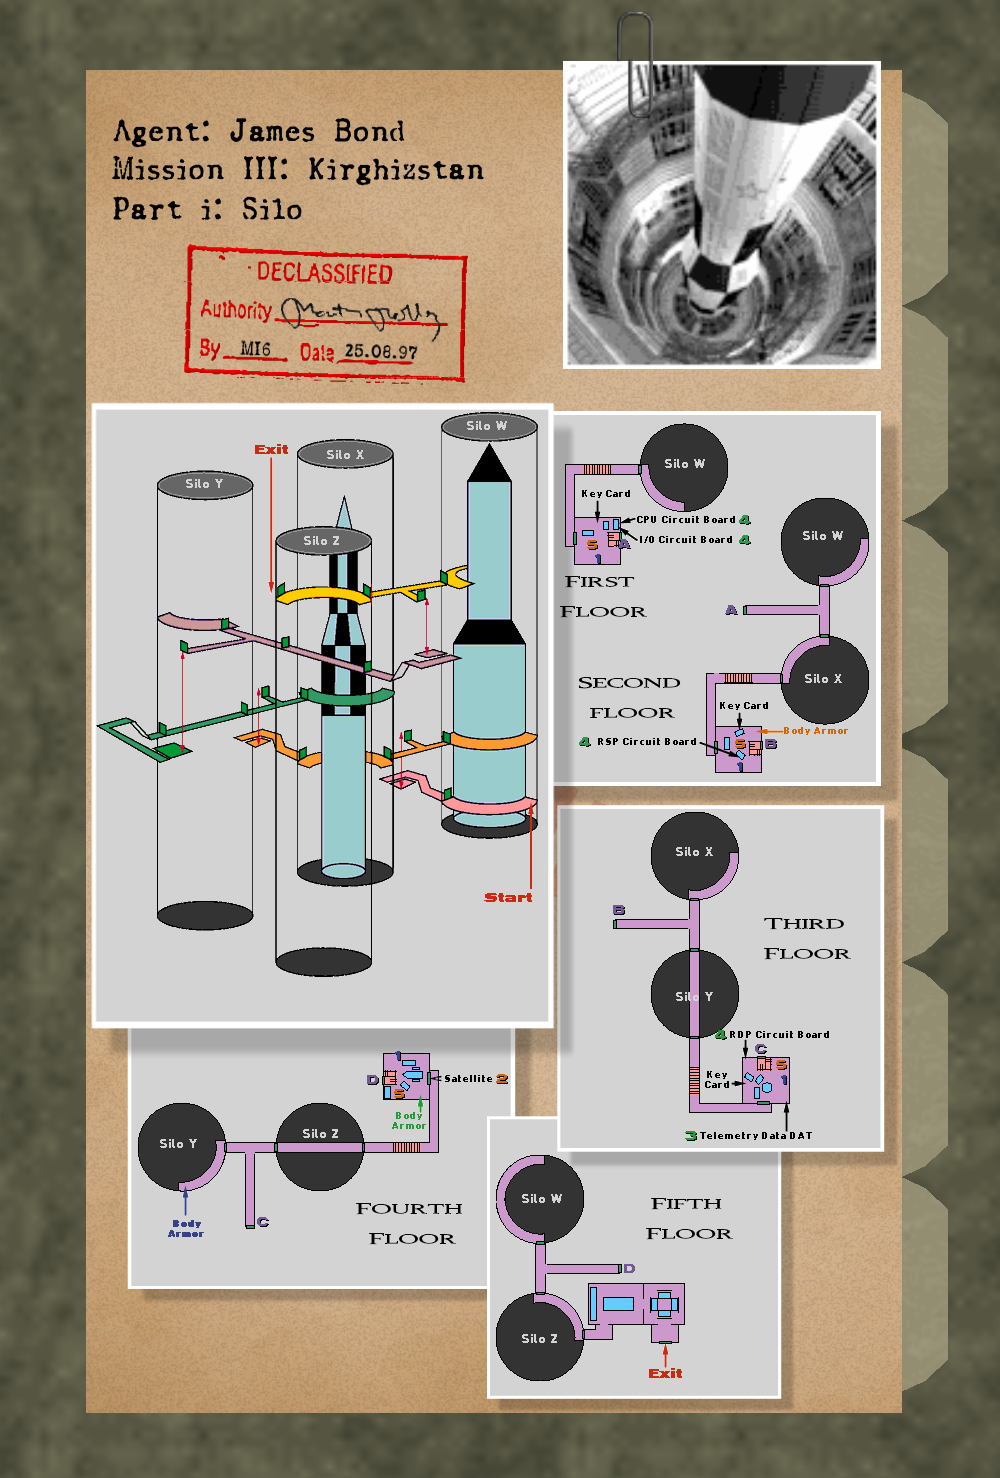
![]() MISSION 1: KIRGHIZSTAN – STAGE 1: SILO – MAPS
MISSION 1: KIRGHIZSTAN – STAGE 1: SILO – MAPS
These declassified maps from MI6 give a satellite view of the Silo – our intelligence has also taken great care to provide internal blueprints for any area that our cameras haven’t been able to peer inside of, giving you complete visibility of every location in your mission. Crucial provisions like Body Armor and hidden Weapons have also been detailed inside the dossier, along with other points of interest during the assignment.
Click here to expand the dossier and take a closer look at the maps provided within.
You may use these maps before the mission starts to familiarize yourself with the region, and refer to them throughout as you need them.
Good luck, 007!
LAUNCH SILO #4, KIRGHIZSTAN
You find yourself at the base of Launch Silos #1 through #4. This stage is very linear so directions should be understood. There are more soldiers here than you could believe, so get ready for an onslaught of gunfire. The biggest challenge of this stage is the amount of enemies, not the objectives, so be informed of that.
After the first corridor of enemies, the first room will have a keycard (just point your gun at a scientist and he will drop it), two chips of Satellite Circuitry, and a place for setting explosives. Keep in mind that on 00 Agent, you must set explosives in each fuel room where there is a small explosives insignia (you’ll know it when you see it). For now, move ahead.
Head to the second floor and kill more people. Take a right and head past the next silo and through another hallway filled with soldiers. In this next fuel room, there will be more circuitry to collect, more scientists to avoid, and explosives to place. Check the corner for Body Armor, too. Continue on once you get the Key Card.
Make your way through yet another corridor of rifles. Head to the right and on for even more and more. Once you hit the next fuel room, there will be the last circuitry board to collect, the telemetry data chip, and the Key Card. Move on ahead to a fourth set of hallways packed to the brim with poorly-trained Russian troops left over from an old regime. There will be body armor to the left, which you will need when heading right into more gunfire. If you survive into the next fuel room, you might notice the namesake of this little game.
Grab your camera and snap a shot of the GoldenEye satellite, which is proof that Ourumov has stolen it and has betrayed all of Russia! Plant another C4 charge and move on. Now you will reach the final stretch of the stage. Here, General Ourumov himself is on the run, so take out all his minions first and damage him. You cannot kill him, but you can make him drop his briefcase as he runs off. Follow him to the left, and into the control room with lots of explosive computers. There will be a fair number of soldiers here, but if you can manage to make it past them and to the elevator, this mission will be yours!