GoldenEye 007 Walkthrough – 1-2: Facility


Navigation:
Mission 1: Arkangelsk
– 1-1: The Dam
– 1-2: Facility
– 1-3: Runway
Mission 2: Severnaya
Mission 3: Kirghizstan
Mission 4: Monte Carlo
Mission 5: Severnaya
Mission 6: St. Petersburg
Mission 7: Cuba
Mission 8: Teotihuaca’n
Mission 9: el-Saghira
MISSION 1: ARKANGELSK – STAGE 2: FACILITY
Objectives:
1- Gain Entry to Laboratory Area (Agent)
2- Contact the Double Agent (Secret Agent)
3- Rendezvous with 006 (Agent)
4- Destroy the Tanks in the Bottling Room (Agent)
5- Minimize Scientist Casualties (Agent)
M Briefing: You’ll be working with 006 on this assignment, the bottling room is the rendezvous point. Don’t forget to contact our double agent scientist before you leave, and warn him to get out. He will provide you with a decoder for the final security door. There are no women or casinos for a thousand miles, 007, so even you will be able to concentrate on this mission.
Q Branch: Now listen carefully, Bond. Those bombs will be armed as soon as the last one is set. Don’t be too close when you set them off or you’ll go up in flames as well, and while you’re at it, please try and bring back that door-opener undamaged for once. Too much rough handling like the last mission and it might go wrong at a bad time. Honestly 007, sometimes I think you damage your equipment on purpose.
Moneypenny: These chemicals could prove to be a match even for your pheromones, James. Don’t take too many risk.
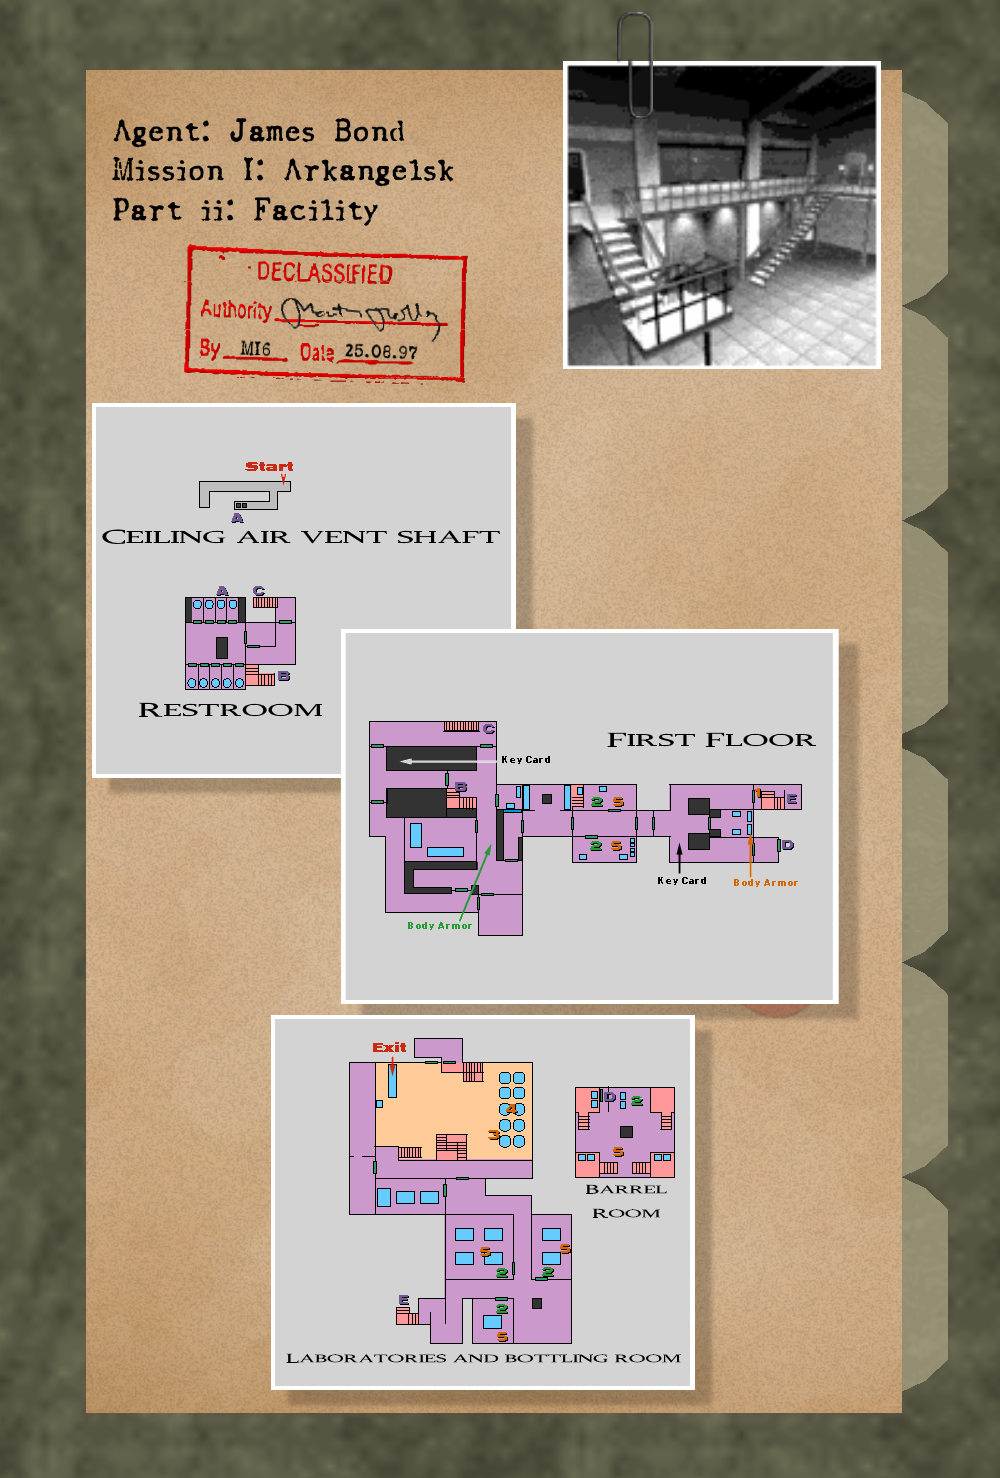
![]() MISSION 1: ARKANGELSK – STAGE 2: FACILITY – MAPS
MISSION 1: ARKANGELSK – STAGE 2: FACILITY – MAPS
These declassified maps from MI6 give a satellite view of the Facility – our intelligence has also taken great care to provide internal blueprints for any area that our cameras haven’t been able to peer inside of, giving you complete visibility of every location in your mission. Crucial provisions like Body Armor and hidden Weapons have also been detailed inside the dossier, along with other points of interest during the assignment.
Click here to expand the dossier and take a closer look at the maps provided within.
You may use these maps before the mission starts to familiarize yourself with the region, and refer to them throughout as you need them.
Good luck, 007!
CHEMICAL WARFARE FACILITY #2, SEVERNAYA
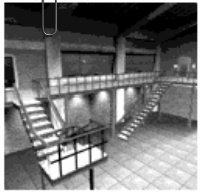
After a brisk base jump from atop the Dam, Bond descends towards a ventilation shaft and makes his way inside. Now that he’s managed to access the Arkanglesk Chemical Facility, Bond will have to navigate his way through the heavily restricted area to rendezvous with his partner, 006 who waits in the Bottling Room on the opposite end of the building. Such is the day in the life of a secret agent, and Bond should manage it in spades. From where you start off in the claustrophobic ducts here, you’ll need to crawl forward and then stick to the left hand side to find your window of opportunity. Be sure to watch where you step as you progress, as the opening of the shaft descends towards the Facility washroom. Before you jump out of the shaft and into the toilets, you should manage to spot a guard that’s occupying the stall to the right; take this time to squeeze off a silent shot and you’ll be hindered by one less guard as you drop down into your stall. There are four armed guards in total taking a quick break here in the bathroom, so take them by surprise by swinging their stall doors open and eliminate them one by one with your standard issue PP7.
Once you’ve managed to clear out the Facilities facilities, leave the lavatory and then open a second door that will take you into the main hallway. You’ll find guards patrolling the halls and be posted at almost every corner below your current position, so stealth is essential in gaining the upperhand. Take charge by shooting the first guard you see walking down the hallway below before he sees you, then head through the door to your immediate left and shoot the next guard below as you come out the other side. Go down the stairs here and you should manage to spot another door to the left; around the corner you’ll spot another guard facing the main hallway. Take him out quickly with a quick shot to the back of the head and he’ll drop something as he crumples to the floor. Walk over top of the object and you’ll obtain Clearance B Key Card which will grant us access to previously restricted areas of the Facility. Walk through the door that the guard was standing in front of and you’ll manage to spot a second door just ahead that our newly acquired Key Card will unlock for us.
For this next bit we’ll need to draw the KF7 Soviet Rifle that we’ve picked off one of the guards and then open the Key Card Door ahead. Be on your toes as the door opens, as you’ll need to open fire on the three unsuspecting Russian soldiers occupying these cramped quarters; if you’re quick on the trigger you should manage to off all three unsuspecting soldiers before they’re even alerted to your presence. Avoid shooting the large console to your right, as you’ll need to activate it to open a door on the other end of the Facility. Once the guards have been gunned you’ll need to get ready to run; activate the console with B and then charge back out into the main hallway. Run down the hallway to your left and stick to the left hand side, doing so will allow you to pick up the Body Armor atop a crate before you finish your stretch by rounding the corner to the left. If you’ve made it in time, you should manage to squeeze through the active door in the corner here. If it’s locked, you’ll need to activate the console again.
Once you’ve managed to charge through the console door in time, you’ll be tasked with opening the door just ahead to find yourself in a small area with a set of lockers to the left. Take out the two oblivious Russian soldiers in this area and then walk over their remains to replenish your supply of KF7 Soviet bullets; you’ll need as full a clip you can manage for the next area. When you’re ready, rush through the door ahead to the long hallway and you should manage to meet three more Russian soldiers head-on. If you need to take cover, the pillars to your right and left will provide you ample time to shelter yourself before taking them out quickly with gratuitous use of your KF7 Soviet Rifle. Once you’ve taken them all out, be sure to walk over their remains for some more KF7 Soviet Rifle Bullets. Before taking off down the center hallway here, take note of the two rooms to your right and left here. If you can’t find the Double Agent ahead, you’ll need to come back to this location and enter the rooms to find him, so keep that in mind.
Once you’ve made your way through the door at the end of the hall, you’ll need to open a second door that leads to a split path with a door in the center. Be on your toes as you’ll be assaulted by soldiers from both directions, it’s best to stick by the door you’ve just came through and let the soldiers come to you so you can pick them off as they show up. Once you’ve managed that, you’ll need to head towards the central door in the middle of the path which opens up to a large windowed room. You’ll spot two consoles similar to the one we came across in the first portion of the Facility, and some Body Armor to get you patched up. The console on the right side unlocks the mechanized door to the right – but doing so will only lead to a dead end with a few Russian soldiers and possibly the Double Agent, but we’ll come back to him if he’s not up ahead. Instead, activating the left console will unlock the mechanized door to the left, which will allow us to progress farther into the Facility.
Akin to the previous mechanized console door, we’ll have to rush through to the opposite side as quickly as possible. Once you’ve activated the left console, head back out into the split hallway and sprint to the right (originally left when entering the first time), round the bend and get through the door.
Unlock the door to the left and run through. You have now reached the laboratory area of the facility. Be on your toes for guards. It may take you a while to shoot through them, but once you reach the glass lab rooms, the scientists will run away from you, all except for Dr. Doak. If the double agent is not in any of these three rooms, then he will be back in the Barrel Room, or the two parallel Tank Rooms. Once you have the Door Decoder from him, move forward.
You’ll be met with the Bottling Room door. On Agent, this is simply unlocked, but on Secret Agent and 00 Agent, you require the Decoder to unlock the door. Select it from the items menu and use it will Z. Once unlocked, enter the room. The huge gas tanks here contain all of the Russian army’s toxic bioweapon! Downstairs you will find 006, and after you get close to him some witty dialogue will be shared. Your job now is to set explosive mines on the tanks to blow them up as you leave. Think of these tanks as two rows of five. Plant five mines so that each one placed on one row will incinerate two tanks.
Before this can be done, however, you are detected! The infamous General Ourumov has been informed of MI6’s presence here, and has flooded the Bottling Room with Russian soldiers. 006 cannot fight them off, and surrenders. Ourumov is holding a gun to your friend’s head and will pull the trigger momentarily! What can you do?
When you’re away from the tanks, detonate the mines and send everyone here to kingdom come. You can escape on the far side of the room on the conveyor belt or the sets of doors. It doesn’t make a difference.
Note: One objective states to minimize civilian casualties. In this case, the morally ambiguous scientists are considered civilians. If you kill three white labcoats, you will fail the mission, so watch your fire.