Grabbed by the Ghoulies Concept and Beta Gallery
Filling the “Gallery” section of Grabbed by the Ghoulies showcases true mastery of the game; you’ll need to collect all 100 Bonus Books and then complete each Bonus Challenge with a Platinum ranking.
If you can manage this ghoulish task (made marginally easier with our Bonus Book and Bonus Challenges Guide) you’ll get a behind-the-scenes look at the development of Grabbed by the Ghoulies including early character models, scrapped Ghoulies and entire rooms that never made the cut.
All 20 pages have been included here with choice commentary providing context for each image, enjoy!

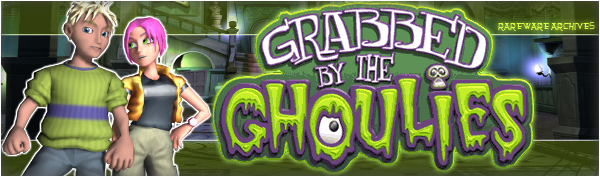
![]() Your first Platinum medal unlocks this early Ghoulies scene taken during the Gamecube development era. The first models of Cooper, Amber and a Zombie are in T-poses while Crivens remains virtually unchanged from his contemporary appearance. At this point Cooper’s name hasn’t been decided on, as Amber’s speech bubble offers, “Help me, Bud/ Chip/ Bill/ Billy Bob”, suggesting a number of alternate names that were never used.
Your first Platinum medal unlocks this early Ghoulies scene taken during the Gamecube development era. The first models of Cooper, Amber and a Zombie are in T-poses while Crivens remains virtually unchanged from his contemporary appearance. At this point Cooper’s name hasn’t been decided on, as Amber’s speech bubble offers, “Help me, Bud/ Chip/ Bill/ Billy Bob”, suggesting a number of alternate names that were never used.
[Expand “Where It Began…” Image]

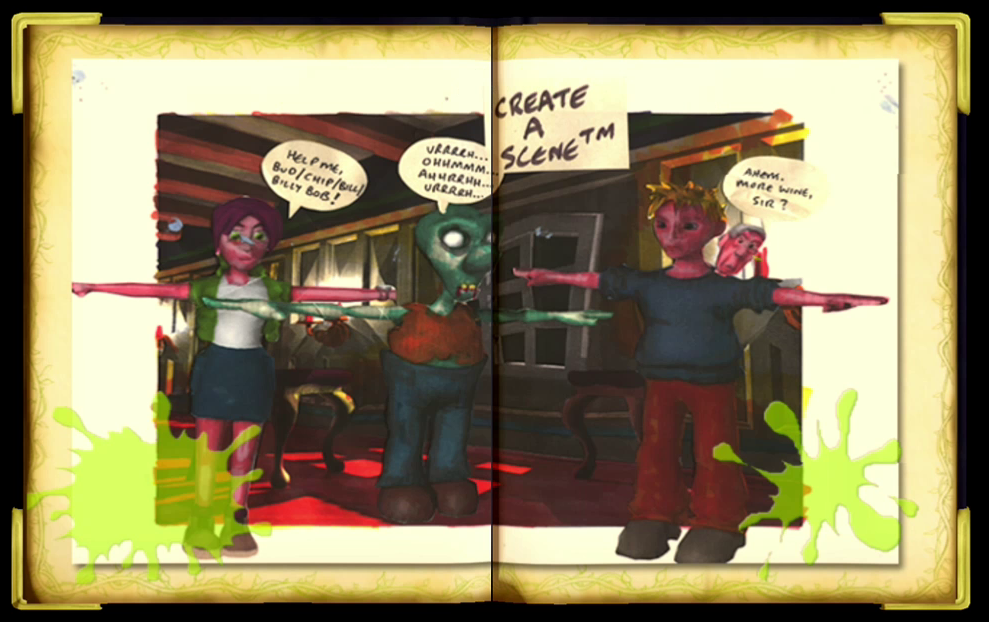
![]() Whereas Cooper’s design underwent very little change during development, Amber’s character model had at least five revisions, as evidenced by the second Platinum page. Starting things off with a mini-skirt and a small backpack before establishing her trademark vest in the second variation, it would take until our finalized version to convince Amber to try on some decidedly-less leggy wear to keep the Ghoulish stares at bay.
Whereas Cooper’s design underwent very little change during development, Amber’s character model had at least five revisions, as evidenced by the second Platinum page. Starting things off with a mini-skirt and a small backpack before establishing her trademark vest in the second variation, it would take until our finalized version to convince Amber to try on some decidedly-less leggy wear to keep the Ghoulish stares at bay.
[Expand “Amber Evolution” Image]

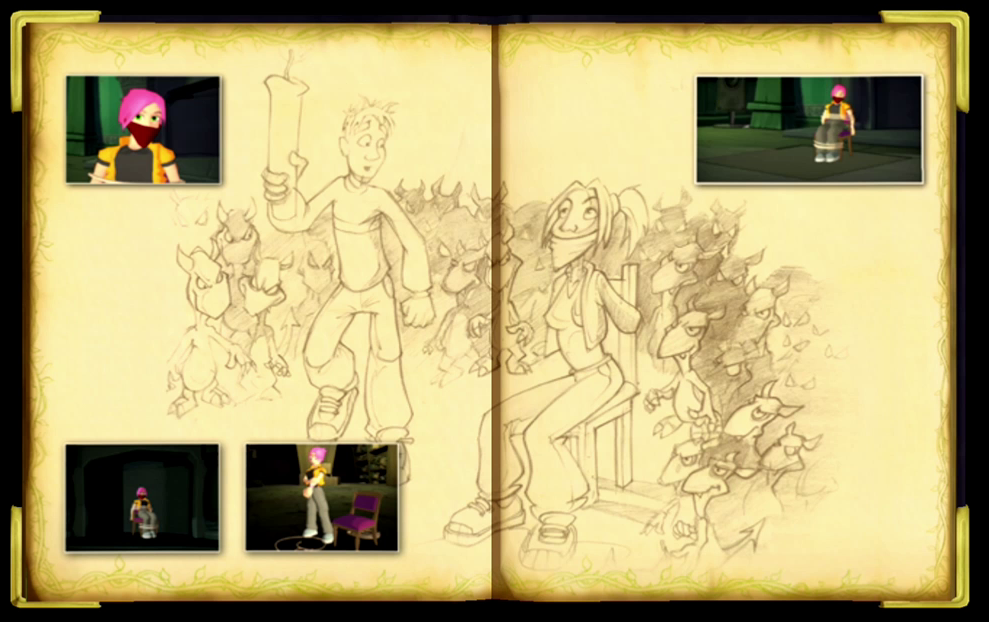
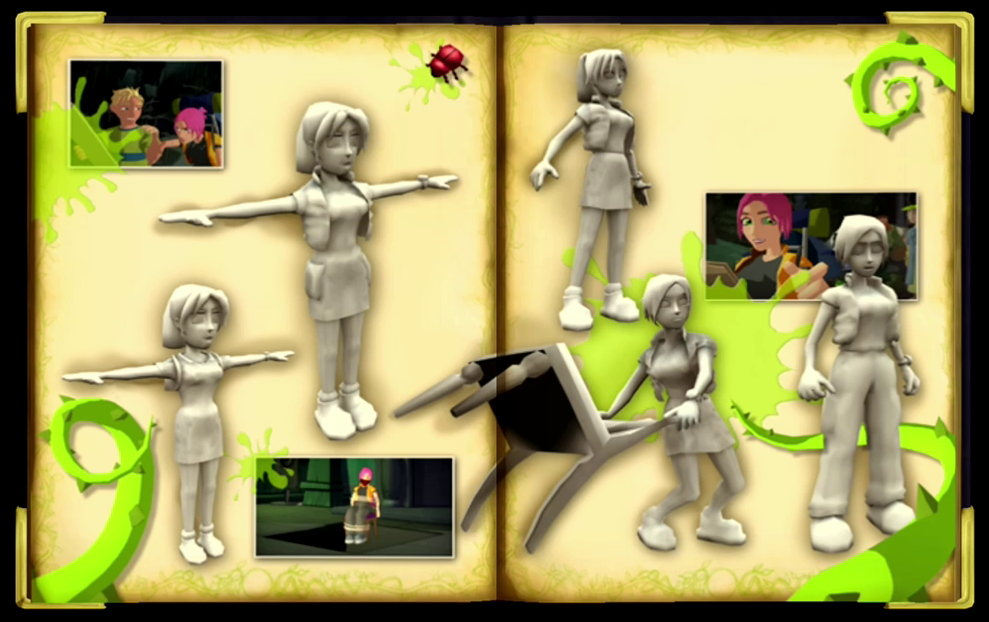
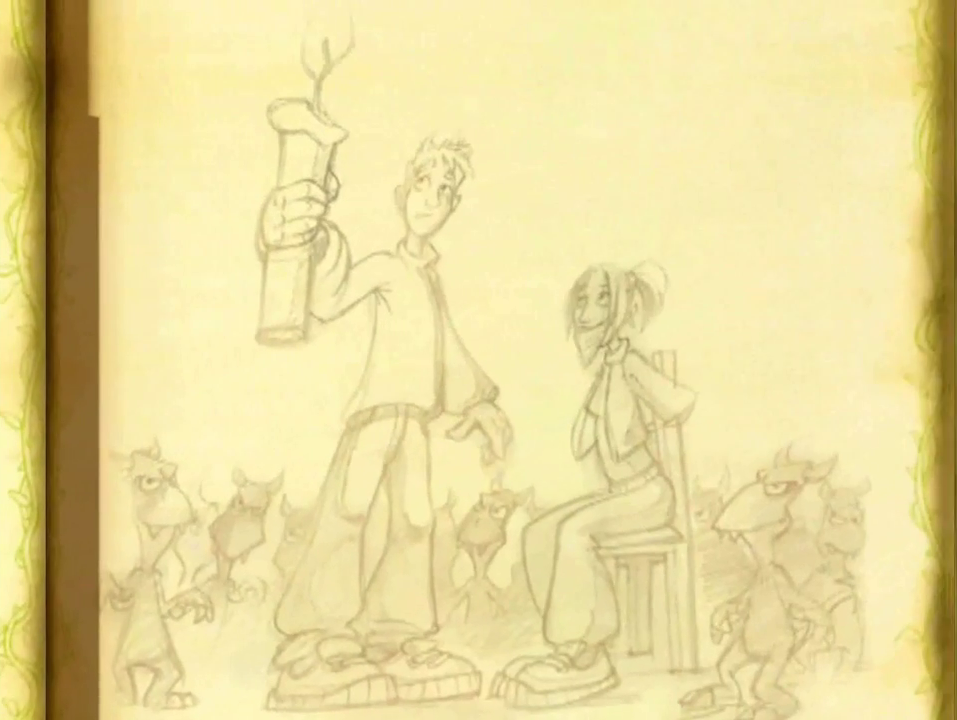
![]() As the title suggests, this Bonus Challenge page would have taken the place of the final drawing for Chapter One : The Rescue. While both sketches depict Cooper stumbling across a bound and gagged Amber amidst a crowd of sinister looking Imps, there are a variety of changes between the two versions, including a shift in perspective, a greater number of Imps and the layout of the page which stretches across the binding in the original.
As the title suggests, this Bonus Challenge page would have taken the place of the final drawing for Chapter One : The Rescue. While both sketches depict Cooper stumbling across a bound and gagged Amber amidst a crowd of sinister looking Imps, there are a variety of changes between the two versions, including a shift in perspective, a greater number of Imps and the layout of the page which stretches across the binding in the original.
[Expand “Alternate Chapter One Title Page” Image]


![]() Each cutscene in Grabbed by the Ghoulies requires its own storyboard to break down the action of the scene to establish camera angles and proper framing for the benefit of the animation later on. In this case, two pivotal scenes in Grabbed by the Ghoulies (Amber’s Transformation and The Barons Introduction) have been given a page of their own, documenting the evolution from the proposed set-up to our final version.
Each cutscene in Grabbed by the Ghoulies requires its own storyboard to break down the action of the scene to establish camera angles and proper framing for the benefit of the animation later on. In this case, two pivotal scenes in Grabbed by the Ghoulies (Amber’s Transformation and The Barons Introduction) have been given a page of their own, documenting the evolution from the proposed set-up to our final version.
[Expand “From Storyboard to Storybook” Image]

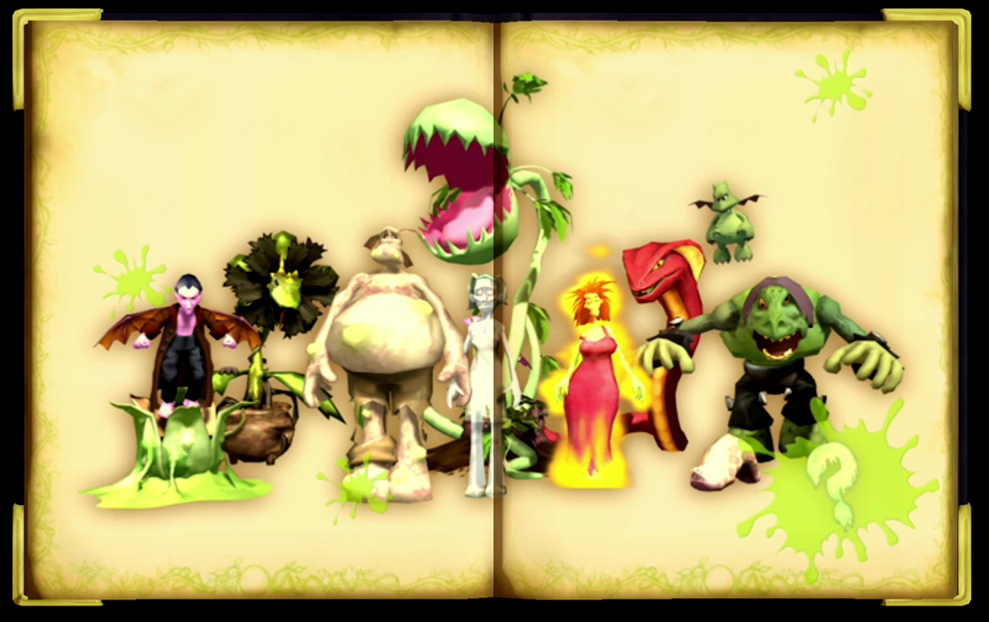
![]() As Ghoulhaven Hall is positively busting with Ghoulies, perhaps it became too full to house these unfortunate frights cut down in their prime. While Cooper would never manage to brush shoulders, elbows or knuckles with these nine Ghoulies, they did manage to appear throughout the Hall in candid portraits, statues and in the case of the bloated brute covered in boils, behind a series of bars in the Lower Corridors.
As Ghoulhaven Hall is positively busting with Ghoulies, perhaps it became too full to house these unfortunate frights cut down in their prime. While Cooper would never manage to brush shoulders, elbows or knuckles with these nine Ghoulies, they did manage to appear throughout the Hall in candid portraits, statues and in the case of the bloated brute covered in boils, behind a series of bars in the Lower Corridors.
[Expand “Missing In Action” Image]

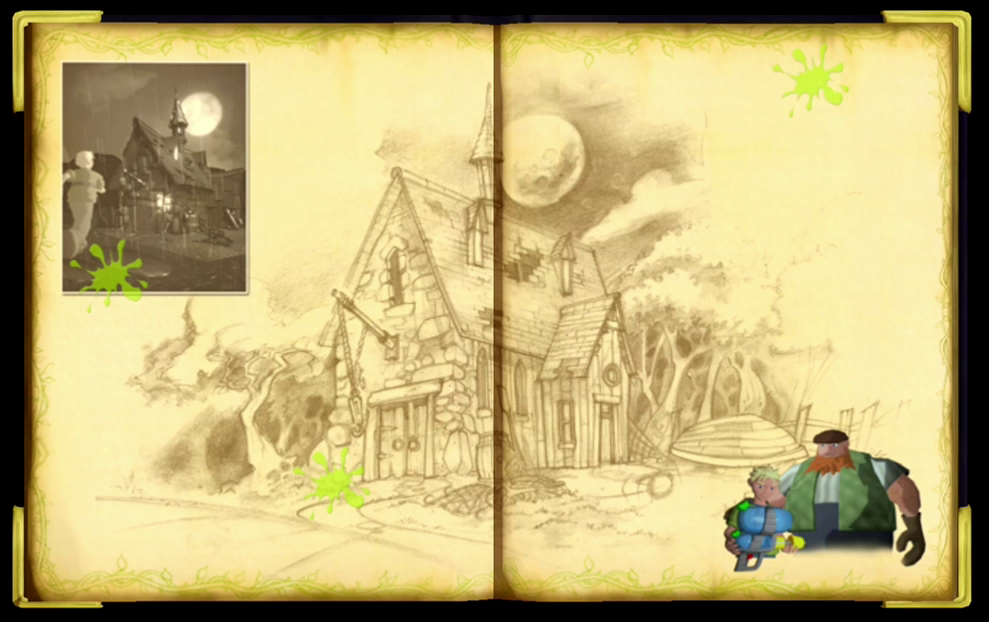
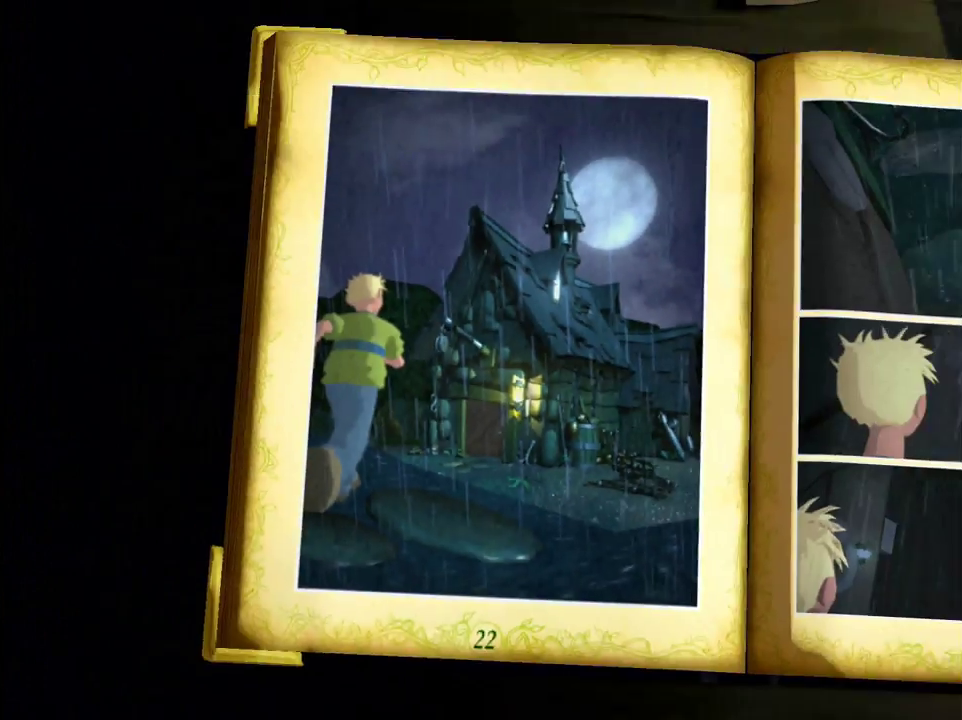
![]() Venturing away from Ghoulhaven Hall, the Boathouse is where Cooper would meet the alliterative groundskeeper, Fiddlesworth, for the first time in his adventure during the Restoration chapter. Very little has changed from this early concept sketch to the final version of the Boathouse we’re familiar with, save for a few cosmetic touches that served to reinforce the ‘no-straight-edges’ rule that Grabbed by the Ghoulies championed.
Venturing away from Ghoulhaven Hall, the Boathouse is where Cooper would meet the alliterative groundskeeper, Fiddlesworth, for the first time in his adventure during the Restoration chapter. Very little has changed from this early concept sketch to the final version of the Boathouse we’re familiar with, save for a few cosmetic touches that served to reinforce the ‘no-straight-edges’ rule that Grabbed by the Ghoulies championed.
[Expand “Boathouse Concept Sketch” Image]

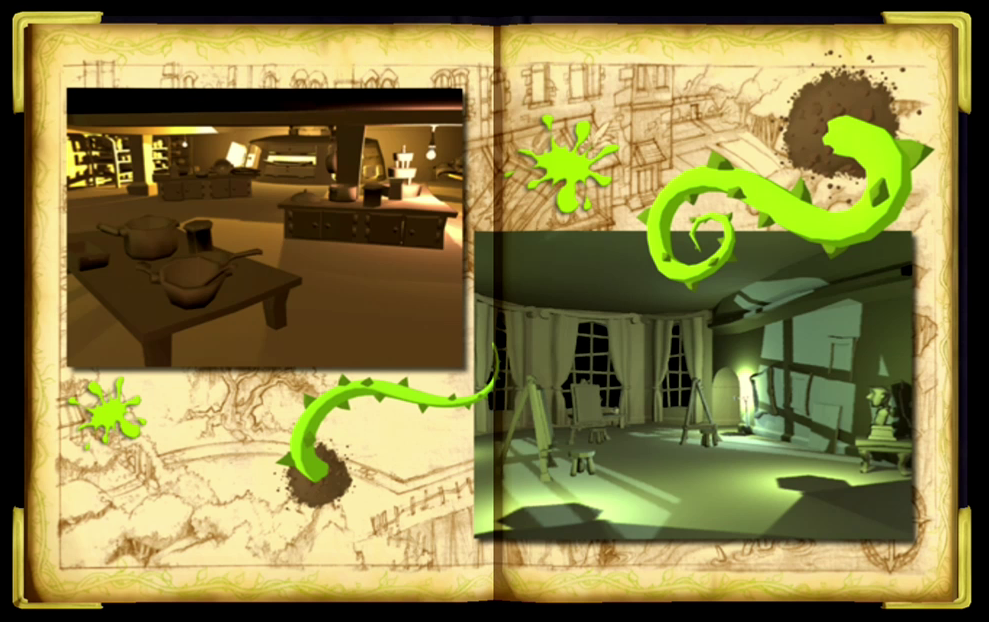
![]() After passing through the concept stage and advancing far enough to have their geography rendered out in the game, the Bakery and the Gallery were both nearly realized before it was decided to lock the doors to their respective areas forever. While we lament the chance to kick a Zombie through a canvas or send an Imp careening into a tray of pastries, we can appreciate their presence here for posterity.
After passing through the concept stage and advancing far enough to have their geography rendered out in the game, the Bakery and the Gallery were both nearly realized before it was decided to lock the doors to their respective areas forever. While we lament the chance to kick a Zombie through a canvas or send an Imp careening into a tray of pastries, we can appreciate their presence here for posterity.
[Expand “Bakery & Gallery (Unused)” Image]

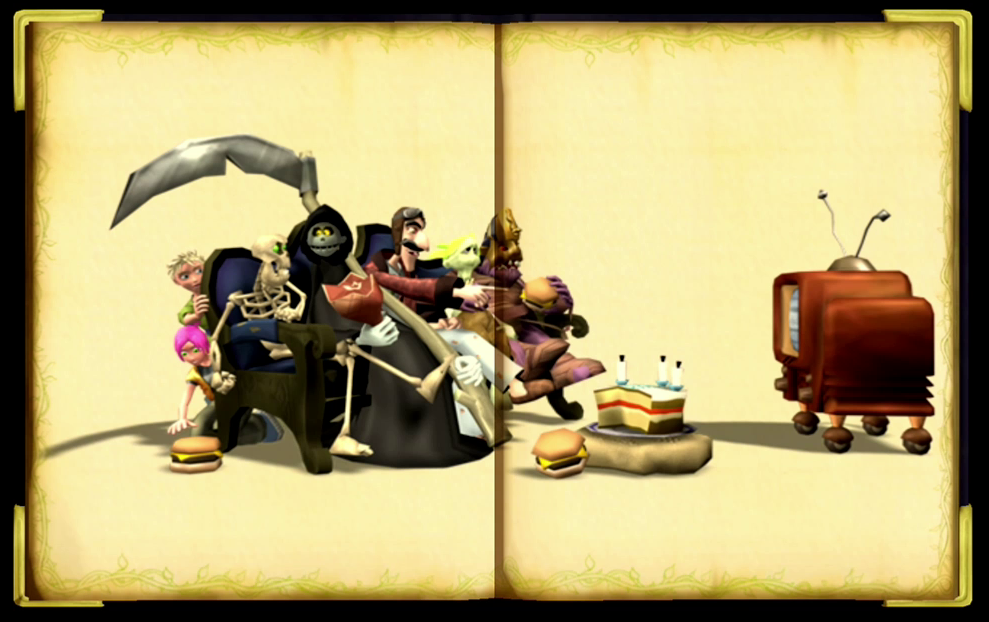
![]() Seeking to add a little bit of levity behind the scenes, these bonus promotional renders were created using assets within Grabbed by the Ghoulies and depicted events that couldn’t occur during the game. In this instance, Baron Von Ghoul, a Cursed Mummy, a Skeleton and the Grim Reaper share the couch as they watch the Haunted Television. Just behind the cushions, Cooper and Amber attempt to steal a burger…
Seeking to add a little bit of levity behind the scenes, these bonus promotional renders were created using assets within Grabbed by the Ghoulies and depicted events that couldn’t occur during the game. In this instance, Baron Von Ghoul, a Cursed Mummy, a Skeleton and the Grim Reaper share the couch as they watch the Haunted Television. Just behind the cushions, Cooper and Amber attempt to steal a burger…
[Expand “Haunted TV Dinner” Image]

![]() This concept art page showcases a handful of designs for some of the Ghoulies including a Warlock, a Mummy and Jessie N’ Clyde. Also featured is the bloated brute with boils previously featured on the ‘Missing in Action’ page – however he’s lost his trousers and has taken to prancing about in his underpants. Cooper is up to some mischief of his own, as he attempts to unwrap the Mummy and pose with a piece of the Baron’s riddle.
This concept art page showcases a handful of designs for some of the Ghoulies including a Warlock, a Mummy and Jessie N’ Clyde. Also featured is the bloated brute with boils previously featured on the ‘Missing in Action’ page – however he’s lost his trousers and has taken to prancing about in his underpants. Cooper is up to some mischief of his own, as he attempts to unwrap the Mummy and pose with a piece of the Baron’s riddle.
[Expand “Character Sketches” Image]

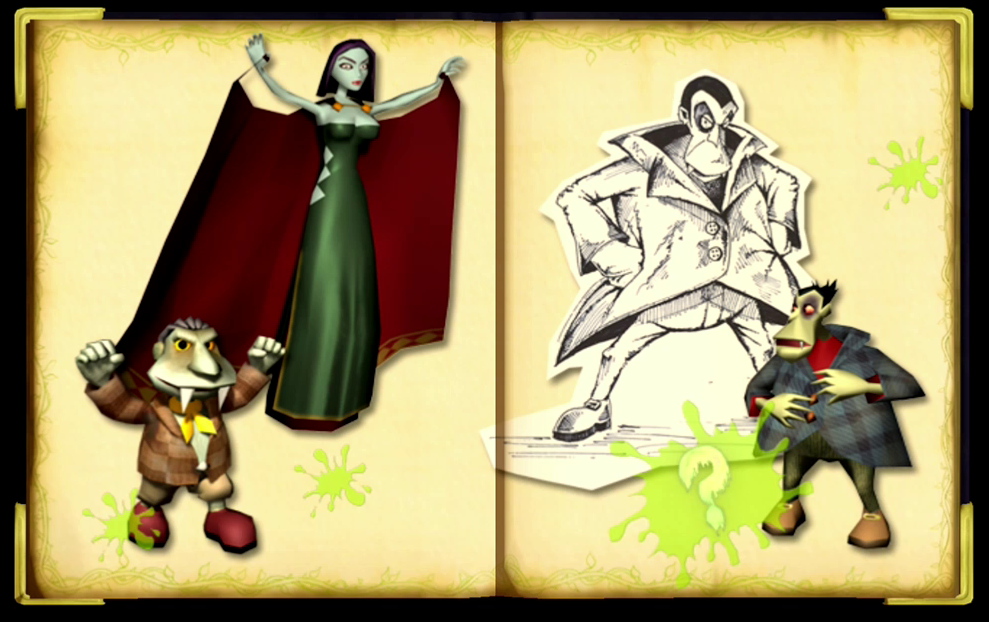
![]() Once you’ve managed to earn at least 10 platinum medals, you’ll sink your teeth into some very early Vampire character designs. Starting as a sketch, the Vampire appeared as a man wearing a oversized plaid jacket before his height was experimented with in the third variation. Swapping genders to become something of a temptress, this final design serves as the missing link to our rather ample-figured coffin-dweller.
Once you’ve managed to earn at least 10 platinum medals, you’ll sink your teeth into some very early Vampire character designs. Starting as a sketch, the Vampire appeared as a man wearing a oversized plaid jacket before his height was experimented with in the third variation. Swapping genders to become something of a temptress, this final design serves as the missing link to our rather ample-figured coffin-dweller.
[Expand “Casualties of War” Image]

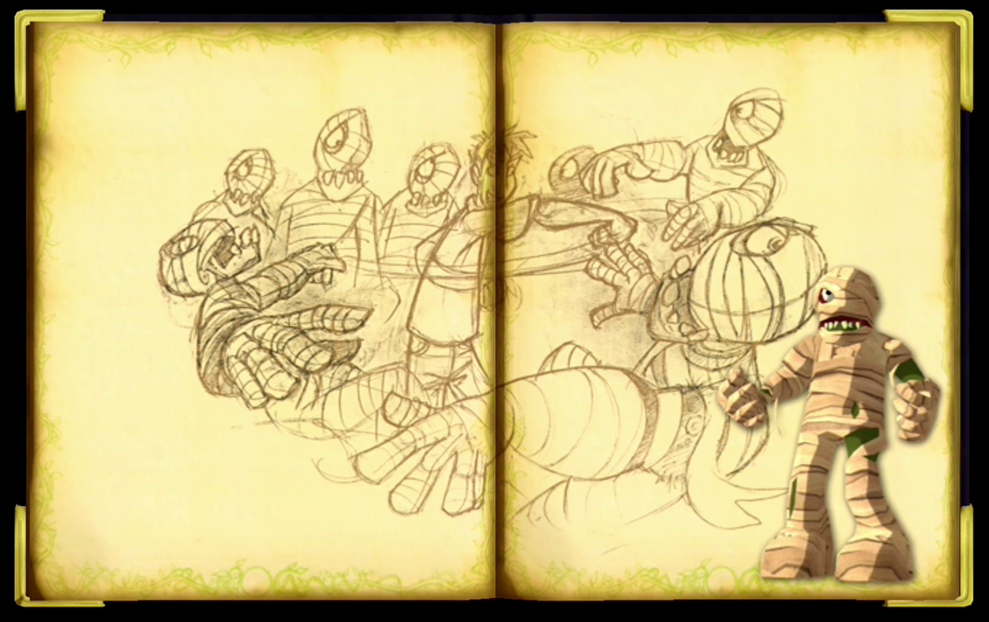
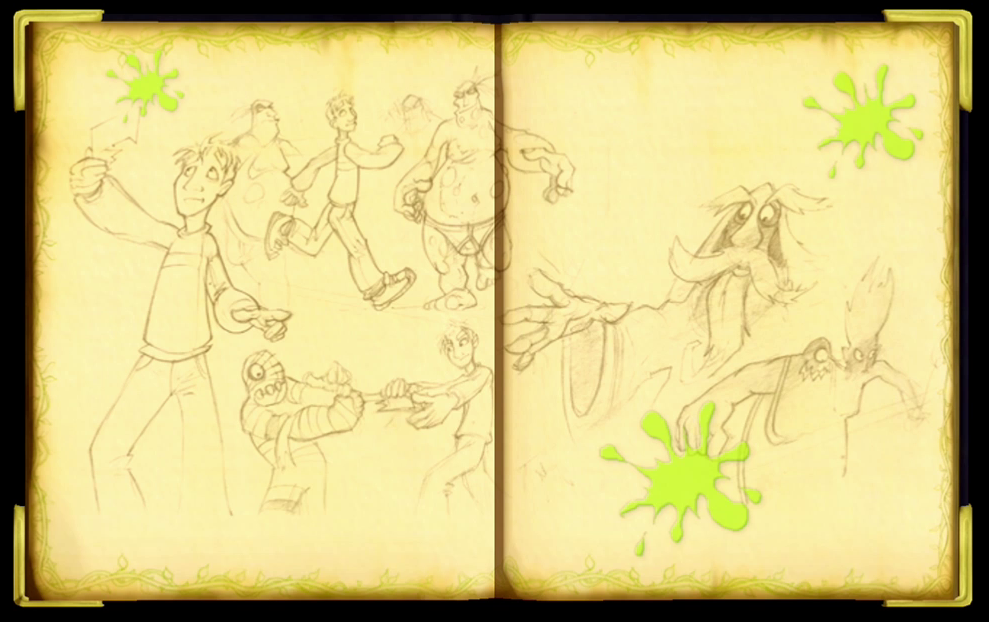
![]() Without a torch to guide him, things don’t bode too well for Cooper as he attempts to ward off a crowd of Mummies with his fists alone, though it does make for some interesting concept art. While this page may have been planned for use at some point during the adventure (in similar nature to Fiddlesworths supposed conquering of the Farmyard Ghoulies during the Restoration chapter) it has found a home proper in the Gallery.
Without a torch to guide him, things don’t bode too well for Cooper as he attempts to ward off a crowd of Mummies with his fists alone, though it does make for some interesting concept art. While this page may have been planned for use at some point during the adventure (in similar nature to Fiddlesworths supposed conquering of the Farmyard Ghoulies during the Restoration chapter) it has found a home proper in the Gallery.
[Expand “Who’s the Daddy?” Image]

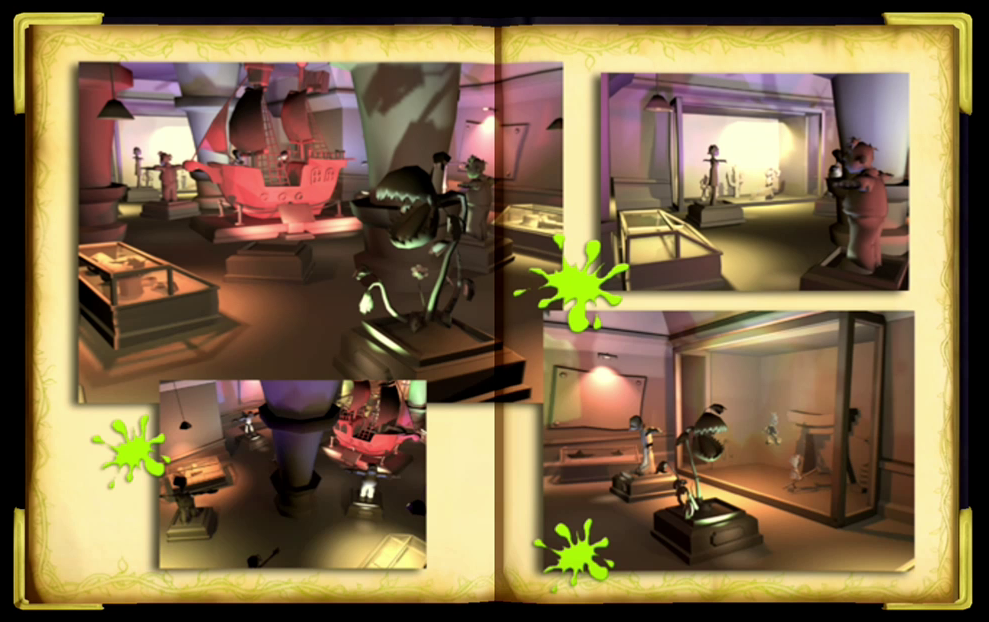
![]() Originally planned to appear next to the Gallery as a fully-realized area in Grabbed by the Ghoulies, the Museum would have featured a host of unused Ghoulies that acted as exhibits in a self-referential nod to the development of the game. Unfortunately, the Museum itself became relegated to unused status in an ironic twist of fate when the entire room was removed from Ghoulhaven Hall, taking all of its exhibits and easter eggs with it.
Originally planned to appear next to the Gallery as a fully-realized area in Grabbed by the Ghoulies, the Museum would have featured a host of unused Ghoulies that acted as exhibits in a self-referential nod to the development of the game. Unfortunately, the Museum itself became relegated to unused status in an ironic twist of fate when the entire room was removed from Ghoulhaven Hall, taking all of its exhibits and easter eggs with it.
[Expand “Museum (Unused)” Image]

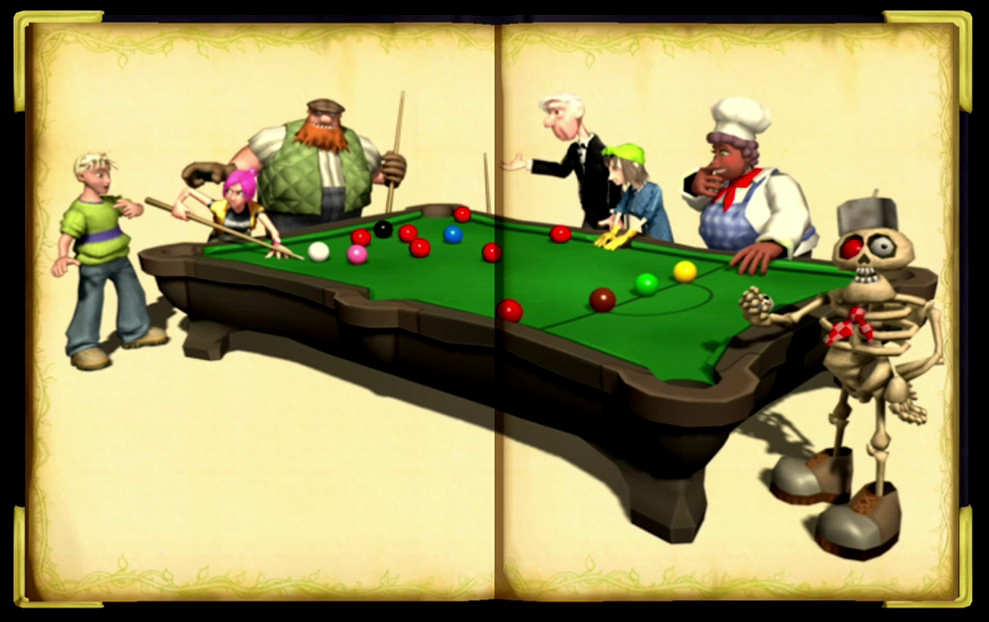
![]() In this second promotional image using Grabbed by the Ghoulies assets, the protagonists of the adventure gather around a billiards table to take in game. Cooper nearly gets an eyeful of poker as Amber readies her shot, while the rest of the Ghoulhaven Hall staff watch on with baited breath. Across the table, Mr. Ribs has replaced his own eye with a red billiard ball, leaving grisly implications to Ambers cue ball…
In this second promotional image using Grabbed by the Ghoulies assets, the protagonists of the adventure gather around a billiards table to take in game. Cooper nearly gets an eyeful of poker as Amber readies her shot, while the rest of the Ghoulhaven Hall staff watch on with baited breath. Across the table, Mr. Ribs has replaced his own eye with a red billiard ball, leaving grisly implications to Ambers cue ball…
[Expand “A Much Needed Break” Image]

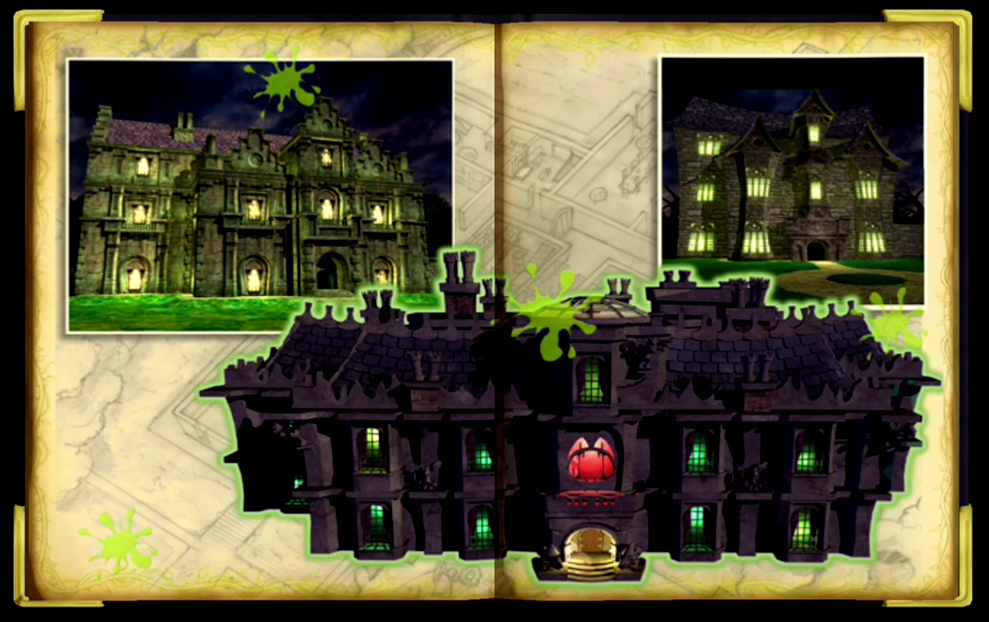
![]() Ghoulhaven Hall has undergone quite the transformation, becoming more stylized as development continued. Originally it was depicted as a traditional mansion with realistic architecture, in the second revision we can begin to see that ‘no-straight-edges’ rule in effect as the walls and roof curve inwards. Our version of Ghoulhaven Hall arrives at this natural conclusion, with a highly stylized exterior that remains iconic.
Ghoulhaven Hall has undergone quite the transformation, becoming more stylized as development continued. Originally it was depicted as a traditional mansion with realistic architecture, in the second revision we can begin to see that ‘no-straight-edges’ rule in effect as the walls and roof curve inwards. Our version of Ghoulhaven Hall arrives at this natural conclusion, with a highly stylized exterior that remains iconic.
[Expand “Mansion Evolution” Image]

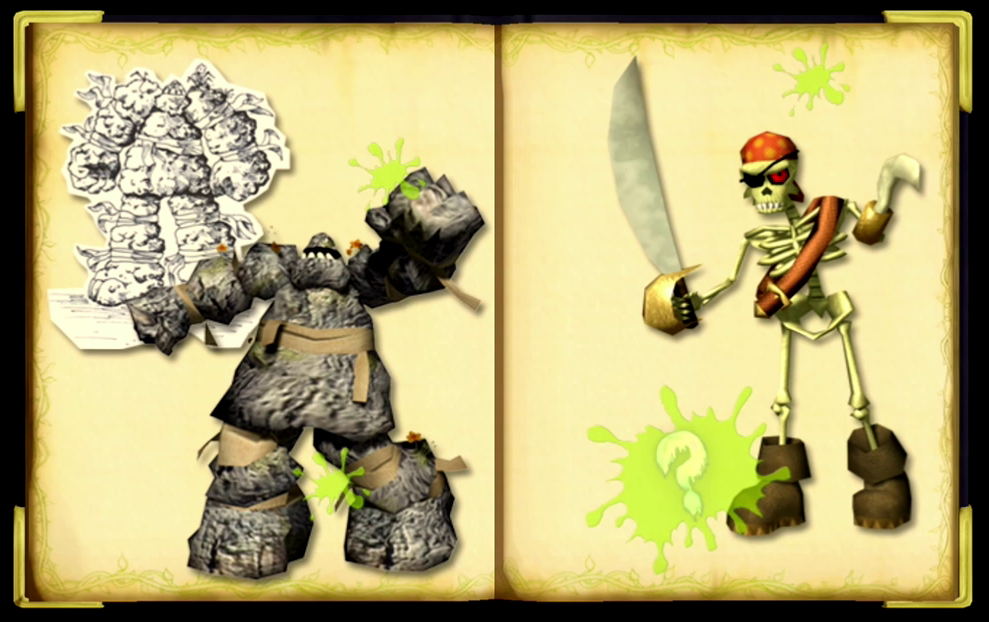
![]() Acquiring fifteen Platinum medals will reveal a pair of Ghoulies that were removed from the final version of the game for being redundant, as the title suggests. A large goliath-like Mummy that could have been a boss character was likely removed for its competition against the Cursed variety, whereas the Pirate Skeleton Ghouly was likely removed for its similarity to both the Skeleton and the Zombie Pirate.
Acquiring fifteen Platinum medals will reveal a pair of Ghoulies that were removed from the final version of the game for being redundant, as the title suggests. A large goliath-like Mummy that could have been a boss character was likely removed for its competition against the Cursed variety, whereas the Pirate Skeleton Ghouly was likely removed for its similarity to both the Skeleton and the Zombie Pirate.
[Expand “Involuntary Redundancies” Image]

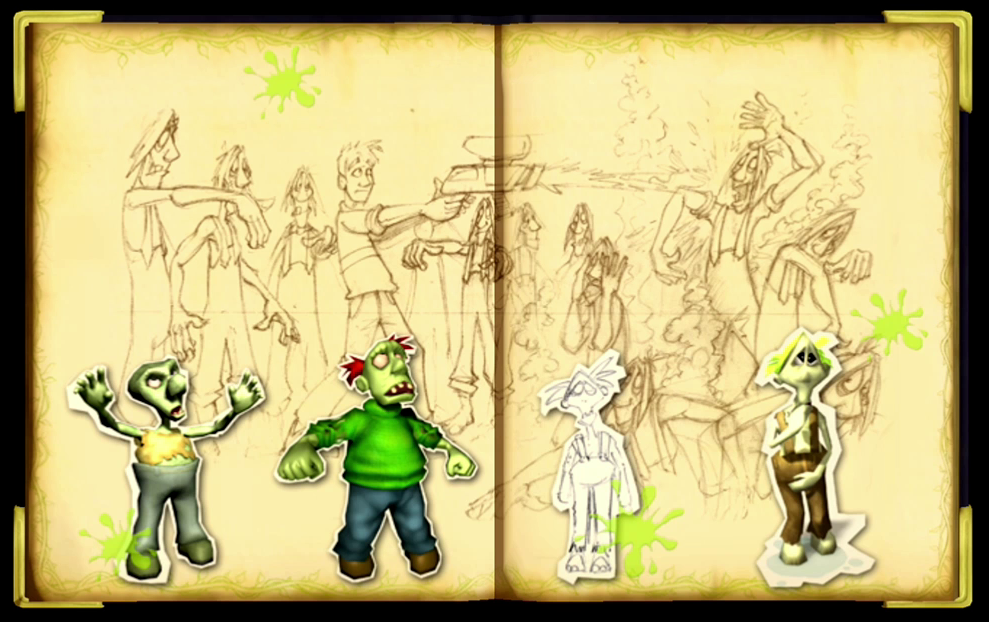
![]() Since the earliest incarnation of Grabbed by the Ghoulies, the Zombie has become somewhat of a staple throughout its development, evolving with the game. Rare has offered a sneak peak of four variations of the Zombie, the first appearing in the ‘Where It Began’ page. A full head of hair was added in the second design, which would carry on through to our Zombie as a concept and then full-fledged model in the third and fourth depiction.
Since the earliest incarnation of Grabbed by the Ghoulies, the Zombie has become somewhat of a staple throughout its development, evolving with the game. Rare has offered a sneak peak of four variations of the Zombie, the first appearing in the ‘Where It Began’ page. A full head of hair was added in the second design, which would carry on through to our Zombie as a concept and then full-fledged model in the third and fourth depiction.
[Expand “Zombie Evolution” Image]


![]() Things aren’t looking too well for Cooper and Amber in the third promotional image using Grabbed by the Ghoulies assets. In what could be considered the worst pairing in Ghoulhaven history, a Hunchback prepares to lock a protesting Amber to Krackpots slab, whereas the Vampire contends with her own misfortune after being left with Cooper as her blind date. It began with science but will surely end in disappointment.
Things aren’t looking too well for Cooper and Amber in the third promotional image using Grabbed by the Ghoulies assets. In what could be considered the worst pairing in Ghoulhaven history, a Hunchback prepares to lock a protesting Amber to Krackpots slab, whereas the Vampire contends with her own misfortune after being left with Cooper as her blind date. It began with science but will surely end in disappointment.
[Expand “Dubious Experiments” Image]

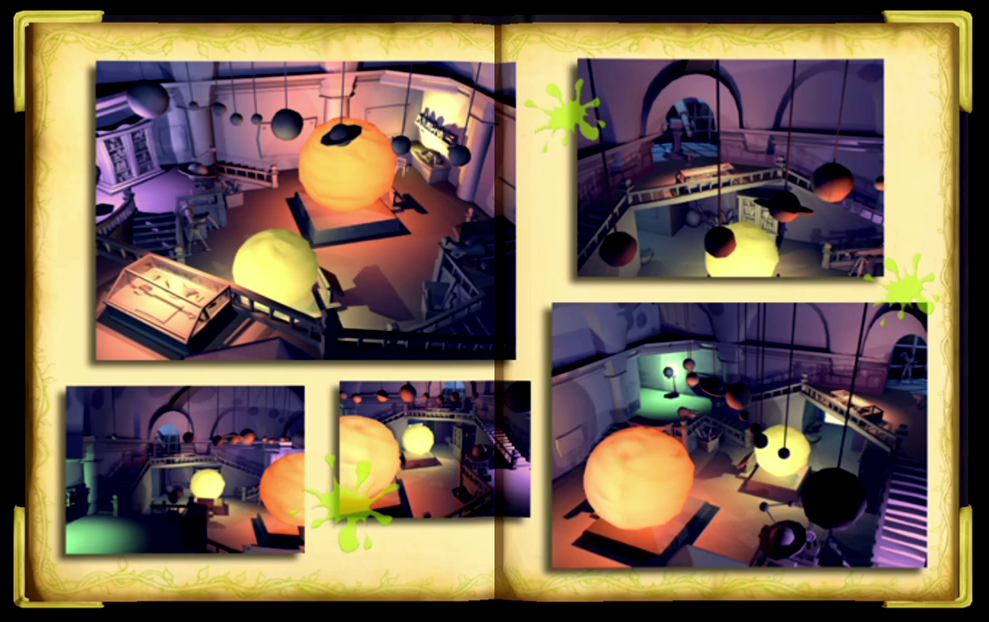
![]() Intended to be explored alongside Krackpots Laboratory, the Observatory serves as the final documented room that was left on the cutting room floor. Given that the images provided showcase the Observatory well past its concept stage, it’s likely that it was quite far along in its development before it was ultimately shelved akin to the Gallery, the Bakery and the Museum. A moment of silence for these gentle gas giants.
Intended to be explored alongside Krackpots Laboratory, the Observatory serves as the final documented room that was left on the cutting room floor. Given that the images provided showcase the Observatory well past its concept stage, it’s likely that it was quite far along in its development before it was ultimately shelved akin to the Gallery, the Bakery and the Museum. A moment of silence for these gentle gas giants.
[Expand “Observatory (Unused)” Image]

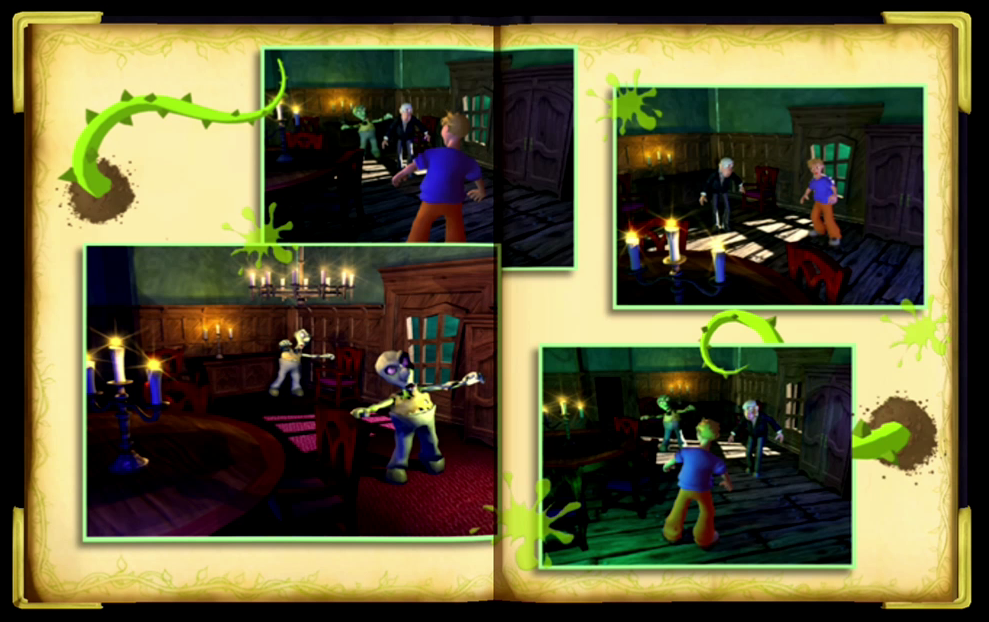
![]() This intriguing series of snapshots showcases Grabbed by the Ghoulies at one of the earliest stages in development. With all of the action contained in a single room, Rare would have used this area as a proof of concept to bring different elements of the design together as a single functioning demonstration. Crivens joins an early Cooper in this exploit, where two of the original Zombies have made themselves at home.
This intriguing series of snapshots showcases Grabbed by the Ghoulies at one of the earliest stages in development. With all of the action contained in a single room, Rare would have used this area as a proof of concept to bring different elements of the design together as a single functioning demonstration. Crivens joins an early Cooper in this exploit, where two of the original Zombies have made themselves at home.
[Expand “Early Style Tests” Image]

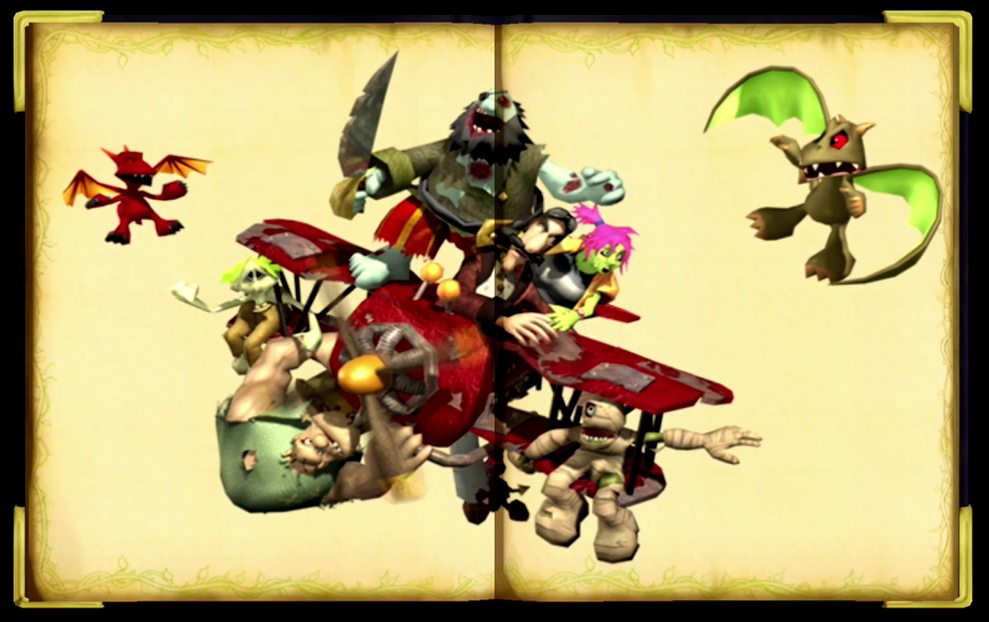
![]() If you’ve managed to collect 20 Platinum medals, you’ll unlock the final entry in the Gallery which showcases the last promotional image created with Grabbed by the Ghoulies assets. Arguably the most frightening image outside of ‘Dubious Experiments’, Baron Von Ghoul has taken the skies with a gaggle of Ghoulies, including Amber during her transformed state acting as Co-pilot! Truly terrifying stuff to be sure.
If you’ve managed to collect 20 Platinum medals, you’ll unlock the final entry in the Gallery which showcases the last promotional image created with Grabbed by the Ghoulies assets. Arguably the most frightening image outside of ‘Dubious Experiments’, Baron Von Ghoul has taken the skies with a gaggle of Ghoulies, including Amber during her transformed state acting as Co-pilot! Truly terrifying stuff to be sure.
[Expand “Tally-Bally-Ho!” Image]
But wait, there’s more! If you’ve cleared off every Bonus Challenge with at least a Gold Ranking, or better still Platinum, you’ll unlock Challenge 21 – “Play It Again, Son.” This time you’ll be tasked with beating the game once more as Amber, without any Super Soups and only 10 health to get you through each room. It’s a challenge that isn’t for the faint of heart, but if you can complete it, you’ll earn the final two rewards in the game, which can be found below: